


Ever notice your floor feels soft in one spot, but you keep walking past it hoping it’ll go away? That soft spot means water already soaked your subfloor, and ignoring it just gives rot and mold more time to spread through the framing. The good news is you can fix subfloor water damage yourself if you catch it early, follow a clear sequence, and don’t rush the drying process. This guide walks you through assessment, safe removal, complete drying, and solid reinstallation so the repair actually lasts.
Immediate Steps: Assessment, Testing, and Preparation

When you find water damage in your subfloor, you need to work through a clear repair process. It protects your home’s structure and stops mold before it starts. The complete sequence has eight steps: stop the water source, inspect how far the damage goes, dry everything completely, remove damaged sections, treat joists and deal with mold, install new subfloor, secure it with adhesive and screws, then put your finish flooring back. Most projects take at least 3 to 7 days because of drying time. You can’t rush drying. That just traps moisture and brings the problem back.
Moisture testing tells you when it’s safe to keep going. Use a pin type or pinless meter to test multiple spots across the damaged area and the zones around it. Wood materials need to read below 16% moisture before you start replacing anything. Test the joists and framing from underneath, not just the surface from above. Take daily measurements until the readings stay stable for 24 to 48 hours. Write down your baseline readings when you start drying so you can track what’s happening. Testing only the surface misses moisture trapped deeper in the floor system.
Your inspection checklist shows you what needs attention:
- Soft or spongy feeling when you walk on the floor
- Visible sagging or warping
- Dark stains or discoloration
- Persistent musty or moldy smell
- Squeaking or weird noises
- Gaps between boards or separation
- Water stains on the ceiling below if you have multiple stories
- Moisture readings above 16%
- Visible mold or mildew
- Rot or deterioration you can see
- Soft spots in the joists
- The water source identified
| Category | Item | Estimated Cost | Priority Level |
|---|---|---|---|
| Testing Equipment | Moisture meter | $30-80 | High |
| Testing Equipment | Flashlight | Included | High |
| Safety Gear | N95 respirator | $15-30 | High |
| Safety Gear | Work gloves | $10-20 | High |
| Safety Gear | Eye protection | $8-15 | High |
| Demolition Tools | Pry bar | $15-25 | High |
| Demolition Tools | Circular saw | $80-150 | High |
| Demolition Tools | Hammer | $15-30 | Medium |
| Installation Tools | Drill/screw gun | $60-120 | High |
| Installation Tools | Tape measure | $10-20 | High |
| Installation Tools | Carpenter’s square | $12-25 | Medium |
| Drying Equipment | Dehumidifier rental | $40-60/day | High |
| Drying Equipment | High-velocity fans | $30-80 each | High |
| Materials | 3/4″ tongue-groove plywood | $45-65 per sheet | High |
| Materials | Construction screws | $12-20/box | High |
| Materials | Construction adhesive | $6-12/tube | High |
| Materials | Antimicrobial treatment | $15-35 | Medium |
| Materials | Vapor barrier | $25-50 | Medium |
DIY makes sense for small spots under 25 square feet. Easy access locations. Minor moisture you caught early. No compromised joists. Mold contamination less than 10 square feet. You can handle these with basic carpentry skills and the right equipment. But call professionals when damage goes past 100 square feet, when multiple joists are compromised, when you see black mold or widespread contamination, when crawl space or between floor access is really tight, when you need engineering help for load bearing questions, or if sewage caused the water damage. These situations involve risks that go beyond what most homeowners should handle.
Before you start, turn off power to the affected rooms at the breaker. Get ventilation going by opening windows and running fans that push air outside. Wear your respirator throughout the whole project, especially when you’re tearing things apart and stirring up mold spores and wood dust. Seal off the work area from where you live using plastic sheeting if there’s mold. Keep a fire extinguisher close when you’re using power tools. These steps prevent injuries and health problems during what can be a dusty, physically tough project.
Identifying Signs of Water Damage in Your Subfloor
Catching water damage early prevents structural problems that cost thousands more to fix and could compromise your home’s safety. Small leaks you ignore for weeks or months weaken the floor framing, create mold risks, and can damage ceiling materials in the rooms below. Checking for damage after plumbing problems, storms, or when appliances fail helps you respond before small issues turn into major repairs.
Common signs tell you water’s gotten to the subfloor:
- Soft or spongy feeling when you walk
- Visible sagging or warping
- Dark stains or discoloration
- Persistent musty or moldy smell
- Squeaking or unusual noises
- Gaps between floorboards or separation
- Water stains on the ceiling below if you have two stories
Start your inspection by pulling up floor vents or getting into crawl spaces to see the subfloor directly. Pull up floor registers and shine a flashlight at an angle to spot discoloration or staining on the underside. In basements, walk through with good lighting and look up at the floor joists and subfloor above. Crawl spaces work the same way if you can get through them safely. Take photos of what you find.
Checking moisture with a meter gives you real data about how bad things are. Press a pin type meter into the subfloor in several spots, working from the obvious damage outward until you hit dry readings. This shows you whether you’re dealing with one isolated spot from a single leak or widespread damage from long term exposure. Take photos of your moisture readings and the damaged areas. These records help with insurance claims if you file, and they give contractors specific information if you decide professional help makes more sense than doing it yourself.
Locating and Stopping the Water Source

Fixing damaged subfloor without dealing with the water source just leads to the same damage happening again. You waste your effort. New materials get exposed to the same problem that destroyed the original subfloor. Find the source, fix it completely, and confirm it’s resolved before you spend time and money on structural repairs. This step seems obvious, but homeowners sometimes rush to repair visible damage while a slow leak keeps going.
Interior water sources cause most subfloor damage in homes. Leaking pipes under sinks or toilets create ongoing moisture that gets worse over months. Washing machine hoses can fail suddenly and flood laundry rooms with dozens of gallons. Water heater leaks start small but keep depositing water until someone notices. Condensation from HVAC systems drips onto floors when drain lines clog. Toilet seal failures let water escape around the base every time someone flushes. Walk through your home step by step and check each possible source, even if it seems unlikely.
Exterior sources bring water from outside. Foundation cracks allow groundwater in during heavy rain or when the water table rises. Poor drainage around your home sends runoff toward the foundation instead of away from it. Damaged gutters or downspouts dump roof water right next to the house. Crawl space moisture problems develop when ground vapor barriers fail or ventilation doesn’t work. Check the outside of your home after rain to see where water flows and pools. That often explains mysterious interior moisture.
Call specialists when the source needs expertise beyond basic repairs. Plumbers handle pipe issues, fixture replacements, and water heater problems more efficiently than DIY for complex situations. Foundation experts assess structural water entry and recommend drainage solutions, French drains, or waterproofing systems. Make sure the source is completely fixed before you move on to drying and repair. Test the fix during the next rain if weather caused it, or watch plumbing repairs for 48 hours before you commit to subfloor work.
Assessment and Preparation Phase: Damage Evaluation and Work Area Setup
Thorough evaluation before you start tearing things apart prevents surprises mid repair, helps you understand the full scope, and lets you get all your materials before you start cutting. Homeowners who skip careful assessment often discover damage goes further than they thought after they’ve already removed flooring and started cutting subfloor. That means multiple trips for materials and delays.
Evaluate how far the damage goes by carefully removing finish flooring in affected areas to expose the subfloor completely. Mark the boundaries of damage with chalk or tape, going at least 12 inches past visible problems to make sure you capture the full zone. Use the screwdriver probe test on the subfloor by pressing a flathead screwdriver firmly into the wood. Damaged wood feels soft or punches through easily. Solid material resists. Check for water stains or discoloration on nearby areas that might show hidden damage. Measure the total square footage you need to replace. This number tells you how much material to buy and helps estimate your timeline.
Evaluating Joist Condition and Structural Concerns
Check joists from below if you have crawl space or basement access, or from above through subfloor openings. Probe joists with a screwdriver or awl to find soft spots that mean rot. Push firmly into the wood at multiple points. Solid wood resists. Rotted wood feels punky and lets the tool sink in easily. Look for dark discoloration and cracked grain patterns, which signal moisture damage even if the wood hasn’t softened yet. Figure out whether damage is just surface level, the outer quarter inch, or goes deep into the joist structure. Test several points along each joist in the affected zone, not just one spot. Identify whether joists are load bearing, running perpendicular to floor joists above and supporting weight from walls or upper floors, or non load bearing.
Rot going beyond 25% of the joist span or affecting multiple joists means you need a structural engineer before you go further. These situations involve potential safety risks and code compliance issues. An engineer can specify proper reinforcement methods, determine whether you need temporary support posts during repair, and provide documentation for building permits. Don’t guess about structural adequacy when multiple joists show damage.
Set up your work area to protect your home and make the repair smoother. Remove all furniture and obstacles from the room. Protect nearby areas with plastic sheeting secured with painter’s tape to control dust. Set up ventilation with fans positioned to push contaminated air outside through windows or doors. Organize tools and materials for easy access near your work zone. Set up a power tool cutting station near an exterior door or window for better dust control. Get disposal containers or tarps ready for demolished materials. Bagging as you go keeps mess from spreading.
Safety setup includes posting warning signs if people in your household need to stay away during work hours. Turn off HVAC systems to prevent spreading mold spores or dust through ductwork to other rooms. Make sure you have enough light for inspection and cutting. Install temporary work lights if permanent fixtures don’t give you enough. Review emergency procedures if you’re working alone, and keep a phone where you can reach it.
Demolition and Treatment Phase: Drying, Removal, and Structural Remediation
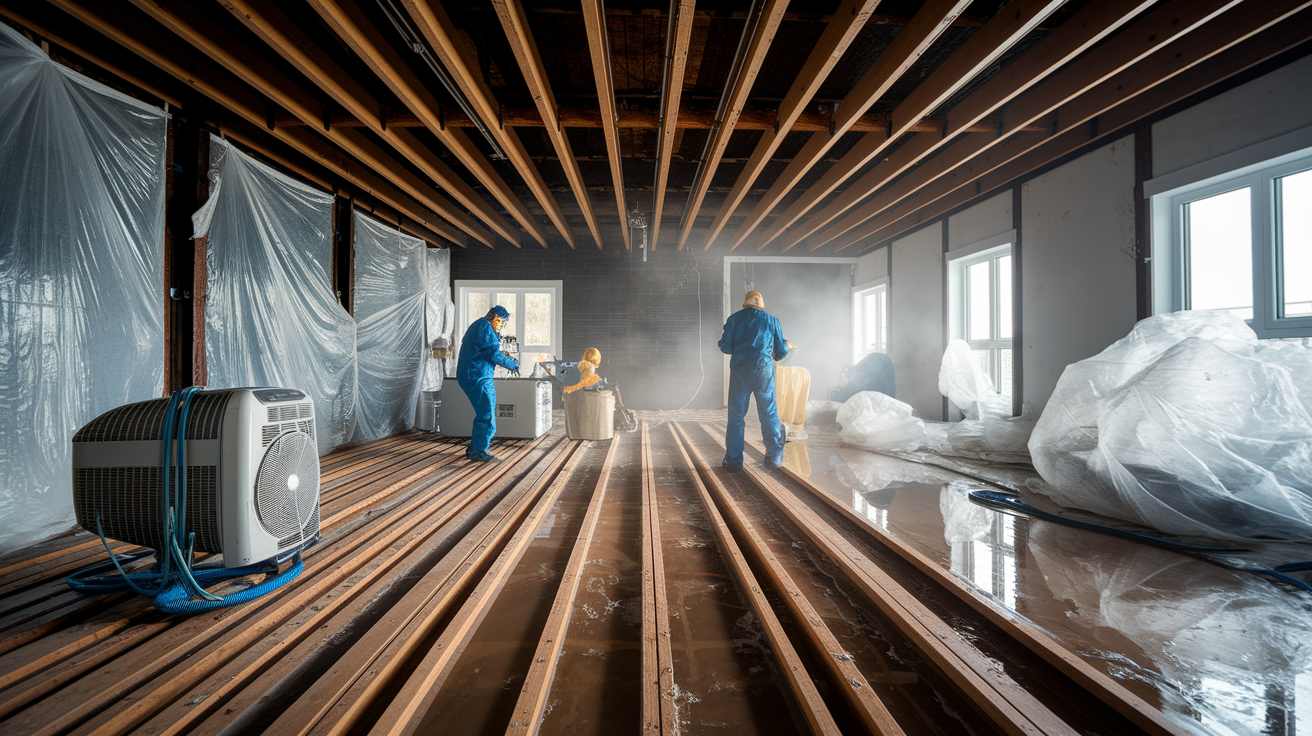
This phase needs patience for proper drying and thoroughness in dealing with all compromised materials and mold concerns. Homeowners who rush through drying or skip treatment steps face recurring moisture and mold growth that means starting over. Taking time to do each step right saves money and prevents health problems.
Complete Drying Protocol
Pull out all wet flooring materials right away to expose the subfloor and let air circulate. Carpet, padding, and sheet vinyl trap moisture against the subfloor and stop it from drying. Position commercial dehumidifiers with at least 50 pint capacity in affected rooms. Residential units with smaller capacities can’t pull moisture out fast enough. Place high velocity fans to create cross ventilation patterns directing moisture toward the dehumidifier intake. Aim fans across the floor surface at angles, not straight down. Keep room temperature above 60°F to speed up evaporation. Cold slows drying a lot.
Run equipment continuously. Don’t shut it off overnight or during the day when you’re away. Typical drying time runs 3 to 5 days for minor moisture exposure where water was there less than 24 hours. Saturated conditions where standing water sat for days need 7 to 10 days. Ground level or crawl space situations with poor air circulation need up to 14 days. These are minimums, not maximums. Use your moisture meter to verify readings below 16% across all tested areas before you move forward. Test daily and wait for 24 to 48 hours of stable readings below that number. If readings drop one day but rise the next, keep drying. Make sure no musty smell remains. Smell means active microbial growth even if meters show acceptable numbers.
Systematic Material Removal
Safe demolition sequencing prevents damage to materials you’re keeping and reduces injury risk. Remove finish flooring first. Pry up hardwood carefully if you might salvage it for another project, working from edges toward the center. Remove and throw away water damaged carpet and padding. These materials hold mold and odors that make reuse impossible. Lift vinyl or laminate planks by hand if they’re floating installations. Chip out tile if you need to using a hammer and cold chisel, though most tile removal destroys both the tile and the subfloor under it.
Mark subfloor cut lines to extend cuts to joist centers using chalk lines. Cuts that land between joists create unsupported edges that squeak and flex. Set your circular saw blade depth to exactly 3/4 inch, which matches typical subfloor thickness. Deeper settings risk damaging joists. Make plunge cuts away from joist locations. Cutting directly over joists damages them and dulls blades fast. Cut along marked lines and stop cuts 2 inches before joists. Use a reciprocating saw for final cuts near joists where the circular saw can’t reach safely. Use a pry bar to lift sections, working from cut edges toward fasteners. Leverage against joists, not against the subfloor you’re keeping.
Follow these safety reminders during demolition:
- Wear your respirator throughout demolition because of mold and dust
- Check for hidden plumbing or electrical before cutting
- Support subfloor sections as you cut so they don’t suddenly drop
- Remove all nails and fasteners from exposed joists right away
- Bag contaminated materials in heavy duty plastic before disposal
Joist Treatment and Reinforcement
Inspect all exposed joists thoroughly with screwdriver probe testing. Press firmly in multiple spots on each visible joist. Identify joists with surface rot where only the outer 1/4 inch feels compromised versus deep structural rot that goes into the core. Wire brush surface contamination and loose material from joists showing minor damage. Apply wood hardener to these areas following product instructions. Wood hardener penetrates and stabilizes partially deteriorated wood, stopping it from getting worse.
Sistering reinforcement becomes necessary for joists with damage too extensive for wood hardener. Install new dimensional lumber matching the existing joist size alongside the damaged joist. If the original is a 2×8, use a 2×8 sister. Secure with 3 inch construction screws staggered every 12 inches on both sides of the joist. Alternating screw positions prevents splitting and gives better load distribution. Make sure the sister joist extends minimum 24 inches beyond the damaged section on each end. That overlap transfers load from the compromised zone to solid wood. Use pressure treated lumber for bathroom, kitchen, and crawl space applications where moisture exposure might happen again.
Joists with rot exceeding 30% of cross section or affecting more than 3 feet of length should be fully replaced by professionals. That work requires temporary support structures to hold up the floor while you remove and replace the joist. It also involves code compliance and inspection requirements in most jurisdictions.
Mold Remediation and Antimicrobial Application
Mold safety protocols protect your health during remediation. Wear an N95 or P100 respirator rated for mold spores during all remediation work. Standard dust masks don’t filter particles small enough. Seal the work area from living spaces using plastic sheeting taped to walls and doorways. Use a HEPA vacuum for cleanup instead of regular vacuums that blow mold spores back into the air. Stop and hire professionals if you find visible black mold, area exceeding 10 square feet of contamination, or if anyone with a compromised immune system lives in the home.
Treatment starts with scrubbing mold affected wood surfaces using a stiff brush and antimicrobial solution. Work the bristles into the wood grain to knock loose surface growth and embedded spores. Let surfaces dry completely after scrubbing, which takes 24 to 48 hours with fans and dehumidifiers running. Apply EPA registered antimicrobial wood treatment to all exposed framing and joists following manufacturer instructions for coverage rate and application method. Products come in spray bottles or you brush them on. Pay special attention to joist tops and areas where the new subfloor will make contact. These zones trap moisture and create conditions for future mold if not treated.
Allow full cure time, typically 24 hours, before moving on to subfloor installation. Apply encapsulating primer to prevent odor and stain bleed through if you had extensive contamination. The primer seals residual mold stains and stops them from showing through finish flooring or creating ongoing smell issues.
Installation and Finishing Phase: Subfloor Replacement and Flooring Reinstallation
Precision and proper technique during installation ensure long term performance and prevent squeaks or structural issues. Mistakes during installation cause problems that show up months later when fixing them means tearing everything out again. Taking your time with measurements, using correct fastener patterns, and following proper spacing prevents callbacks and floor failures.
Measuring, Cutting, and Installing Replacement Subfloor
Material selection affects durability and performance. Use 3/4 inch tongue and groove plywood, which performs better than OSB in moisture prone areas. OSB swells permanently when wet. Plywood keeps its dimensions better. Choose exterior grade or pressure treated materials for bathrooms and kitchens where future moisture exposure might happen. Make sure material thickness matches existing subfloor. Mixing thicknesses creates uneven surfaces that show through finish flooring.
Follow this installation sequence:
- Measure the opening precisely, making sure all edges land on joist centers
- Transfer measurements to replacement plywood, adding joist center marks
- Cut replacement pieces using a circular saw with a carbide blade
- Test fit each piece, checking tongue and groove alignment with existing subfloor
- Remove the piece and apply construction adhesive in a zigzag pattern on joist tops
- Position replacement keeping 1/8 inch expansion gaps at all edges around the perimeter
- Make sure tongue and groove edges interlock tightly without gaps
- Secure with 2 inch construction screws every 6 inches along each joist
- Drive screws slightly below surface, 1/16 inch, without overdriving and crushing wood
- Check for level surface using a 6 foot straight edge, shimming joists if needed before installation
Installation considerations include staggering seams so no four corners meet at one point, which weakens the floor system and concentrates stress. Make sure you have proper load distribution across joists. Apply additional construction adhesive to tongue and groove joints to prevent squeaks. The adhesive bonds the sheets together and stops movement. Countersink screw heads slightly for finish flooring compatibility. Screws sticking up damage underlayment and finish materials. Fill any gaps over 1/4 inch with wood filler.
Deal with height matching between new and existing subfloor carefully. Use plywood shims under joists if new material is thinner than what you removed. Shims should be thin plywood, not wood shingles that compress over time. Plane high spots if new material is thicker, using a belt sander or hand plane to create smooth transitions. Uneven surfaces show through finish flooring and create visible ridges or valleys.
Finish Flooring Reinstallation
Wait 24 to 48 hours for construction adhesive to cure completely before reinstalling flooring. Walking on the subfloor or stacking materials before cure time messes up the bond and can cause squeaks later. Use this waiting period for other tasks or work in different areas.
Hardwood, laminate, and vinyl installations need different approaches. Install appropriate underlayment type matched to your flooring. Foam underlayment goes under laminate for sound dampening and smoothing minor subfloor imperfections. Rosin paper goes under hardwood to prevent squeaking and allow slight movement. Vinyl needs no underlayment in most cases. Keep proper expansion gaps around the room perimeter, minimum 3/8 inch. Flooring expands and contracts with humidity changes. Gaps prevent buckling. Let new wood materials adjust to room temperature and humidity for 72 hours if you’re replacing damaged sections. Match existing board direction and pattern to make repairs less visible. Use proper fastening methods. Blind nail hardwood at 45 degree angles through the tongue so nails don’t show. Install laminate as a floating floor without fasteners to the subfloor.
Tile and carpet installations involve additional substrate layers. Install cement board substrate over repaired subfloor sections for tile applications. Use thinset mortar to bond cement board to the subfloor and cement board screws driven every 8 inches. Make sure seams between cement board pieces don’t line up with subfloor seams underneath. Offset them by at least 6 inches to prevent crack lines. Use modified thinset mortar for tile adhesion over cement board. Install completely new carpet padding in affected areas. Never reuse water damaged padding, which holds mold and odors you’ll smell every time someone walks on the floor. Make sure you get professional carpet stretching and seaming if replacement sections are large. Poor stretching causes wrinkles and premature wear.
Walk the entire repaired area checking for squeaks or movement. Press down firmly with your full weight in multiple spots. Listen for any noise. Check smooth transitions between old and new sections by running your hand across the seam. Feel for ridges or lips. Confirm a level surface with a straight edge laid in multiple directions. Deal with any minor imperfections using additional fasteners or shimming before they affect finish flooring performance. Adding a few screws now prevents callbacks later.
Cost Breakdown and Time Estimates for Subfloor Water Damage Repair

Costs vary widely based on how much damage there is, how easy the location is to access, and whether you’re including flooring replacement in the project. Small bathroom repairs run thousands less than whole house subfloor replacement. Accessible locations with basement access below cost less than repairs needing crawl space work. Breaking down costs by project scope helps you budget accurately.
| Project Scope | DIY Cost Range | Professional Cost Range | Typical Timeline |
|---|---|---|---|
| Small isolated area (under 10 sq ft) | $150-400 | $500-1,200 | 2-4 days |
| Medium bathroom/closet (25-50 sq ft) | $400-900 | $1,200-3,000 | 4-7 days |
| Large room section (100-150 sq ft) | $1,200-2,500 | $3,500-7,500 | 1-2 weeks |
| Multiple room areas (200+ sq ft) | $2,500-5,000 | $7,500-15,000 | 2-3 weeks |
| Whole-house subfloor issues | $8,000-15,000 | $20,000-40,000+ | 3-6 weeks |
Cost factors beyond square footage include materials at $2 to 4 per square foot for plywood sheets, $8 to 15 per square foot for moisture barriers and antimicrobial treatments. Tool rental if you don’t own equipment adds $50 to 150 to the project. A decent circular saw, drill, and pry bar might run $200 if you’re starting from nothing. Dehumidifier and fan rentals cost $40 to 60 per day, which adds up during week long drying periods. Mold remediation if you need it runs $500 to 3,000 depending on how bad the contamination is and whether you hire specialists. Finish flooring replacement often doubles or triples total project cost. Hardwood runs $8 to 15 per square foot installed. Tile costs $10 to 20 per square foot with cement board and installation. Even basic carpet with padding runs $4 to 8 per square foot.
Professional contractor pricing typically runs $15 to 30 per square foot for subfloor replacement alone, not including finish flooring. Full service repairs including flooring reinstallation cost $40 to 75 per square foot. Factors that increase costs include crawl space access difficulty where contractors can’t stand or move freely, load bearing considerations requiring engineering consultation and temporary support structures, and emergency response situations needing immediate attention where contractors charge premium rates. Foundation work to address root causes of water intrusion adds thousands on top of subfloor repair costs.
Timeframe expectations for DIY projects typically need 2 to 3 weekends including mandatory drying time. You can’t rush drying without risking mold and structural issues. Professional repairs take 3 to 7 days for most residential projects, with drying periods accounting for most of that timeline. Complex situations with extensive damage or difficult access stretch timelines to 2 to 3 weeks.
Common Mistakes to Avoid in Subfloor Water Damage Repair
Mistakes during subfloor repair mess up structural integrity or lead to recurring problems that mean starting over. Learning from common errors saves time, money, and frustration. Some mistakes create safety risks. Others void insurance coverage or create resale issues.
Homeowners frequently make these errors:
- Starting repairs before finding and stopping the water source
- Not enough drying time, which traps moisture
- Not extending cuts to joist centers, creating weak edges
- Ignoring damaged joists and only replacing subfloor
- Using wrong fastener spacing or length
- Skipping vapor barrier installation in moisture prone areas
- Reusing water damaged flooring or padding
- Not treating for mold before closing up the repair
- Not checking building codes or getting required permits
- Trying repairs beyond DIY skill level without professional help
Building codes and permits matter more than many homeowners realize. Permits are typically required for structural repairs or work exceeding certain square footage thresholds, often 100 to 200 square feet depending on your jurisdiction. Code compliance protects you during insurance claims. Insurance adjusters look for permitted, code compliant repairs when evaluating claims. Non compliant work gives them grounds to deny coverage or reduce payouts. Home resale creates problems with unpermitted work. Inspectors flag unpermitted structural repairs during home sales, which delays closing or kills deals. Buyers demand repairs be brought to code or ask for price reductions covering the cost of proper corrections.
Consequences of unpermitted work include fines from building departments when they discover violations, liability issues if improper repairs contribute to injuries, and invalidated homeowner’s insurance coverage for future claims related to the area. The small permit fee, usually $100 to 300, prevents expensive problems later.
Be honest about your skill level. Some situations need expertise beyond typical homeowner capabilities. Structural concerns with multiple compromised joists need engineering assessment. Engineers specify proper reinforcement methods and provide calculations for load bearing capacity. Extensive mold contamination beyond 10 square feet requires professional remediation with containment procedures and air quality testing. Inaccessible areas where you can’t physically work safely need professional equipment and experience. Consider professional assessment even if you plan to do the work yourself. A contractor’s inspection and consultation, often $150 to 300, identifies problems you might miss and validates your repair plan.
Long-Term Maintenance to Prevent Future Subfloor Water Damage

Prevention costs a lot less than repair and protects your home value. Regular maintenance catches small problems before they become expensive structural repairs. A $50 plumbing part replaced right away prevents $5,000 in subfloor damage. Simple attention to moisture sources and drainage keeps your floor system healthy.
Practice these maintenance habits:
- Inspect plumbing fixtures and connections quarterly for leaks
- Replace washing machine hoses every 3 to 5 years
- Check toilet seals and tank components annually
- Clean gutters and downspouts twice yearly
- Make sure proper grading slopes away from foundation
- Monitor basement or crawl space humidity levels
- Service water heaters and HVAC systems on manufacturer schedules
- Deal with small leaks right away before they cause major damage
Proactive monitoring helps you catch problems early. Install water leak detectors near appliances and fixtures. These battery powered devices sound alarms when they sense moisture. They cost $15 to 40 each and alert you to problems you might not notice for days otherwise. Check moisture levels in vulnerable areas like bathrooms, kitchens, and laundry rooms periodically with a moisture meter. Quarterly checks during routine maintenance take five minutes. Spot early warning signs before major damage happens. Musty smells, minor staining, or slight floor softness show problems you can fix with simple repairs instead of major demolition.
Specific protection measures for high risk areas add layers of defense. Apply waterproofing sealers around bathroom fixtures and kitchen sinks where water exposure happens daily. Keep caulking and grout in good shape, recaulking when you see gaps or cracks. Make sure you have adequate ventilation to reduce condensation that damages subfloors over time. Run bathroom exhaust fans during showers and for 20 minutes afterward. Consider whole house water shut off systems for added protection when you’re away from home for extended periods. These automatic systems detect unusual flow patterns and shut off the main water line, preventing catastrophic damage from pipe bursts or appliance failures when nobody’s home to notice.
Final Words
Water damaged subfloors don’t fix themselves, and trying to patch over the problem without addressing the source just wastes time and money.
How to repair subfloor water damage comes down to a clear sequence: stop the water, dry everything completely, remove what’s compromised, treat the framing, and install quality replacement materials the right way.
Most homeowners can handle small isolated areas with the right tools and patience. Larger projects, structural concerns, or mold contamination mean it’s time to bring in professionals who do this every day.
Either way, taking care of it now protects your home’s structure and keeps a manageable repair from turning into a major problem.
FAQ
Can a water damaged subfloor be repaired?
A water damaged subfloor can be repaired by drying the area completely, removing damaged sections that extend to joist centers, treating or reinforcing affected joists, and installing replacement plywood secured with construction adhesive and screws.
How much does it cost to repair a water damaged subfloor?
Water damaged subfloor repair costs range from $2-4 per square foot for DIY materials to $15-30 per square foot for professional installation, with total project costs varying based on damage extent, accessibility, and whether finish flooring replacement is included.
Is the subfloor ruined if it gets wet?
A subfloor is not automatically ruined if it gets wet, but requires immediate drying within 24-48 hours to prevent permanent damage. Minor moisture exposure caught early can dry completely, while prolonged saturation causes warping, rot, and mold requiring replacement.
How to pull moisture out of a subfloor?
Moisture is pulled out of a subfloor by removing wet flooring materials immediately, positioning commercial dehumidifiers and high-velocity fans to create cross-ventilation, maintaining room temperature above 60°F, and running equipment continuously for 3-14 days until moisture meter readings stabilize below 16%.
What are acceptable moisture levels before repairing subfloor?
Acceptable moisture levels before repairing subfloor are below 16% for wood materials, verified by taking daily moisture meter readings across affected areas until measurements stabilize for 24-48 consecutive hours with no musty odor remaining in the space.
When should you hire a professional for subfloor water damage?
You should hire a professional for subfloor water damage when damage exceeds 100 square feet, multiple joists show structural compromise, black mold or sewage contamination is present, crawl space access is extremely limited, or load-bearing considerations require engineering consultation.
How long does subfloor need to dry before replacement?
Subfloor needs to dry for 3-5 days for minor moisture exposure, 7-10 days for saturated conditions, and up to 14 days for ground-level or crawl space situations, with drying time confirmed by stable moisture meter readings below 16% for 24-48 hours.
What tools are needed for subfloor water damage repair?
Tools needed for subfloor water damage repair include a moisture meter, N95 respirator, circular saw, pry bar, drill with screws, dehumidifier, high-velocity fans, tape measure, and carpenter’s square for proper measurement, cutting, drying, and installation of replacement materials.
How do you know if floor joists are damaged from water?
Floor joists are damaged from water when screwdriver probe tests reveal soft spots, dark discoloration and cracked grain patterns appear, rot extends beyond surface level into the joist structure, or sagging and compromised structural integrity become visible from below or through subfloor openings.
Can you install new flooring over water damaged subfloor?
You cannot install new flooring over water damaged subfloor without first drying the area completely, removing damaged sections, treating for mold, replacing compromised materials, and verifying moisture readings below 16%, as trapped moisture causes recurring damage and finish flooring failure.