


Ever notice how a small soft spot in your siding just sits there, quiet and harmless looking, until one day you press on it and your finger goes straight through? That’s rotted wood doing what it does best: hiding the real damage until it’s spread into the wall behind it. The good news is you can stop rot and repair the damage yourself if you catch it early and fix the root cause, not just the surface. This guide walks you through identifying rot severity, deciding between epoxy fill and board replacement, and making repairs that actually hold up.
Identifying Wood Rot and Assessing Siding Damage Severity

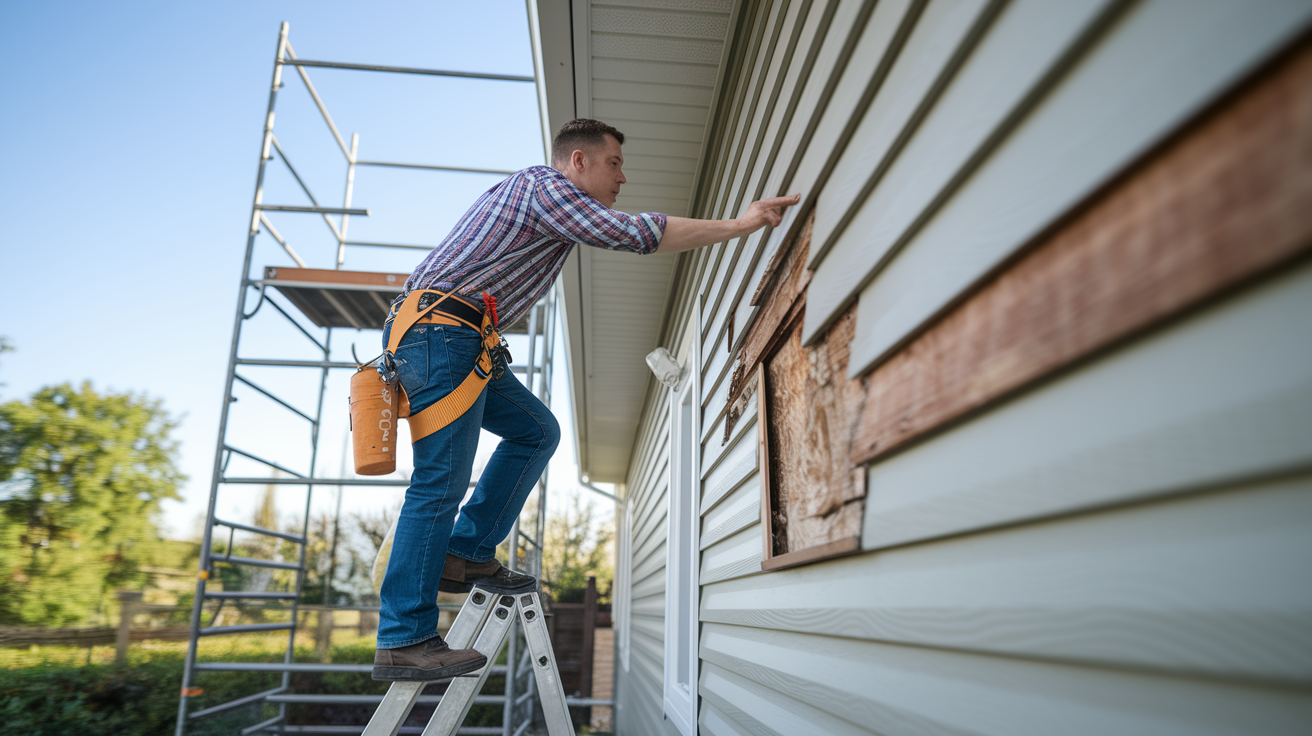
Finding wood rot early saves you from way bigger repairs later. That small soft spot you’re looking at today? It can turn into a structural nightmare tomorrow if water keeps sneaking behind the siding and into your wall cavity.
The screwdriver test is what you want here. Press the tip of a flathead screwdriver firmly into the wood at several spots across the damaged area. Solid wood pushes back. Rotted wood feels soft and spongy, and the screwdriver just sinks in without much pressure. Sometimes the wood looks totally fine from the outside, but the probe test shows you the decay hiding right below that painted surface.
Here’s what tells you wood rot has taken hold:
Soft or spongy texture when you press on the wood with your thumb or probe with a screwdriver
Discoloration ranging from dark brown stains to grayish patches that look different from the wood around it
Peeling paint that lifts away in sheets instead of flaking off in small chips
Visible fungal growth showing up as dark spots, fuzzy patches, or white thread-like structures
Cracking patterns that run with the wood grain and open up when you apply a little pressure
Water staining that looks like tide marks or streaks below windows, corners, or roof edges
Surface rot only hits the top layer of wood and shows up as shallow soft spots less than a quarter inch deep. This kind responds well to epoxy filler treatment. Extensive rot goes deeper into the board and often spreads into adjacent boards or the sheathing behind the siding. When your screwdriver goes more than half an inch into the wood, or when rot spreads across multiple boards, full board replacement becomes your only real fix.
Essential Tools and Materials for Wood Siding Restoration
Having what you need before you start prevents those annoying trips to the hardware store halfway through the job.
| Tool/Material | Purpose | Approximate Cost |
|---|---|---|
| Oscillating multi-tool | Cuts rotted siding sections cleanly without damaging adjacent boards | $45-$120 |
| Flat pry bar | Removes nails and lifts damaged boards | $15-$25 |
| Wood chisel set | Cleans out rot and creates square repair edges | $20-$40 |
| Sandpaper assortment | Smooths epoxy patches and preps surfaces | $8-$15 |
| Two-part epoxy system | Fills small rotted sections and damaged trim | $25-$85 |
| Borate wood preservative | Prevents future rot in treated areas | $15-$30 |
| Exterior primer | Seals bare wood and epoxy before painting | $20-$35 per gallon |
| 8d galvanized ring shank nails | Secures replacement siding without causing rust streaks | $8-$12 per pound |
| Acrylic latex caulk | Seals joints and prevents water infiltration | $5-$10 per tube |
| Safety glasses and dust mask | Protects eyes and lungs during cutting and grinding | $10-$20 |
| Plastic putty knives | Mixes and applies epoxy without sticking | $3-$8 |
| Replacement siding boards | Replaces extensively damaged sections | $2-$8 per linear foot |
For epoxy systems, Advanced Repair Technologies, System Three, and Abatron offer professional-grade products that outlast hardware store alternatives. The price difference is real. Abatron kits can run $70 to $85 compared to $25 for generic brands. But the extra cost gets you longer working time, better adhesion, and repairs that hold up for decades instead of years. If you’re fixing high-visibility trim work or areas that take repeated stress, the premium products are worth it. For basic siding patches that’ll be painted over, mid-range products work fine.
Wear safety glasses whenever you’re cutting, grinding, or prying. Rotted wood harbors mold spores and bacteria you don’t want to breathe, so grab a dust mask rated for fine particles. Work gloves protect your hands from splinters and sharp edges. If you’re working above ground level, proper ladder setup and fall protection become non-negotiable.
Repairing Small Rotted Areas with Epoxy Filler
Epoxy repair makes the most sense for window sills, trim boards, corner boards, and any detailed profile that’d be expensive or difficult to replace with new wood.
Here’s how to do a repair that lasts:
Grind out all rotted wood using a trim router with a v-shaped grinding bit, a rotary tool, or a die grinder set to medium speed. Keep grinding until you hit solid wood that resists the bit. Epoxy only bonds to sound wood, never to compromised material.
Drill small holes into the remaining solid wood around the repair area and inject borate wood preservative using a squeeze bottle or syringe. This treatment gets into the wood and stops decay from restarting at the repair edges.
Let the wood dry completely before moving forward. Epoxy won’t cure properly over damp wood. In humid conditions, this can take several days. A moisture meter reading below 15 percent tells you the wood’s ready.
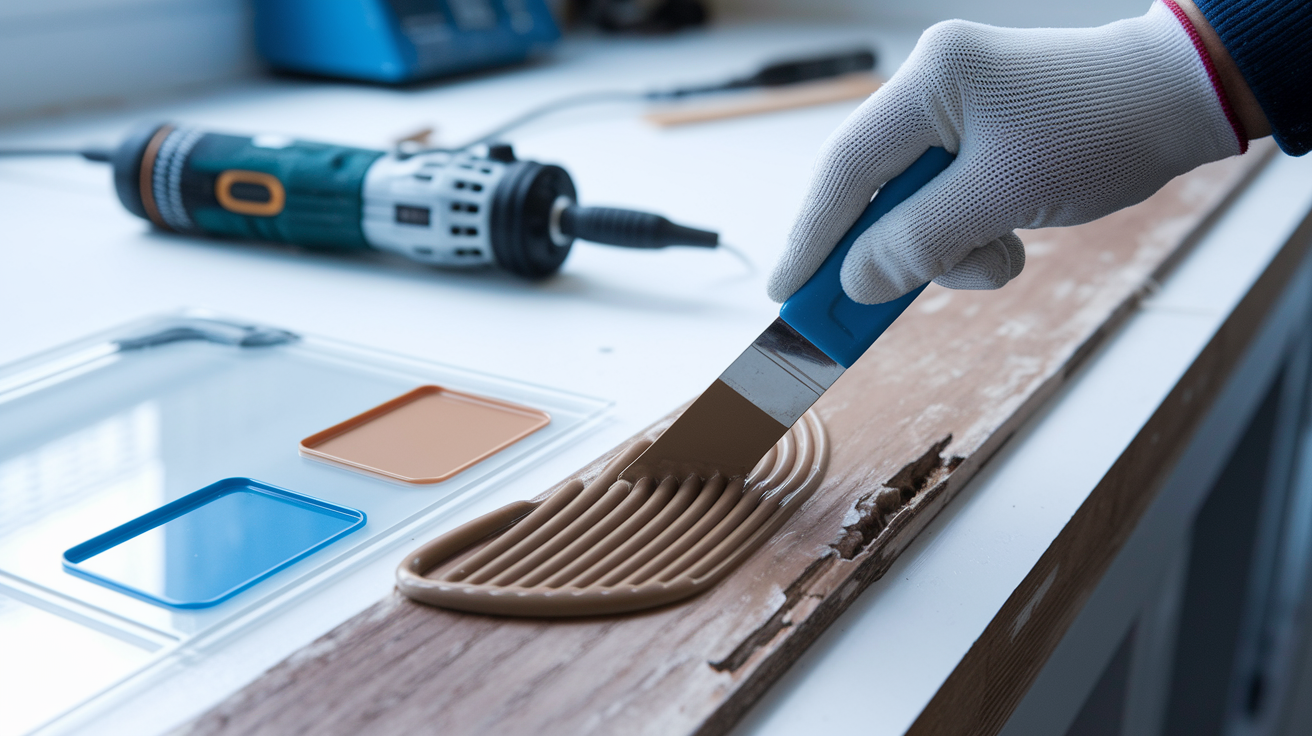
Mix the two-part epoxy on a piece of plexiglass or scrap acrylic using a plastic putty knife. Combine equal parts of component A and component B, working them together until the color becomes uniform with no streaks.
Apply the mixed epoxy quickly, using your plastic putty knife to press it firmly into the cavity. For profiled trim, create a custom scraping tool by tracing the existing profile onto a plastic putty knife, then cutting the shape with tin snips or heavy scissors. Use this shaped tool to drag across the wet epoxy, matching the original profile.
Allow full cure time as specified on the product label, typically 8 to 24 hours depending on temperature. Epoxy cures slower in cold weather and faster in heat.
Sand the hardened patch starting with coarse 60 or 80-grit sandpaper to knock down high spots and rough edges, then move through 120-grit and finish with 180 to 220-grit for a smooth surface that blends with the surrounding wood.
Mixed epoxy gives you only a few minutes of working time before it starts to set up and becomes unworkable. The chemical reaction generates heat as it cures, and once that process begins, you can’t reshape it. Work in small batches if you’re repairing a large area. Temperature affects working time. Cold weather extends it, hot weather shortens it.
Epoxy won’t stick to hard plastic, which is why plexiglass sheets and plastic putty knives make ideal tools for mixing and shaping. You can scrape off any excess epoxy from these tools once it hardens. Tape off the wood surrounding your repair area before applying epoxy. If wet epoxy gets on adjacent surfaces, it forms a permanent bond that can only be removed by sanding or scraping, often damaging the finish.
Removing Damaged Wood Siding Boards Safely
Cutting and Removing Nails from Overlapping Boards
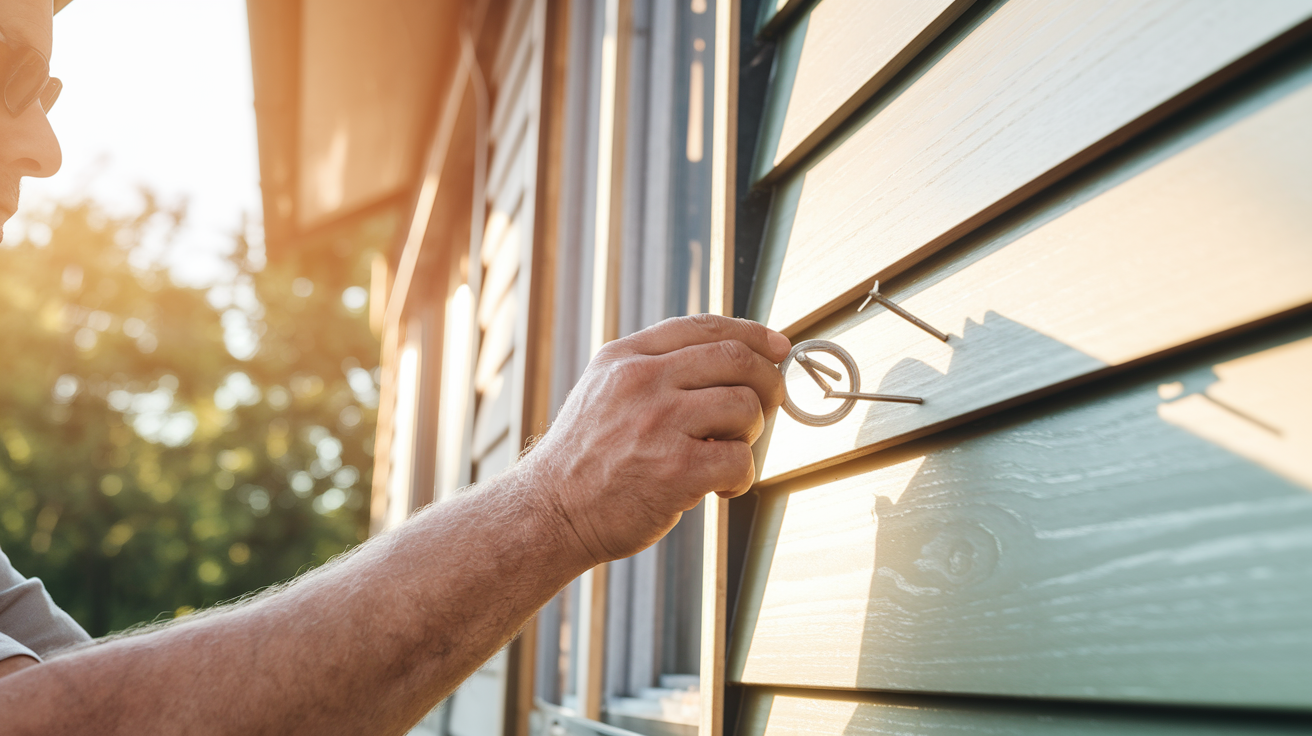
Lap siding installs with each course overlapping the one below it, which means nails from the upper course pass through and hold down the top edge of the lower course. Before you can remove a damaged board, you need to access and cut those nails. Slide wooden shims (paint stir sticks work well) under the board above your damaged section, lifting it about 1/8 to 3/16 inch. This creates just enough space to fit a hacksaw blade between the courses. Work the blade back and forth horizontally to cut through each nail shaft.
The other method uses a flat pry bar slipped under the board, lifting it 1/8 to 1/4 inch, then pressing back down firmly. This rocking motion pulls the nails partway out so the heads stick up above the board surface. Once the heads are visible, use the pry bar’s claw or a cat’s paw to yank them out completely.
Making Precision Cuts in Damaged Siding
Mark the cutting depth on your oscillating tool blade using a permanent marker or a wrap of electrical tape. Measure the thickness of your siding (typically 1/2 to 3/4 inch) and mark that distance from the blade tip. This visual guide helps you avoid cutting into the plywood or OSB sheathing behind the siding. For siding reveals under 5 inches (the exposed face of the board), use an oscillating tool fitted with a wood-cutting plunge blade. Reveals over 5 inches work better with a circular saw set to match siding thickness.
Center your cuts directly over wall studs, which you can locate by finding existing nail head positions. Nails always drive into studs, so the vertical line of nail heads maps the stud locations. Making your cuts at studs gives you solid backing for nailing the replacement board.
Place 1/4 inch plywood scraps against the boards next to your damaged section before inserting the pry bar. This buffer spreads out prying pressure and prevents the metal tool from denting or crushing the good siding you want to keep. Work the bar gently, gradually increasing pressure instead of forcing it.
When removing multiple courses of damaged siding, work from the top down. Each removed course exposes the nails holding the course below it, making access easier and reducing the risk of splitting boards you’re trying to save.
Installing Replacement Wood Siding Boards
Measure the length you need by holding your tape measure from one end of the opening to the other, then subtract 1/8 inch. This gap allows for wood expansion during humid weather and prevents boards from buckling. If you removed the damaged piece in one section, use it as a measuring template. Take it to the lumber yard to match the profile. Lap siding comes in different reveal heights and edge shapes.
Install replacement boards working from bottom to top. Position the bottom edge of your new board so it overlaps the course below by at least 1 inch. This overlap sheds water and keeps it from running behind the siding. Start your nails at least 1/2 inch above the bottom edge of the board. Nails placed lower than this will pin through the board below, preventing natural wood movement and potentially splitting both boards during expansion and contraction cycles.
When working over insulated sheathing, predrill nail holes before driving fasteners. Direct nailing can crush the foam, creating voids that reduce the insulation value and leave the nail with less holding power. Use an 8d galvanized ring shank nail driven into each stud location. The ring shanks grip better than smooth nails and resist backing out over time. Set each nail head just below the wood surface using a nailset, creating a small dimple you’ll fill with caulk later.
What you need to get right:
Ring-shank galvanized nails only. Standard smooth nails work loose, and ungalvanized steel causes rust streaks that bleed through paint.
1/8 inch expansion gaps at all corner joints and where board ends meet (butt joints).
Nail placement 1/2 inch minimum above the bottom edge to avoid pinning the board below.
Stagger butt joints when installing multiple boards so the seams don’t line up vertically, which creates obvious visual breaks and potential water entry points.
Cedar for longevity. It resists rot naturally and lasts 75 years with basic maintenance. Cypress costs more but can exceed 100 years.
Prime all six sides of your replacement board before installation: front face, back face, top edge, bottom edge, and both ends. Most rot starts where unprimed end grain soaks up water like a wick. The few extra minutes spent priming pays back in decades of protection.
Finishing Techniques: Priming, Caulking, and Painting Repaired Siding
Proper finishing creates the final moisture barrier that protects your repair work from water intrusion and prevents new rot from starting.
Do these finishing steps in order:
Prime all six sides of replacement boards before installation, paying special attention to end grain that absorbs moisture quickly.
Back-caulk behind siding edges by running a bead of high-quality acrylic latex caulk along the house where the back of the board will sit, then immediately pressing the board into place before the caulk skins over.
Clean all surfaces by wiping down the repair area with a damp cloth to remove sawdust, wood debris, and any oily residue that prevents paint adhesion.
Sand the repair area starting with 100-grit to smooth rough spots, then 150-grit to blend transitions between old and new wood.
Apply acrylic primer to all bare wood and epoxy patches, working it into nail dimples and caulked joints with a quality brush.
Paint the repair using two coats of exterior paint that matches your existing siding color, allowing proper drying time between coats.
Back-caulking creates a gasket behind the siding that stops water from wicking behind the boards through tiny gaps at the sheathing surface. Apply the caulk bead continuously along the area where the back edge of your siding will contact the wall, staying about 1/2 inch from the edge. Press the board firmly into the wet caulk. This technique is especially critical at window and door trim where wind-driven rain finds every entry point.
Color matching services at lumber stores and paint suppliers can scan your existing siding and create a custom mix. Bring a small piece of the siding if possible. The scanner reads the actual color more accurately than you can describe it. If your touch-up paint looks too obvious after it dries, paint the entire length of that clapboard from corner to corner or joint to joint. Partial touch-ups often show up as darker or lighter patches, especially on weathered siding where the existing paint has faded.
Preventing Future Wood Rot Through Moisture Control
Repairing rotted siding without addressing what caused the rot sets you up to do the same repair again in a few years. Water always finds a way in, and wood rot only develops where moisture stays trapped long enough for decay fungi to take hold.
Install step flashing where siding meets roof edges, and keep at least a 1 inch gap between the bottom edge of your siding and roof shingles. That gap lets water drain away instead of wicking upward into the siding. Check that flashing laps over the siding properly. Each piece should overlap the one below it, creating a shingled effect that directs water outward.
Borate wood preservative injected into the solid wood surrounding your repair acts as a chemical barrier against decay fungi. Drill angled holes around the repair perimeter, then squeeze or inject the borate solution until the wood won’t absorb any more. The preservative gets several inches into the wood grain and stays effective for years. For more information on addressing moisture-related issues throughout your home, see our guide on Water Damage Repair and Remediation.
Stop moisture at the source with these prevention strategies:
Install or repair gutters and downspouts so roof water dumps at least 6 feet from the foundation instead of sheeting down the siding.
Redirect downspouts with extensions or splash blocks that carry water away from the house.
Adjust lawn sprinklers so they don’t spray directly on siding. Most rot near grade level comes from irrigation, not rain.
Maintain proper ground clearance by keeping siding at least 8 inches above soil and mulch.
Inspect annually for paint failure, caulk gaps, and early signs of water staining before they turn into rot.
Trim vegetation back from siding surfaces so air circulates freely and morning dew dries quickly.
Addressing Underlying Sheathing and Structural Wood Damage
After removing damaged siding, inspect the plywood or OSB sheathing for water staining, soft spots, or dark discoloration that indicates rot has spread beyond just the siding layer. Press a screwdriver into the sheathing at several points. Solid sheathing feels firm and resists penetration. Rotted sheathing crumbles or feels spongy under pressure.
When sheathing damage extends beyond a small area (roughly larger than a dinner plate), cut out and replace the compromised section. Mark a rectangle around the damaged area with all four sides centered over wall studs, then use a circular saw set to the sheathing thickness to cut along your marks. Pry out the damaged piece and install a new section of plywood or OSB of the same thickness, securing it with construction screws every 6 inches around the perimeter into the studs.
Watch for warning signs that rot has reached the wall framing behind the sheathing: studs that feel soft when you probe them with a screwdriver, visible mold growth on framing members, or a musty smell when you pull the siding off. Structural framing carries the weight of your roof and upper floors. Compromised studs or plates need professional evaluation and often require sister boards (new lumber fastened alongside the damaged members) or full replacement. Large areas of rot, damage affecting corners or load-bearing walls, or situations where you can see daylight through rotted framing all indicate it’s time to call in a carpenter who can assess structural integrity and engineer a proper repair that maintains your home’s safety.
Cost Breakdown for DIY Wood Siding Repair Projects
Material and tool costs vary based on how much damage you’re fixing, whether you already own the necessary tools, and what species of wood you choose for replacement boards. Small repairs using epoxy filler run significantly less than replacing entire sections of siding.
| Item | Cost Range | Notes |
|---|---|---|
| Professional epoxy kit (Abatron, System Three) | $60-$85 | Covers 8-12 square feet; longer working time than hardware store brands |
| Hardware store epoxy kit | $25-$40 | Adequate for basic repairs; shorter working time |
| Cedar replacement siding | $3-$6 per linear foot | Best rot resistance; 75-year lifespan with maintenance |
| Pine replacement siding | $2-$3 per linear foot | More affordable but requires better moisture protection |
| Cypress replacement siding | $6-$8 per linear foot | Premium option; 100+ year lifespan |
| Galvanized ring shank nails (1 lb box) | $8-$12 | Enough for 40-60 linear feet of siding |
| Exterior primer and paint | $40-$70 | One gallon covers 300-400 square feet |
| Caulk (tubes) | $5-$10 each | Buy 2-3 tubes for typical repairs |
| Basic hand tools (if purchasing) | $40-$80 | Pry bar, chisel set, putty knives, sandpaper |
| Oscillating multi-tool (if purchasing) | $45-$120 | Homeowner models under $50 work fine for occasional use |
| Safety equipment | $15-$25 | Glasses, dust mask, work gloves |
| Borate wood preservative | $15-$30 | One bottle treats multiple repair areas |
A typical DIY siding repair replacing 10 to 15 linear feet of damaged boards runs $150 to $300 in materials if you already own basic tools. Add the oscillating tool cost if you’re buying new. Professional installation for the same repair typically costs $500 to $900, including labor. The higher material cost for cedar or cypress pays dividends through longer life and less frequent repainting. Pine siding might need attention every 5 to 7 years while properly maintained cedar can go 10 to 15 years between repaints.
Invest in quality caulk, primer, and epoxy instead of buying the cheapest options. A $5 caulk tube that cracks and fails in two years costs you more in the long run than a $10 tube that stays flexible for a decade. Same logic applies to epoxy systems. Professional-grade products cost double but they cure harder, stick better, and resist weathering longer than discount alternatives.
Common Wood Siding Repair Mistakes and Troubleshooting
Getting the technique right matters as much as using quality materials.
Eight mistakes that lead to failed repairs:
Applying epoxy to wet or rotted wood. Epoxy only bonds to dry, solid wood and will peel off damp or punky surfaces within months.
Skipping six-sided priming. Unpainted end grain and back surfaces wick moisture into replacement boards, restarting the rot cycle.
Cutting too deep and damaging sheathing. Saw cuts that go into plywood or OSB create water entry points and weaken the wall structure.
Forgetting back-caulking. Without caulk behind the siding edge, wind-driven rain works its way between the board and sheathing.
Not protecting adjacent boards during removal. Pry bars dent and crush good siding when used without plywood buffer strips.
Working with epoxy past its workable time. Trying to shape partially cured epoxy creates a rough finish that requires extensive sanding.
Insufficient removal of rotted material. Leaving spongy wood under an epoxy patch causes the repair to fail as the rot continues spreading underneath.
Ignoring the moisture source. Repairing symptoms without fixing the underlying water problem guarantees you’ll be back out there in a few years doing it again.
When repairs fail, look for these common causes. Paint peeling off within the first year usually means you painted over damp wood or skipped primer. Epoxy that won’t stick or falls out indicates you applied it to rotted wood that looked solid but wasn’t, or the wood was still wet when you started. Replacement boards that warp or twist within a season typically weren’t primed on all sides before installation, allowing moisture to enter through unprotected surfaces. If you see these problems, remove the failed repair and start over with proper technique. Trying to patch over a failed repair just delays what’s coming.
When to Hire a Professional for Rotted Siding Restoration
Some repair situations exceed typical DIY safety limits or skill levels, and pushing forward anyway often creates bigger problems or safety risks.
Professional carpentry makes sense when you’re dealing with extensive rot covering large wall sections or multiple exterior walls. The scope becomes unmanageable for a homeowner working weekends, and the risk of misdiagnosing hidden damage increases. Professionals carry liability insurance that covers damage during repairs, which matters when you’re making structural modifications or working on load-bearing walls.
Experienced contractors spot underlying problems that aren’t obvious to homeowners. They know what hidden rot looks like behind siding, how to identify compromised house wrap or moisture barriers that need replacement, and when apparently minor damage signals bigger structural issues. Their familiarity with building codes and proper flashing techniques prevents code violations that could complicate future home sales.
Call a professional when you run into these situations:
Rot affecting multiple exterior walls or covering more than 20 percent of any single wall surface.
Compromised structural framing including soft studs, rotted plates, or load-bearing members that need evaluation by someone who understands structural loads.
High-elevation work requiring scaffolding, fall protection, or repairs above second-story level where ladder work becomes dangerous.
Complex architectural details such as decorative trim, historical siding profiles, or custom millwork that requires specialized tools and experience.
Damaged house wrap or moisture barriers behind the siding that need proper integration with existing weatherproofing systems.
Presence of lead paint or asbestos in homes built before 1980, which require containment and disposal following EPA regulations.
For extensive damage assessment or situations beyond typical DIY capability, visit RestoreSafeHome.com to connect with restoration professionals who can evaluate structural concerns and develop comprehensive repair plans. Professional work costs more up front but often saves money long-term by correctly diagnosing root causes and preventing recurring damage.
Final Words
Rotted wood siding won’t fix itself, and patching over damage without removing all the rot just sets you up for another repair down the road.
Whether you’re filling a small trim section with epoxy or replacing full boards, the key is getting back to solid wood, treating what’s left, and sealing everything properly.
Take your time with prep work. Let materials dry completely. Prime all six sides before installation.
If the damage is widespread or you find soft framing behind the siding, bring in a pro. Otherwise, these methods will give you a repair that holds up and looks clean when you’re done.
FAQ
How can you fix rotting siding on a house without replacing it?
You can fix rotting siding without replacing it by using a two-part epoxy wood filler system on small damaged areas. Grind out all rotted wood until you reach solid material, treat the area with borate wood preservative, let it dry completely, then fill with marine-grade epoxy. This method works well for trim, window casings, and small sections where the rot hasn’t compromised structural integrity. Sand the cured epoxy smooth, prime all surfaces including bare wood, and paint to match existing siding.
How do you fix rotten wood siding boards?
Rotten wood siding boards are fixed by either removing and replacing the damaged section or using epoxy filler for smaller areas. For board replacement, use wooden shims to lift the overlapping board, cut nails with a hacksaw, remove the rotted section, and install a new piece with galvanized ring shank nails. Prime all six sides of the replacement board before installation, back-caulk behind edges to prevent water infiltration, and finish with exterior primer and paint to protect against future moisture damage.
Can you fix rotted wood without replacing it completely?
Rotted wood can be fixed without full replacement if the damage is limited to surface areas and hasn’t compromised structural integrity. Remove all rotted material with a trim router or die grinder until you reach solid wood, drill small holes and inject borate wood preservative to prevent further decay, then fill the cavity with two-part epoxy once completely dry. This approach works for decorative trim, window sills, and corner boards where matching existing profiles would be difficult or expensive.
Will homeowners insurance cover rotted siding damage?
Homeowners insurance typically will not cover rotted siding because it’s considered gradual deterioration from lack of maintenance rather than sudden accidental damage. Insurance policies generally exclude damage caused by long-term moisture exposure, poor upkeep, or normal wear over time. However, if the rot resulted from a covered peril like sudden storm damage or a burst pipe, you might have coverage for related water damage. Check your specific policy and document any sudden event that caused moisture intrusion.