


Ever notice how a small water stain on the ceiling somehow turns into a saggy, crumbling mess faster than you expected? That’s because water doesn’t just sit on the surface. It soaks through the paper, saturates the gypsum core, and travels along studs to places you can’t see yet. Fixing water damaged drywall the right way means more than patching what’s visible. You need to find the source, dry everything completely, cut out all the compromised material, and blend the repair so it disappears. Skip a step and you’ll be doing it again in six months.
Identifying and Assessing Water Damage in Drywall
Getting the assessment right from the start saves you from patching a problem that’s still spreading behind the wall. You need to know what you’re dealing with before you buy materials or start cutting.
Surface damage means the outer layer took a hit but the paper backing and gypsum core are mostly intact. Structural damage goes deeper. The drywall feels soft when you press it, or it crumbles when you touch it. Structural damage often means the framing behind it got wet too.
Check areas you can’t see easily. Pull back baseboards if water came from below. Look in the attic above ceiling stains. Open electrical outlet covers (with power off) to see inside the wall cavity. Water travels along studs and settles in low spots, so damage spreads wider than what shows on the surface.
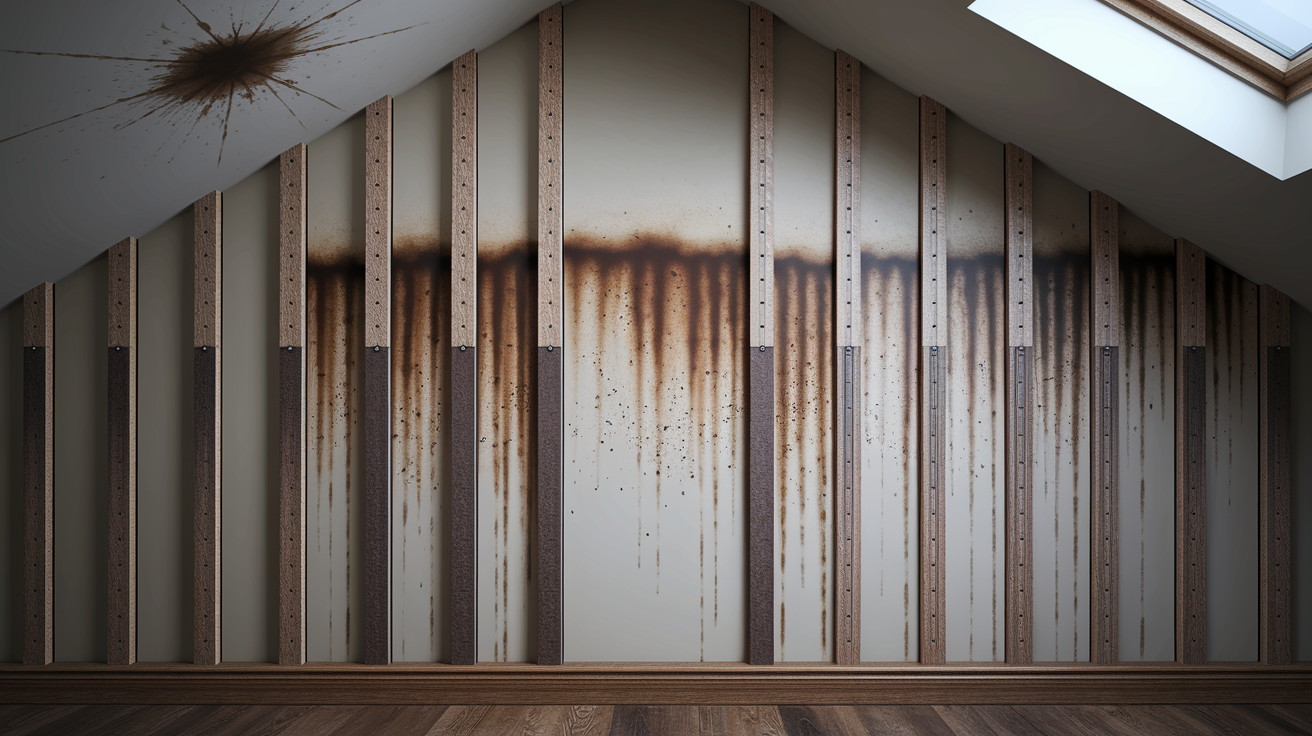
Here’s what water damage looks like and feels like when you check the wall or ceiling:
- Sagging or bulging areas – Drywall pulls away from fasteners when the gypsum core gets waterlogged and heavy
- Brown or yellow stains – These coffee colored marks show where water soaked through, even after it dried
- Bubbling or peeling paint – Paint loses its grip when moisture gets between the paint layer and drywall surface
- Soft spots when pressed – Healthy drywall feels solid. Damaged drywall compresses under your finger like a sponge
- Crumbling texture – The surface falls apart or flakes off when you scrape it lightly with your fingernail
- Musty odors – That basement smell means moisture is still present or mold started growing behind the surface
- Visible mold spots – Black, green, or gray patches, often appearing as small dots that spread into larger colonies
Stopping the Water Source Before Drywall Repair
Fixing drywall while water still leaks is like mopping the floor with the faucet running. You’ll do the work twice, and the second time will cost more because the damage spreads.
Common water sources include roof leaks (especially around chimneys and valleys), bathroom plumbing (toilets, showers, sink supply lines), kitchen leaks (under the sink, behind the dishwasher), burst pipes in walls, and HVAC condensation dripping from units or ductwork. Sometimes the source is obvious, like a pipe spraying water. Other times you’ll need to trace it, especially when stains appear far from where the leak started.
Call a plumber for pipe leaks, supply line issues, or drain problems. Call a roofer for ceiling stains that line up with roof features. Call an HVAC tech if water appears near vents, registers, or the air handler. Don’t start drywall work until whoever fixes the source confirms the repair is done and tested.
Drying Water Damaged Drywall Completely
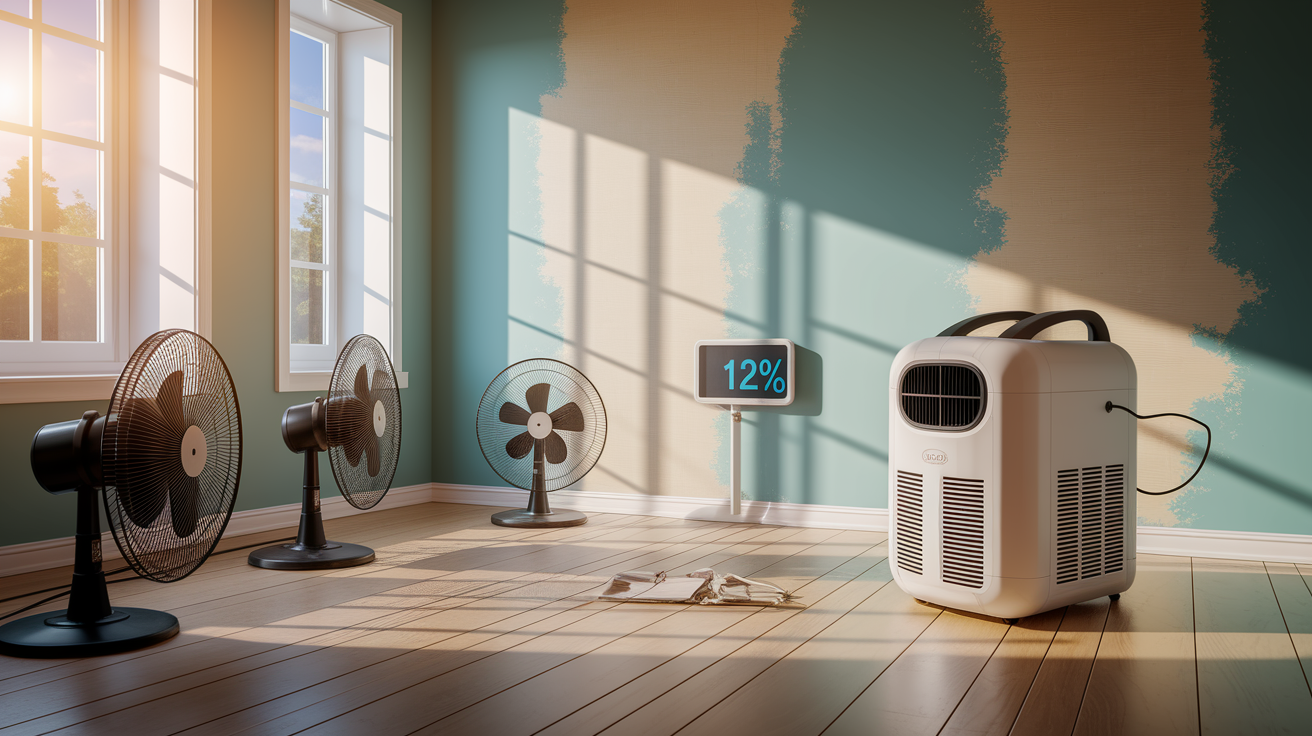
You have 48 hours from the time drywall gets wet until mold starts growing in the right conditions. That’s not a lot of time, and it’s why the drying step can’t be rushed or skipped.
Fully dry drywall feels firm when pressed and looks uniformly colored without dark spots. Damp drywall still has soft spots, shows waterlines or uneven coloring, and might feel cool to the touch even in a warm room. If you’re not sure, wait another day.
Use these methods to pull moisture out of drywall and the framing behind it:
- Open windows for ventilation – Creates airflow that carries humid air outside. Works best on dry days
- Position fans directly on wet areas – Aim fans at the damaged section to keep air moving across the surface constantly
- Run dehumidifiers in enclosed spaces – Pulls moisture from the air faster than ventilation alone, especially in basements or windowless rooms
- Remove baseboards for airflow behind walls – Lets air circulate in the wall cavity where water often settles
- Increase room temperature – Warmer air holds more moisture, speeding evaporation. Use a space heater if needed but don’t overheat
A moisture meter takes the guesswork out of drying. You’re looking for readings below 12 percent moisture content in drywall before you patch it. Readings between 12 and 15 percent mean keep drying. Anything above 15 percent means the drywall is still wet enough to support mold growth. Moisture meters cost $20 to $40 and have two pins you press into the drywall to get a digital reading. Check multiple spots around the damaged area, not just the center, because edges dry slower than the middle.
Essential Tools and Materials for Water Damaged Drywall Repair
Having everything on hand before you start means you won’t stop mid project to run to the store with drywall dust all over you.
| Tool/Material | Purpose | Approximate Cost |
|---|---|---|
| Utility knife | Scoring and cutting drywall, trimming edges | $5-10 |
| Drywall saw | Cutting irregular shapes and starting holes | $8-15 |
| Measuring tape | Measuring damaged area and replacement piece | $8-12 |
| Drill with screwdriver bit | Driving drywall screws into studs and backing | $30-60 (if purchasing) |
| Drywall screws (1-1/4 inch) | Fastening replacement drywall to framing | $6-8 per pound |
| Replacement drywall sheet | Filling the hole left by damaged section | $10-15 for 4×8 sheet |
| Premixed joint compound | Filling seams, covering tape, smoothing surface | Under $5 small container, $12-15 gallon |
| 3-5 inch putty knife | Applying compound to small areas and gouges | $6-10 |
| 10-12 inch taping knife | Spreading compound wide, feathering edges | $12-18 |
| Mesh or paper tape | Reinforcing seams between old and new drywall | $4-8 |
| Sandpaper assortment (80-180 grit) | Smoothing dried compound between coats | $8-12 |
| Primer (stain-blocking) | Sealing repair before paint, blocking stains | $15-25 per gallon |
You can borrow or substitute some items. A borrowed drill works fine if you don’t own one. A sanding block with sheets costs less than a palm sander. A drywall saw can be replaced with a utility knife and patience for small repairs. The essentials you shouldn’t skip are the joint compound, both sizes of knives (the wide one makes feathering possible), tape, sandpaper, and primer. Trying to spread compound with one narrow knife leaves visible ridges you’ll fight with sanding. Regular primer won’t stop water stains from bleeding through your finish paint. The under $5 container of premixed joint compound handles small repairs up to about one square foot.
Safety Precautions When Repairing Water Damaged Drywall

Water damage brings risks beyond just fixing the wall.
Follow these safety steps every time:
- Wear N95 or better respirator when mold present – Standard dust masks don’t filter mold spores small enough to reach deep into lungs
- Shut off electricity to affected area – Water and electricity together create shock hazards. Flip the breaker before touching wet walls
- Wear safety glasses during cutting and sanding – Drywall dust and debris fly toward your face during both operations
- Use dust mask for all sanding work – Even without mold, drywall dust irritates lungs and stays airborne for hours
- Ventilate area with fans and open windows – Moves contaminated air outside instead of circulating it through your house
- Wear gloves when handling moldy materials – Direct skin contact with mold can cause rashes and allergic reactions
Small mold areas under 10 square feet can be handled by a homeowner wearing proper protection (N95 mask, gloves, eye protection). Spray the moldy section with water to reduce airborne spores before you cut it out. Bag the moldy drywall pieces in heavy plastic and seal the bag before carrying it through the house. Anything larger than 10 square feet, or any amount of black mold, needs a professional mold remediation company. They have containment equipment, HEPA filters, and training to prevent spreading spores throughout your house. Mold exposure causes respiratory problems, allergic reactions, and in severe cases, chronic health issues. If anyone in your household has asthma, lung problems, or weakened immune systems, call professionals even for small amounts.
Removing and Cutting Out Water Damaged Drywall Sections
Clean cuts and proper workspace prep make the rest of the repair easier.
Preparing the Work Area
Lay tarps or plastic sheeting on the floor extending at least four feet beyond the damaged area. Drywall dust gets everywhere and cleanup takes longer than the repair itself if you skip this step. Move furniture out of the room or push it to the center and cover it completely. Mark your cut lines with a pencil and straightedge, making them level and plumb so the patch fits square. Cut back to the nearest stud on each side when possible, even if that means cutting out more than the visible damage. You need solid backing to screw the new piece to.
Cutting Techniques for Different Damage Sizes
For straight cuts with a utility knife, score the front paper deeply, snap the drywall backward to crack the gypsum core, then slice through the back paper. This works for cuts up to about two feet long. For irregular shapes or longer cuts, use a drywall saw. Punch the pointed tip through the drywall, then saw with steady strokes that cut on the push. The saw teeth face forward and cut aggressively, so control it or you’ll blow out the backside. Large sections come out easier when you cut them into smaller squares first, especially ceiling repairs where you’re working overhead. Break the damaged section into pieces you can manage without straining your arms.
Stud location matters because the edges of your patch need solid backing. Use a stud finder and mark each stud location with light pencil marks. If you don’t have a stud finder, knock on the wall and listen for the solid thud (that’s a stud) versus the hollow thump (that’s the cavity between studs). Studs typically sit 16 inches apart, measured from center to center. When you cut, center your cut line on the stud so half the stud remains exposed for the old drywall and half stays clear for screwing the new piece. Cut square or rectangular shapes even when damage is irregular because straight edges are easier to patch and tape than wavy ones.
Installing Backing Support and New Drywall Pieces
The patch won’t hold without something solid behind it.
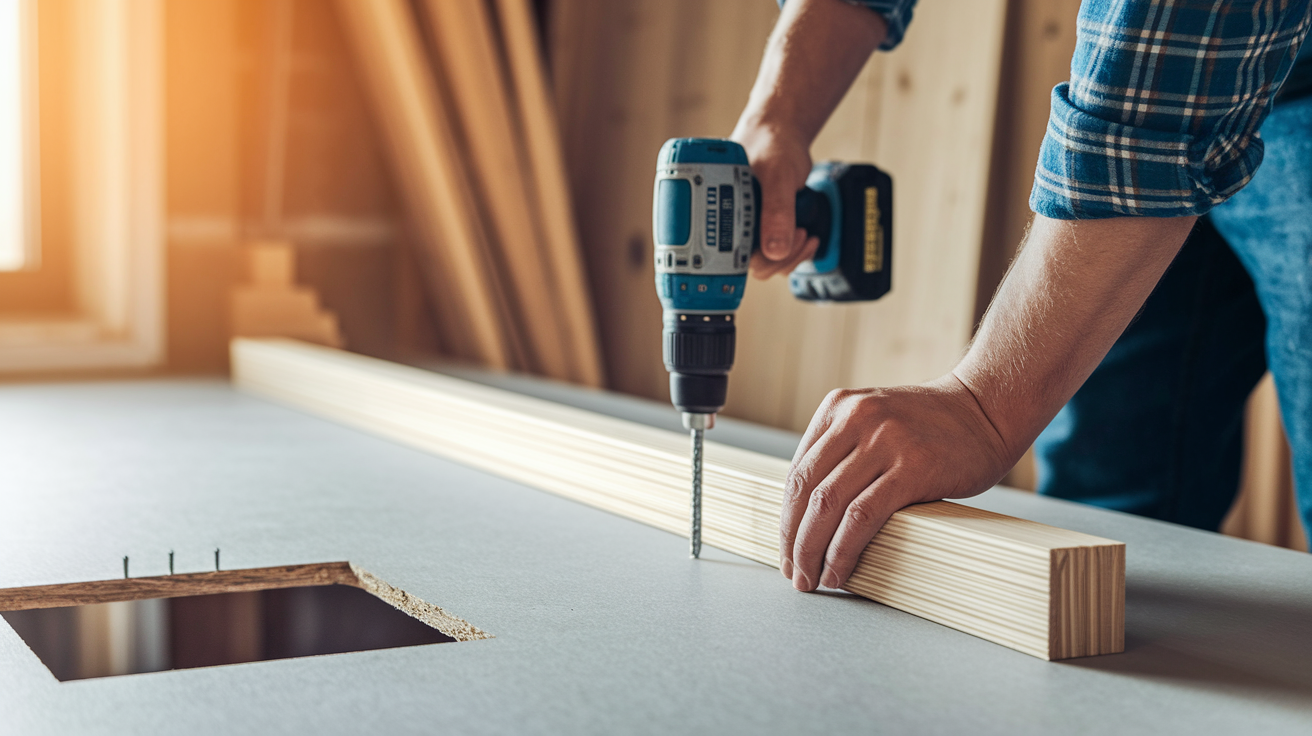
When the damage falls between studs and you can’t cut back to a stud edge, you need to add backing strips. Cut pieces of lumber at least 3/4 inch thick and 2 inches wide, and make them about 6 inches longer than the height of your opening. Slide one strip behind the drywall on each side of the cutout, holding it flat against the back of the existing wall. Drive screws through the existing drywall into the backing strip, spacing them every few inches. This gives you something to screw the edges of your patch into. The backing strip should stick out at least one inch into the opening on each side.
Check the insulation behind the wall before you install the patch. Pull out any wet insulation and let the cavity dry completely, or replace it with new insulation cut to fit the space. Wet insulation loses its R value and grows mold, so leaving it in defeats the purpose of fixing the drywall.
Cut your replacement piece to fit the opening with about a quarter inch gap on all sides. Those gaps give you room for error and prevent the patch from binding if it’s slightly oversized. Measure twice, cut once. If the piece is too tight, trim it rather than forcing it. Hold the patch in place and check the fit before driving any screws.
Drive screws every 8 to 12 inches around the perimeter of the patch, staying about 3/8 inch from the edges. Countersink each screw just enough that the head dimples the surface without breaking through the paper facing. Broken paper weakens the hold and shows through paint later. The screw heads should sit just below flush, leaving a slight depression that disappears when you apply joint compound.
Applying Joint Compound and Tape to Water Damaged Drywall Repairs
The taping and mudding process is what makes your patch disappear.
Mesh tape is easier for beginners because it’s self adhesive and you can’t bubble it like paper tape. Paper tape is stronger, lies flatter, and resists cracking better in corners, but it requires a thin bed of compound underneath to stick. For most wall patches, mesh tape works fine.
Here’s the coat sequence that builds a smooth, invisible repair:
-
Apply thin first coat with mesh tape embedded – Spread a layer of joint compound over the seam using your 3 to 5 inch knife, press mesh tape into the wet compound, then cover the tape with another thin layer smoothing out from the center. Embed screw heads with compound at the same time.
-
Allow full drying, several hours or overnight – Thick areas take 8 to 12 hours. Thin areas might dry in 4 to 6 hours. Compound changes from dark gray to light gray or white when fully dry. Don’t rush this.
-
Apply wider second coat extending 2 to 3 inches beyond first – Use your 10 to 12 inch taping knife now. Load compound along the center seam and spread it outward with long, smooth strokes. The goal is widening the repair area to make the transition gradual.
-
Third coat feathered even wider – Extend this coat another 2 to 3 inches beyond the second coat on each side. Keep the center seam fairly flat, but thin the edges to nearly nothing.
-
Final skim coat if needed for smooth transition – Not every repair needs this, but if you see ridges or texture differences after the third coat dries, apply one more very thin layer with the wide knife.
Feathering means extending the compound in gradually thinner layers as you move away from the center of the repair. Start with a loaded knife at the seam, then pull outward with decreasing pressure so the compound thins to a transparent film at the edges. The wide knife makes this possible because it bridges the low spot in the middle and contacts the high, original wall surface on both sides. Each stroke smooths the transition. Focus on eliminating knife marks by overlapping your strokes, but stop when the surface looks smooth. Overworking the compound causes it to roll up and get lumpy, creating more problems than it solves.
Sanding and Finishing Water Damaged Drywall Repairs

Sanding reveals whether your mudding created a smooth transition or left ridges you’ll need to fix.
Start with 80 to 120 grit sandpaper for knocking down high spots and obvious ridges. This removes material quickly but leaves visible scratches. Switch to 150 to 180 grit for final passes that smooth the surface and remove the coarse scratches from the first sanding. Hand sanding with a sanding block gives you the most control on smaller repairs. Palm sanders work faster on repairs bigger than four square feet, but they remove material aggressively so use light pressure. Sand in circular motions over high spots, and in long strokes along seams to feather them flatter. Keep pressure light. Let the sandpaper do the work instead of forcing it.
Drywall dust becomes a thick fog that coats everything. Wear your dust mask the entire time you’re sanding. Open windows and point a fan out the window to push dust outside instead of into the rest of the house. Close doors to other rooms. After sanding, wipe the wall with a barely damp cloth to pick up the fine dust that clings to the surface. Don’t wet it too much or you’ll damage the compound.
Follow these practices for the best sanding results:
- Sand only when compound fully dry – Damp compound gums up sandpaper and leaves rough gouges instead of smoothing the surface
- Use sanding block for flat surfaces – Bare hands or sandpaper without a block create wavy spots because fingers apply uneven pressure
- Feather edges thin – The goal is making the repair blend into the original wall so no ridge shows where new compound meets old paint
- Check smoothness with hand not just eyes – Run your palm across the repair lightly with your eyes closed. You’ll feel ridges your eyes missed
- Avoid over sanding which exposes tape – If you see mesh or paper tape through the compound, stop sanding that spot and apply another thin coat of compound instead
Texture Matching for Water Damaged Drywall Repairs
A perfectly smooth patch on a textured wall sticks out like a bald spot.
Smooth repairs work fine on smooth walls, but most walls have some texture applied, even if it’s subtle. Orange peel texture looks like the skin of an orange, with small random bumps covering the surface. Knockdown texture has ridges that were flattened slightly with a trowel, creating a pattern that’s partly smooth, partly bumpy. Skip trowel texture shows trowel marks in overlapping arcs. Popcorn ceiling texture has lumpy, cottage cheese looking bumps, often found in older homes.
Spray texture comes in aerosol cans at home centers and works for orange peel and light knockdown. Shake the can hard for two minutes, hold it 18 to 24 inches from the wall, and spray in a circular pattern with light, overlapping passes. Practice on a piece of cardboard first to see what the texture looks like and adjust your distance and speed. For knockdown, let the sprayed texture sit for 30 seconds to one minute until it’s tacky, then lightly drag a wide taping knife across the high points to flatten them slightly.
For skip trowel or heavier textures, you’ll need to mix texture compound (thicker than joint compound) and apply it with a trowel using the same motion as the original texture. This takes practice. Load compound on a trowel, press it lightly to the wall, then pull the trowel away in short arcs. The pattern it leaves should match the surrounding wall. If it doesn’t look right on the first try, scrape it off while wet and try again. Popcorn ceiling texture usually comes in a spray bottle or hopper gun that shoots the texture material onto the ceiling under pressure. These are available to rent at tool rental shops.
Priming and Painting Water Damaged Drywall Repairs

Skipping primer means water stains bleed through your paint, sometimes after two or three coats.
Water stains contain tannins that regular primer can’t seal. You need a stain blocking primer specifically designed for this, usually labeled as “stain blocker,” “stain sealer,” or “stain killer.” Oil based primers block stains the most reliably, but they smell strong and require mineral spirits for cleanup. Shellac based primers also block stains and dry faster than oil based. Water based stain blocking primers work for lighter stains and clean up with soap and water.
Apply primer to the entire repaired area, extending it a few inches beyond where you applied joint compound. Use a brush to cut in around edges, then a roller for larger flat areas. Roll in a “W” pattern to distribute primer evenly, then smooth it with straight passes. Don’t overwork it or the roller will leave texture marks. One coat of primer usually covers repairs, but if you see the stain or compound color showing through after it dries, apply a second coat.
Paint matching requires either bringing a chip of your existing paint to the store or giving them the original paint code if you have it. Most stores can scan a chip and mix a very close match. Test the match on an inconspicuous area first, or on a piece of cardboard, and let it dry completely. Paint looks different wet versus dry. If the match is close but not perfect, you might need to paint the entire wall instead of just the patch to avoid a visible difference in sheen or color.
Paint the repaired area using the same technique as primer. Feather the edges where new paint meets old by gradually reducing pressure on the roller as you move away from the repair. Multiple thin coats give better coverage and a smoother finish than one thick coat. Most repairs need two coats of paint. Let each coat dry completely (check the can for recoat times, usually 2 to 4 hours for latex paint) before applying the next.
Preventing Future Water Damage to Drywall
Fixing the damage once is enough if you take steps to keep water away from drywall going forward.
Different rooms need different protection strategies. Bathrooms and laundry rooms benefit from moisture resistant drywall (often called green board because of its color) or mold resistant drywall (purple board) that resists moisture better than standard drywall. These specialty boards cost slightly more but last longer in humid conditions. Basements need vapor barriers behind drywall on exterior walls to prevent condensation when warm indoor air hits cold concrete. Without a vapor barrier, moisture condenses on the back of the drywall where you can’t see it until damage shows up.
Regular maintenance catches small problems before they become drywall repairs. Check under sinks for drips every few months. Look at ceilings below bathrooms for stains. Walk the roof line and gutters once or twice a year to spot damage or clogs. Check window and door frames for gaps where caulk dried out and cracked.
Follow these steps to keep water away from drywall:
- Install moisture resistant drywall in bathrooms and basements – Costs $2 to $3 more per sheet but handles humidity without deteriorating as fast as standard drywall
- Maintain proper ventilation in high humidity areas – Use exhaust fans during and after showers. Run them for 20 minutes after you finish to clear moisture
- Seal gaps around windows and doors with caulk – Check caulk lines every two years and recaulk when you see cracks or separation
- Inspect and maintain roof regularly – Look for missing shingles, damaged flashing, or worn spots where leaks start before they reach the ceiling
- Check plumbing for leaks periodically – Inspect supply lines under sinks and behind toilets. Replace washing machine hoses every 5 years even if they look fine
- Use vapor barriers in basements – Install 6 mil plastic sheeting between studs and drywall on walls that contact exterior concrete or soil
- Control indoor humidity below 50 percent – Use dehumidifiers in damp spaces. High humidity feeds mold growth even without visible leaks
- Address condensation issues promptly – If you see water beading on walls, windows, or pipes, improve ventilation or insulation before drywall damage starts
If water issues keep coming back, something bigger might need attention. Water damage repair and remediation coordination involves identifying sources you can’t easily see, like foundation cracks or failing waterproofing, that keep feeding moisture into walls.
Cost Estimates for Water Damaged Drywall Repair

Knowing what repairs cost helps you decide between DIY and calling someone.
| Repair Scope | DIY Cost | Professional Cost |
|---|---|---|
| Small patch under 1 sq ft | $20-50 | $150-300 |
| Medium repair 1-4 sq ft | $40-80 | $300-600 |
| Large section 4-8 sq ft | $80-150 | $600-1,200 |
| Ceiling repair per sq ft | $10-20 per sq ft | $75-150 per sq ft |
| Full room (8×10 room, all walls) | $300-600 | $2,000-4,000 |
Several factors push costs higher. Mold presence requiring professional remediation before repair adds $500 to $3,000 depending on extent. Ceiling repairs cost more per square foot than walls because working overhead takes longer and requires staging or scaffolding. Texture matching adds time and materials, especially for specialty textures like popcorn or skip trowel. Accessibility matters too. Repairing a wall section at eye level costs less than repairing a two story foyer ceiling where you need special equipment to reach it.
Joint compound costs under $5 for small containers that handle repairs up to about one square foot. A gallon runs $12 to $15 and covers much larger areas. A 4×8 sheet of drywall costs $10 to $15. Most small DIY repairs stay in the $20 to $50 range for materials. Professional repairs include labor (usually $50 to $80 per hour), insurance coverage, and a guarantee that the work will look right and last. They also have experience spotting hidden damage you might miss, which can save money in the long run by fixing everything at once instead of patching the same area twice.
Time Requirements for Water Damaged Drywall Repair
Repairs take days, not hours, because of drying time between steps.
Small repairs covering under one square foot typically take 3 to 5 days total from start to painted finish. Medium repairs of 1 to 4 square feet run 4 to 6 days. Large sections of 4 to 8 square feet or more need 1 to 2 weeks, mostly because of the additional coats of joint compound required to feather such a large area smoothly.
The timeline breaks down like this. Initial drying takes 24 to 48 hours depending on how wet the drywall was and your drying conditions. Cutting and patching the hole takes 1 to 2 hours of working time. First coat of joint compound and tape takes 30 minutes to an hour, then dries 8 to 12 hours. Second coat takes 30 minutes, dries overnight. Third coat takes 30 minutes, dries overnight. Sanding takes 30 minutes to an hour. Priming takes 20 minutes, dries 1 to 2 hours. First coat of paint takes 20 minutes, dries 2 to 4 hours. Second coat of paint takes 20 minutes, dries overnight before the area is fully cured.
Actual working time is only 4 to 8 hours total spread across those days. The rest is waiting for things to dry. You can’t speed up drying significantly without causing problems. Applying a second coat before the first coat dries leads to cracking as the underlying layer shrinks. Using heat guns or hair dryers to force drying creates a hard shell with a damp interior that cracks later. The best approach is planning the repair across several days and working on other projects while coats dry.
When to Hire Professionals for Water Damaged Drywall

Some repairs make sense to hand off.
Professionals bring experience that shows in the finished work. They’ve repaired hundreds of patches and know how to feather edges until they’re truly invisible. They own specialty tools like stilts for ceiling work, corner tools for inside and outside corners, and commercial grade sanders that speed the process. Their work often includes a warranty or guarantee that if the repair fails or looks wrong, they’ll come back and fix it at no charge.
The cost benefit calculation shifts when complexity increases. A simple wall patch might cost $300 professionally versus $40 in DIY materials, so DIY makes sense if you’re capable. But a large ceiling repair requiring scaffolding rental, texture matching, and multiple days of work might cost $1,000 professionally versus $200 DIY plus tool rental and significant time investment. Factor in the risk of doing it wrong and needing to hire someone to fix your fix, and professional work often pays for itself on complex jobs.
Call professionals when you face these situations:
- Mold covering more than 10 square feet – Requires containment equipment and procedures you likely don’t own or know how to use safely
- Structural damage or sagging – Could mean framing damage behind the drywall that needs assessment and repair before patching the surface
- Electrical wiring in damaged area – Mixing water damage and electrical work raises safety concerns that require licensed work
- Ceiling damage over living spaces – Falling ceiling drywall causes injury. Repairs need to be secure and proper
- Extensive damage requiring permit – Some jurisdictions require permits for structural repairs and inspections by professionals
- Lack of confidence in DIY skills – Better to pay for good work than attempt something you’re not comfortable with and create more damage
- Recurring water damage requiring source investigation – Persistent problems need diagnostic skills to identify hidden leaks that keep causing damage
For help with house repair services including drywall repair and water damage issues, professionals can assess the situation and provide estimates before you commit to anything.
Troubleshooting Common Water Damaged Drywall Repair Problems
Most problems have straightforward fixes if you catch them before painting.
| Problem | Cause | Solution |
|---|---|---|
| Joint compound cracking | Applied too thick, didn’t dry fully before next coat, or house settling | Scrape out crack, apply thin layer of compound, feather edges, let dry completely |
| Visible seams after painting | Didn’t feather edges wide enough or sanded through compound exposing tape | Apply wider coat extending 6 inches beyond visible seam, sand smooth, reprime and paint |
| Texture doesn’t match | Wrong texture type, wrong distance when spraying, or wrong technique | Scrape off bad texture while wet, practice technique on cardboard, reapply matching existing pattern |
| Compound won’t dry | High humidity, applied too thick, or poor ventilation | Run dehumidifier, increase air circulation with fans, wait longer, or scrape off and reapply thinner |
| Bubbling paint after repair | Didn’t use stain blocking primer or moisture still present in wall | Sand bubbled paint, verify wall is completely dry, apply stain blocking primer, repaint |
| Ridges visible after sanding | Knife marks left during application or uneven feathering | Sand ridges smooth, apply thin skim coat with wide knife using light pressure, resand after drying |
| Stains bleeding through paint | Used regular primer instead of stain blocking primer | Apply stain blocking primer over the stain, let dry, then repaint |
Most of these problems correct themselves when you add another coat, sand again, and take more care with technique. Multiple attempts aren’t failure. They’re part of learning how joint compound behaves and how much pressure to use with the knife. Beginners commonly need 4 to 5 coats to get a repair smooth, while experienced workers do it in three. Give yourself patience and time, and the repair will eventually disappear into the wall.
Final Words
Water damaged drywall repair takes patience and attention to detail, but the right approach gets results.
Stop the leak first, dry everything completely, and take your time with each coat of joint compound. Most small repairs cost under $50 in materials and give you working time spread across several days of drying.
If you’re dealing with mold over 10 square feet, structural concerns, or damage that keeps coming back, it’s time to call in a pro who can dig into the root cause.
With the steps above, you now know how to fix water damaged drywall and restore your walls to a clean, solid finish.
FAQ
Will drywall be ruined if it gets wet?
Drywall can be ruined if it gets wet, but it depends on how much water exposure occurred and how quickly you dry it. Surface moisture or minor dampness can often be dried within 48 hours without permanent damage. However, drywall that stays wet longer than two days, absorbs significant water, or develops soft spots usually needs replacement because the gypsum core breaks down and mold can start growing inside the wall.
Can you repair drywall without replacing it?
You can repair drywall without replacing it if the damage is limited to the surface layer or small areas. Minor issues like small holes, shallow gouges, or light water stains respond well to patching with joint compound and sanding smooth. However, you’ll need to cut out and replace sections when the drywall feels soft when pressed, shows significant sagging or bulging, has crumbling texture, or contains mold growth behind the surface.
How to dry a wall after water damage?
To dry a wall after water damage, you need to start immediately and finish within 48 hours to prevent mold growth. Position fans directly on the wet areas, run a dehumidifier in the room, open windows for ventilation, and increase the room temperature slightly. For faster drying behind walls, remove baseboards to allow airflow at floor level. Use a moisture meter to verify the wall is completely dry before starting any repairs.
How to patch moldy drywall?
To patch moldy drywall safely, you first need to determine the mold size, as areas larger than 10 square feet require professional remediation. For small moldy patches, wear an N95 respirator and gloves, cut out the affected drywall extending at least 12 inches beyond visible mold, and check for mold on studs and insulation behind the wall. Fix the moisture source completely before installing new drywall, or the mold will return.
What are signs that drywall has structural damage versus surface damage?
Structural damage to drywall shows as sagging or bulging sections, soft spots that compress when pressed, crumbling texture that falls apart when touched, or areas that have separated from studs. Surface damage appears as discoloration, small cracks, bubbling or peeling paint, or water stains without changes to the drywall’s firmness. Structural damage requires cutting out and replacing sections, while surface damage can often be repaired with joint compound and sanding.
How long does it take for wet drywall to dry completely?
Wet drywall typically takes 24 to 48 hours to dry completely when using fans and dehumidifiers in good conditions. Thicker moisture or larger affected areas may need up to 72 hours. The actual drying time depends on how saturated the drywall became, room ventilation, humidity levels, and air circulation. Always verify with a moisture meter that readings are normal before proceeding with repairs, as drywall that looks dry on the surface can still hold moisture inside.
What type of primer prevents water stains from bleeding through paint?
A stain-blocking primer prevents water stains from bleeding through paint after drywall repairs. Regular primers won’t seal water stains effectively, allowing brown or yellow discoloration to reappear through your finish paint. Apply the stain-blocking primer to the entire repaired area, extending slightly beyond the joint compound edges, and let it dry completely before applying your color-matched paint.
When should you call a professional instead of repairing water damaged drywall yourself?
You should call a professional for water damaged drywall when mold covers more than 10 square feet, structural damage or sagging is present, electrical wiring runs through the damaged area, ceiling damage exists over living spaces, or you’re dealing with recurring water damage that needs source investigation. Professionals also make sense when you lack confidence in your skills or when the repair requires permits for extensive work.
How many coats of joint compound do you need for drywall repairs?
You typically need three coats of joint compound for drywall repairs that blend invisibly with existing walls. Apply a thin first coat with mesh tape embedded, then a wider second coat extending 2 to 3 inches beyond the first after it dries overnight. The third coat feathers even wider for a smooth transition. Some repairs may need a fourth skim coat if imperfections remain after sanding the third coat.
What grit sandpaper should you use for drywall joint compound?
You should use 80 to 120 grit sandpaper for initial smoothing of dried joint compound, then switch to 150 to 180 grit for final passes. Starting with coarser grit removes high spots and obvious ridges efficiently. Finishing with finer grit creates the smooth surface needed for painting. Avoid going too coarse, which can gouge the compound, or too fine initially, which won’t cut effectively.
Can you use regular drywall in bathrooms after water damage?
You can use moisture-resistant or mold-resistant drywall in bathrooms after water damage, which is better than regular drywall for high-humidity areas. Regular drywall will work if your bathroom has excellent ventilation and no recurring moisture problems, but moisture-resistant types provide extra protection against future water exposure. The green or purple board costs slightly more but reduces the chance of repeat damage in bathrooms, laundry rooms, and basements.