


Ever notice a crack in your plaster wall and think you can just smear some filler over it and call it done? That quick fix fails in a few months because the crack comes right back. The problem is most people skip the prep work that actually makes repairs stick. This guide walks you through the real repair process, from identifying whether your crack is cosmetic or structural to choosing the right filler and technique that prevents the crack from reappearing after you paint.
Understanding Different Types of Plaster Wall Cracks

Knowing which type of crack you’re dealing with tells you whether this is a DIY job or something that needs a structural engineer. Different crack patterns mean different problems. Using the wrong repair method just wastes your time and materials.
Hairline and Surface Cracks
Hairline cracks are less than 1mm wide and show up as random fine lines on the plaster surface. They usually appear after the house goes through a few heating and cooling cycles or when the building shifts a bit during normal settling. These cracks are superficial. They rarely go deeper than the surface plaster layer. You can fix them yourself with flexible filler, and the job takes less than an hour once you’ve got the materials. Hairline cracks are cosmetic issues, not structural problems, so they’re safe for DIY.
Non-Structural Cracks
Non-structural cracks run narrower than structural ones, usually between 1mm and 3mm wide. They appear as vertical or horizontal lines on the wall surface. You’ll see them along the center of walls or where walls meet ceilings, but they don’t follow diagonal patterns and rarely extend around corners or through multiple surfaces. These form from minor building movement, temperature changes, or slight settling that doesn’t mess with the structure’s integrity. You can safely repair these yourself with simple patching and repainting.
Structural Cracks
Structural cracks are wide and continuous, often measuring 6mm or more. They follow diagonal or stair-step patterns around windows, doors, or corners. These typically extend across multiple surfaces, sometimes running from floor to ceiling or appearing in matching patterns on both sides of a wall. These signal foundation movement, structural shifting, or load-bearing wall problems. If you see diagonal cracks radiating from the corners of door frames or stair-step patterns in plaster near foundation walls, stop planning your repair and call a structural engineer.
Defect-Related Cracks
Defect-related cracks come from problems with how the plaster was originally applied or how it’s bonded to the substrate underneath. Debonding creates hollow-sounding areas where the plaster has separated from the lath or backing material, often with irregular cracking patterns. Grinning makes the underlying lath or mesh visible through thin or poorly applied plaster. Expansion cracks form when thermal fluctuations cause the plaster to move differently than its substrate. Popping happens when particles in the plaster expand, creating small circular cracks or bumps. These patterns often mean larger adhesion problems that might need removing and replastering sections of wall.
Check the crack width with a ruler held directly against the wall surface. Monitor any crack wider than 3mm for a month by marking the crack ends with pencil and dating them. If the crack grows, or if you notice doors and windows sticking or misaligning, the problem goes beyond cosmetic repair. When structural cracks appear, the repair happens in two stages: first, an engineer addresses the structural issue, then you can repair the surface cracks permanently.
When to Call a Professional for Plaster Wall Crack Repair
Stop your DIY plans immediately if you see stair-step patterns in the plaster, especially near corners of windows and doors. Diagonal cracks that run from ceiling to floor or cracks wider than 6mm typically signal foundation movement or structural settling that goes beyond surface repair. Horizontal cracks in load-bearing walls can indicate serious structural stress. If repaired cracks keep reappearing in the same location, or if you notice doors suddenly sticking in frames that worked fine last month, the wall movement needs professional assessment before any surface repair makes sense. Windows that won’t open smoothly or gaps appearing between walls and ceilings alongside the cracks mean the structure is actively shifting.
Cracks with water staining, plaster deterioration, or musty odors point to moisture problems that will destroy any repair you attempt until the water source gets fixed. Recurring cracks in the same spot mean water is getting behind the wall, or there’s an active leak somewhere nearby. Plaster that feels soft, crumbles when you touch it, or shows brown or yellow staining needs water damage repair before you even think about filling cracks. If the plaster sounds hollow when you tap it gently with your knuckles, water has likely compromised the adhesion between the plaster and its backing.
Call a structural engineer if you see large sections of plaster losing adhesion to the lath, extensive crumbling across multiple walls, or if the plaster actually moves when you press on it. Foundation cracks that extend from basement to upper floors, plaster damage that appeared suddenly rather than gradually, or any crack with a stuck door, tilted floor, or separation between wall and ceiling all need professional diagnosis. An engineer can tell you whether the building needs stabilization work before you spend time and money on surface repairs that will just crack again.
Essential Tools and Materials for Plaster Crack Repair
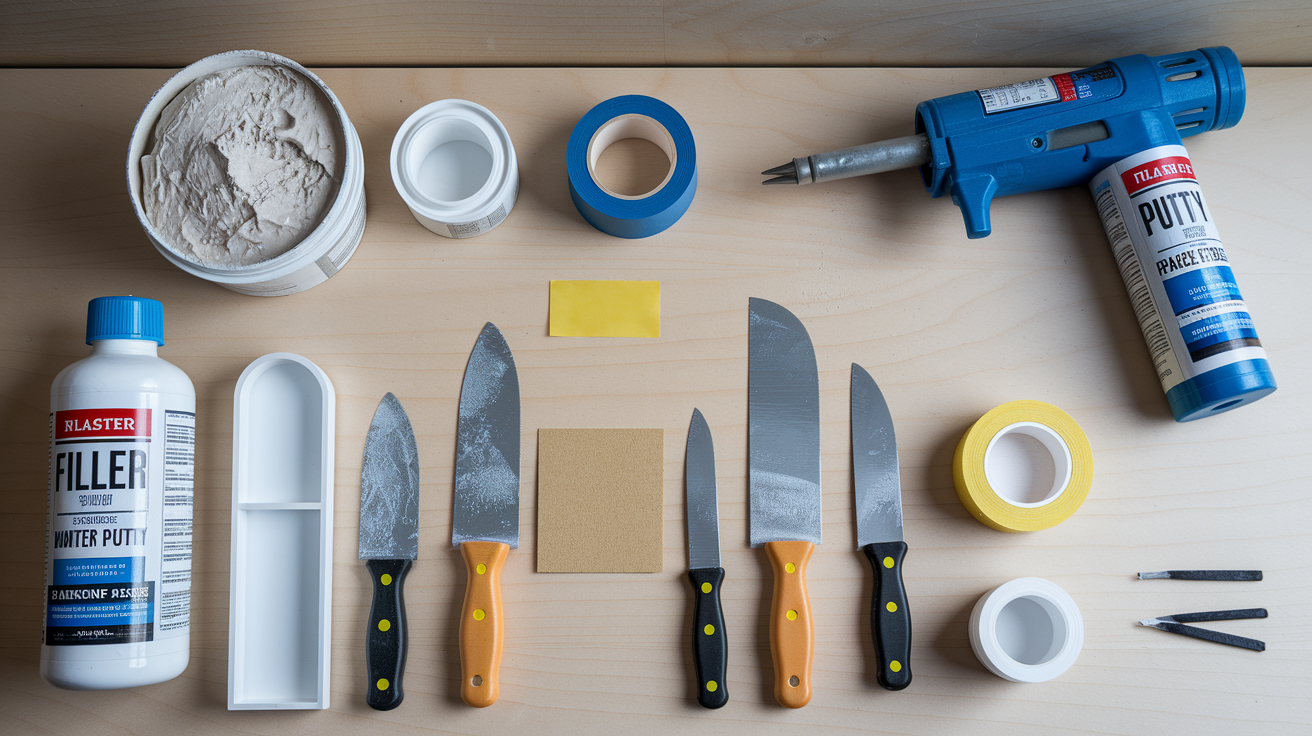
Having everything you need before you start prevents frustrating trips to the hardware store with wet filler drying on your wall. Getting the right tools and materials upfront also helps you finish the repair while conditions are good, rather than letting a partially completed repair sit exposed.
| Item Category | For Hairline Cracks | For Wide/Deep Cracks | Purpose |
|---|---|---|---|
| Cutting Tools | Utility knife or scraper | Utility knife or scraper | Widening crack to create V-shaped groove for better filler adhesion |
| Application Tools | 2-inch putty knife, caulking gun for flexible filler | 3-inch and 6-inch putty knives, caulking gun | Applying filler into crack and smoothing surface |
| Smoothing Tools | Medium-grade sandpaper, sanding block | Medium-grade and fine-grade sandpaper, sanding block | Removing excess filler and blending repair with wall surface |
| Reinforcement Materials | Not required | Fiberglass mesh tape | Preventing crack recurrence in wide or deep repairs |
| Filling Materials | Flexible filler, fine surface filler | Flexible filler or water putty, fine surface filler | Primary crack filling and final smooth finish |
| Finishing Materials | Primer, matching paint | Primer, matching paint | Sealing repair and blending with existing wall color |
| Cleaning Supplies | Wire brush, vacuum with brush attachment | Wire brush, vacuum with brush attachment, mixing bucket with stick | Removing loose plaster and debris from crack |
| Safety Gear | Dust mask, protective eyewear, drop cloths | Dust mask, protective eyewear, drop cloths | Protecting lungs, eyes, and flooring during repair |
The filler you choose directly impacts how long your repair lasts. Standard all-purpose filler goes hard and rigid, so it cracks again as soon as the wall moves from temperature changes or normal building settling. Flexible filler moves with the wall and prevents the crack from reappearing, which is why decorators use it for permanent repairs rather than quick fixes that fail in a few months.
Here are the five filler types you’ll see at the hardware store and when each one works best:
- Joint compound for hairline cracks: Spreads smoothly, dries in 2 to 4 hours for thin applications, minimal shrinkage makes it good for surface repairs, applied with putty knife in thin coats
- Spackling paste for small surface cracks: Pre-mixed and ready to use, dries in 1 to 2 hours, shrinks slightly so better for shallow repairs under 3mm deep, applied directly from container with putty knife
- Plaster of Paris for deep cracks: Mixes with water to form thick paste, sets in 20 to 30 minutes, expands slightly as it hardens so it locks into the crack, applied quickly before hardening begins
- Water putty for no-shrink repairs: Powder mixed with water, dries in 3 to 4 hours, doesn’t shrink at all so the repair stays level with the wall, provides permanent repairs that won’t need redoing, applied with putty knife in layers for deep cracks
- Flexible filler for movement-prone areas: Applied with caulking gun directly into carved-out crack, dries in 4 to 6 hours, remains slightly flexible after drying so it moves with wall expansion and contraction from heating systems and seasonal changes, won’t fracture like rigid plaster
Dust masks protect your lungs from plaster dust when you widen the crack and sand the repair. Protective eyewear keeps debris out of your eyes during the scraping and sanding steps. Drop cloths catch the plaster dust and filler drips that will stain carpet or finished floors.
Step-by-Step Plaster Wall Crack Repair Process
The proper repair technique prevents cracks from reappearing after you paint. That’s why this method involves more than just smearing filler into the crack. Preparation and repair form one continuous process where each step creates the right conditions for the next one to work properly.
-
Check the plaster around the crack for water damage by pressing gently on the wall surface. If it feels soft, sounds hollow when tapped, or shows staining, you need to fix the moisture problem before repairing the crack or your work will fail within weeks.
-
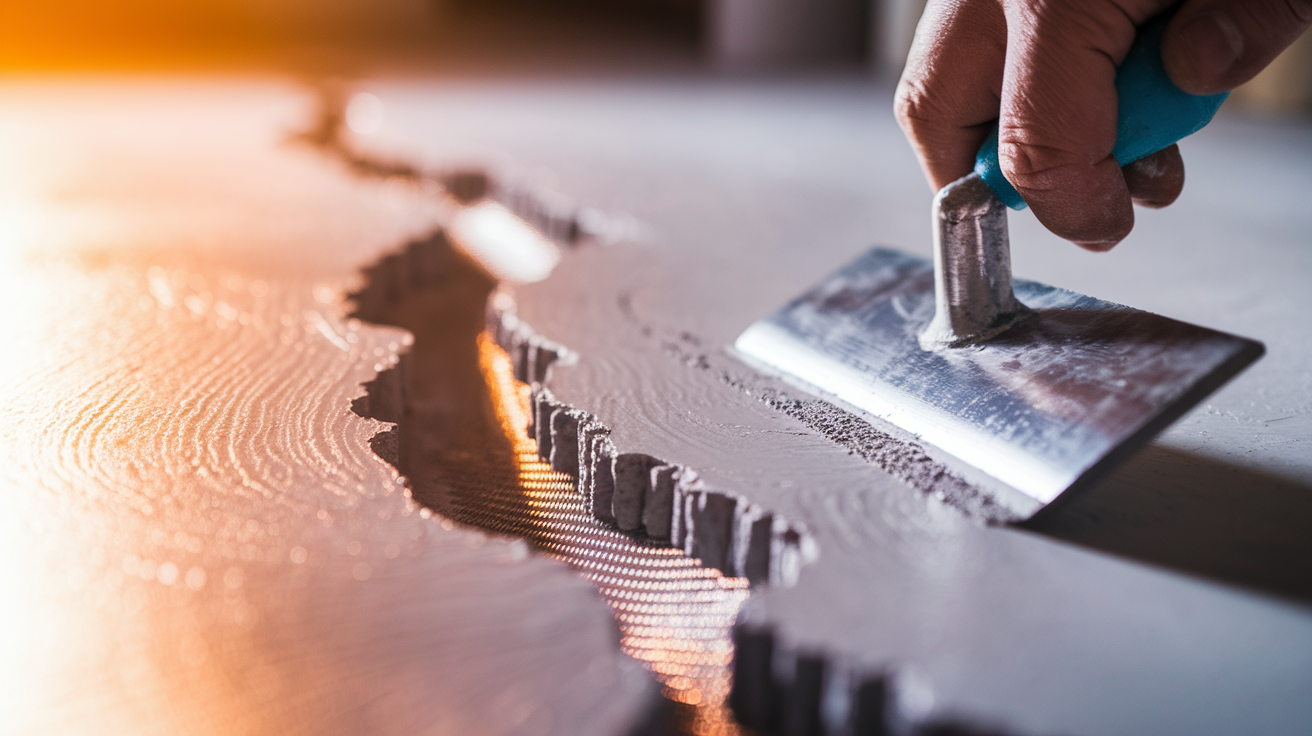
Widen the crack with a utility knife by cutting a few millimeters on each side to create a V-shaped groove. This undercut gives the flexible filler more surface area to grip and prevents the repair from popping out later. Cut about 3 to 4mm deep for hairline cracks, deeper for wider cracks.
-
Remove loose plaster and debris from inside the widened crack using a wire brush first, then vacuum thoroughly with a brush attachment. The filler needs to bond directly to solid plaster, not dust or crumbled material. Brush away from the crack to avoid pushing debris deeper into the groove.
-
Apply flexible filler directly from the caulking gun into the carved-out crack, moving steadily along the entire length. Inject enough filler so it slightly overfills the groove, creating a small raised bead above the wall surface. This excess material ensures complete filling without gaps.
-
Smooth the flexible filler with a putty knife held at a slight angle, dragging it along the crack in one continuous motion. Wipe excess filler off the knife after each pass. The goal here is to press filler deep into the crack and remove major excess, not to create a perfectly smooth surface yet.
-
Let the flexible filler dry completely, which typically takes 4 to 6 hours depending on crack depth and room temperature. The base flexible filler doesn’t need to be perfectly level or smooth with the walls since the fine surface filler accomplishes the finish.
-
Sand the dried flexible filler with medium-grade sandpaper to remove any raised edges or bumps, but don’t try to sand it perfectly smooth. Focus on removing anything that sticks up above the wall surface. Wipe away sanding dust with a slightly damp cloth.
-
Apply fine surface filler over the repaired area using a wider putty knife to spread it about 15cm beyond the crack on each side. This filler spreads well and feathers out to blend with the surrounding wall. Draw the knife smoothly across the repair in one direction, then wipe the knife and make a perpendicular pass.
-
Let the fine surface filler dry for the time recommended on the product label, usually 2 to 3 hours. This material typically needs no sanding after application if you spread it smoothly in step 8. Check by running your hand lightly over the repair. It should feel flush with the wall.
-
Prime the repaired area with a brush or small roller, extending the primer about 10cm beyond the filler. After the primer dries (usually 1 to 2 hours), paint with matching indoor-safe paint, feathering the edges so the repair blends invisibly with the surrounding wall.
Drying time between coats matters more than you might think. The flexible filler base coat needs 4 to 6 hours to cure completely before you sand or apply the fine surface filler over it. The fine surface filler requires 2 to 3 hours before priming. Primer needs 1 to 2 hours before painting. Rushing these intervals causes the layers to separate or the paint to bubble.
Multiple coats become necessary for cracks deeper than 6mm. Apply the flexible filler in layers no thicker than 6mm each, letting each layer dry 4 to 6 hours before adding the next. Thick applications take much longer to dry and may crack or pull away from the wall edges as they cure. The base flexible filler doesn’t need to be perfectly level because the fine surface filler provides the finish that makes the repair invisible.
Repairing Wide and Deep Plaster Wall Cracks
Wide cracks measuring over 3mm and deep cracks that extend beyond the surface plaster layer need reinforcement to stay closed permanently. These repairs build on the main step-by-step guide with additional reinforcement requirements that prevent the crack from spreading under stress. Without proper reinforcement, wide and deep cracks will reopen even when filled with the best materials.
Key differences for wide and deep crack repairs:
- Undercut the crack more aggressively, widening it to at least 6mm and cutting deeper into the plaster to create more space for filler and reinforcement material to grip the solid plaster on both sides
- Apply fiberglass mesh tape over the crack after the first coat of flexible filler partially dries (firm but still tacky), pressing it into the surface so the next filler coat embeds it completely rather than bridging over it
- Use water putty or flexible filler formulations that don’t shrink as they dry, since shrinkage in deep repairs creates voids behind the surface that lead to cracking again within months
- Extend drying time to 6 to 8 hours between coats instead of 4 to 6 hours because thicker applications take longer to cure all the way through to the back of the crack
Multiple thin coats work better than one thick application because plaster filler dries from the outside in. A thick single application forms a hard shell on the surface while the interior stays wet, which causes the repair to crack internally or pull away from the crack edges. Thin coats dry completely through before the next layer goes on, creating a solid repair that bonds properly to the plaster on both sides.
Plan for 6 to 8 hours drying time between each layer when filling deep cracks. A crack that extends 12mm into the plaster might need three separate coats of flexible filler before you apply the fine surface filler. This means the crack repair takes place over two or three days, not in one afternoon.
What Causes Cracks in Plaster Walls
Temperature and humidity fluctuations make plaster expand when it gets warm and contract when it cools down. This movement happens constantly as your heating system cycles on and off throughout the day. Air conditioning and seasonal changes cause similar expansion and contraction. Underfloor heating creates especially strong thermal movement in walls because it heats the entire wall from below, causing more expansion than radiators or forced-air systems. Homes in areas with high humidity swings between seasons see more cracking because moisture makes plaster swell, then it shrinks again when the air dries out. Even freshly repaired walls can develop new cracks if you have underfloor heating or significant temperature changes in that room.
Settlement and structural movement happen naturally as buildings age and adjust to the soil beneath them. Foundation issues from shifting soil, poor drainage, or tree roots create stress that transfers up through walls as diagonal or stair-step cracks. Normal building movement from wind, foot traffic on upper floors, or even heavy trucks passing on nearby streets creates small vibrations that gradually work cracks into rigid plaster. External impacts from door slamming, hanging heavy pictures without proper anchors, or accidental bumps can crack plaster that has already weakened from age or movement. These structural causes usually create wider, more continuous cracks than temperature-related ones.
Poor application techniques during the original plaster installation leave weak points that crack years later. Plaster applied too thick dries unevenly and shrinks too much. Plaster mixed with too much water weakens the bond between layers. Insufficient drying time between plaster coats creates delamination where the layers separate instead of bonding together. Shrinkage during the original drying process can cause fine crazing patterns across the surface. Age-related brittleness affects old plaster that’s gone through decades of expansion and contraction cycles, losing flexibility and becoming more prone to cracking. Deterioration over time from repeated temperature cycles, moisture exposure, or settling gradually weakens the plaster’s internal structure until small cracks begin forming even without obvious stress.
Finishing and Painting Repaired Plaster Wall Cracks

Sand the dried fine surface filler with medium-grade sandpaper using light, circular motions that blend the edges of the repair into the surrounding wall. Hold the sandpaper flat against the wall rather than at an angle to avoid creating grooves. Feather the edges by sanding progressively lighter as you move away from the repair center, which makes the transition invisible once painted. Wipe away sanding dust with a slightly damp cloth and let it dry before priming.
Primer application seals the repaired area and creates consistent paint adhesion across both old plaster and new filler. Without primer, the filler absorbs paint differently than the surrounding plaster, which shows as a dull patch even when using the same paint color. Apply primer with a small brush or roller, extending it about 10cm beyond the filled area on all sides. Let the primer dry completely for 1 to 2 hours before painting. A tacky primer surface will cause the topcoat to drag and look uneven.
Matching existing wall texture matters more than you might expect for invisible repairs. Smooth walls only need the fine surface filler applied smoothly and sanded level. Textured surfaces need you to recreate that texture in the repaired area before painting. For light orange-peel texture, dab the wet fine surface filler gently with a slightly dampened sponge. For heavier textures, apply texture compound with a texturing brush or roller that matches the existing pattern, then let it dry before priming.
Color matching gets easier if you still have the original paint can with the color formula printed on it. Without that information, cut a small paint chip from an inconspicuous area like inside a closet and take it to a paint store for color matching. Paint the repaired area first with a small brush, then feather the edges by brushing outward into the surrounding wall with a nearly dry brush. If the color match isn’t perfect, painting the entire wall from corner to corner prevents visible patching. Use the same paint finish (flat, eggshell, semi-gloss) as the existing wall since different sheens show differently even in identical colors.
Common Mistakes When Repairing Plaster Wall Cracks
Most repair failures result from shortcuts that seem to save time but actually guarantee the crack will reappear within weeks or months. Understanding why these mistakes cause problems helps you avoid the frustration of redoing work you thought was finished.
Common mistakes that cause repair failure:
-
Not widening the crack before filling leaves no room for the filler to grip properly, so it sits on the surface instead of bonding into the plaster. Without mechanical grip from the undercut edges, the repair pops out with the first temperature change. The correct approach widens the crack 3 to 4mm on each side and undercuts the edges to create a V-shaped groove that locks the filler in place.
-
Using all-purpose filler instead of flexible filler creates a rigid patch that can’t move with normal wall expansion and contraction. The wall moves, the rigid filler doesn’t, and the crack reopens right through the repair. The correct approach uses flexible filler that moves slightly with the plaster, especially in areas affected by heating systems or temperature changes.
-
Skipping primer means the paint absorbs unevenly between old plaster and new filler, creating a visible patch even when color-matched perfectly. The topcoat also sticks poorly without primer, leading to peeling around the repair. The correct approach primes all repaired areas before painting, extending the primer beyond the filler edges.
-
Over-sanding and creating depressions happens when you sand too aggressively trying to make the repair perfectly smooth, actually sanding below the wall surface level. This creates a visible dip that shows under paint. The correct approach uses light pressure with medium-grade sandpaper just to remove raised edges, not to level the entire area, since properly applied fine surface filler needs minimal sanding.
-
Applying filler too thick causes the surface to harden while the interior stays wet, resulting in cracking within the repair itself or pulling away from the edges. Thick applications take days to dry completely. The correct approach builds deep repairs in multiple thin layers, each one 6mm or less, with full drying time between coats.
-
Painting before complete drying traps moisture inside the repair, which causes bubbling, peeling, or the entire repair to crack again. Rushing the drying process guarantees failure. The correct approach follows the recommended drying times on each product label: 4 to 6 hours for flexible filler, 2 to 3 hours for fine surface filler, 1 to 2 hours for primer before applying the next coat.
Maintaining Plaster Walls to Prevent Future Cracks

Control indoor humidity levels between 30% and 50% using a hygrometer to monitor conditions in rooms where cracks have appeared. High humidity causes plaster to absorb moisture and expand, then contract again when conditions dry out, which creates stress that forms new cracks. Use dehumidifiers in damp areas like basements, bathrooms without exhaust fans, or rooms with poor ventilation. Address moisture sources directly by fixing leaky pipes, improving bathroom ventilation, and redirecting groundwater away from foundation walls before it causes damage inside.
Minimize temperature fluctuations by avoiding rapid heating or cooling of rooms with plaster walls. Turn heating systems up gradually rather than jumping from 15°C to 22°C in an hour, which causes dramatic expansion. Underfloor heating creates especially strong thermal movement in walls, so set it to maintain steady temperatures rather than cycling on and off throughout the day. Window air conditioners that blast cold air directly at walls cause localized contraction that can crack plaster weakened by previous repairs. Space heaters placed against walls create similar problems from concentrated heat.
Inspect repaired areas visually every three months for the first year after repair, looking for any fine lines or separation at the edges of the repair. Check corners of windows and doors where stress concentrates, and examine ceiling-wall junctions where settling cracks often begin. Run your hand along previously repaired areas to feel for any texture changes that indicate the filler is pulling away from the plaster. Address small cracks as soon as you spot them, while they’re still hairline width and quick to repair, rather than waiting until they widen and need reinforcement with mesh tape.
Plaster Wall Crack Repair Cost and Time Estimates
Cost and time vary significantly based on crack severity, with simple hairline repairs taking an hour and costing almost nothing while structural crack repairs need professional intervention and cost hundreds of dollars. Knowing what to expect helps you plan the project and decide whether DIY repair makes sense for your situation.
| Crack Type | Materials Cost | Time Required | Skill Level |
|---|---|---|---|
| Hairline cracks | $15 to $25 for flexible filler, fine surface filler, primer, and sandpaper | 1 hour active work plus 8 to 10 hours total drying time | Beginner-friendly with basic putty knife skills |
| Small non-structural cracks | $20 to $35 including fillers, primer, paint, and basic tools | 2 hours active work plus 10 to 12 hours drying time | Beginner-friendly with attention to surface preparation |
| Wide or deep cracks | $35 to $60 for water putty, mesh tape, multiple filler types, and finishing materials | 4 to 5 hours active work spread over 2 to 3 days with 18 to 24 hours total drying between coats | Intermediate requiring patience with multiple thin coats and reinforcement techniques |
| Structural cracks | $500 to $2000+ for professional structural assessment and repair | Several days to weeks depending on structural work needed before surface repair | Professional only, requires structural engineer evaluation and contractor repair |
Hairline and small non-structural crack repairs suit beginners who can work slowly and follow instructions carefully. The techniques involve straightforward steps without complicated tools or precision cuts. Wide and deep cracks need intermediate skill because getting multiple thin coats to bond properly and working with mesh tape reinforcement demands more patience and attention to material behavior. You need to recognize when a coat has dried properly versus just surface-dried, which comes with a bit of experience.
Drying time affects project duration more than active work time. A simple hairline crack takes only one hour of hands-on work, but you spread that hour across a full day because you wait 4 to 6 hours after applying flexible filler before sanding, then another 2 to 3 hours after fine surface filler before priming, then 1 to 2 hours before painting. Wide cracks requiring multiple base coats extend over two to three days because each layer needs 6 to 8 hours to dry completely before you add the next one.
Differences Between Plaster and Drywall Crack Repair

Plaster walls consist of wet plaster layers applied by hand over wooden laths or metal mesh that create a rigid, hard surface when fully cured. The plaster bonds directly to the lath structure, forming a solid, monolithic wall rather than separate panels joined together. This makes plaster less forgiving than drywall because the entire wall surface acts as one piece, so stress anywhere in the structure can create cracks far from the source of movement.
Plaster cracks show varied, irregular patterns that follow the stress lines through the material. Hairline cracks wander across the surface in seemingly random directions. Crazing networks look like spiderwebs of fine interconnected cracks. Larger structural cracks follow diagonal paths from corners of openings or create stair-step patterns that move across the wall surface in jagged lines. These irregular patterns contrast sharply with drywall damage, which typically creates straight cracks along the seams where separate sheets meet, caused by joint tape failure, building movement, settling, or improper installation techniques during construction.
Plaster crack repair needs mesh tape reinforcement and plaster compound or flexible filler specifically formulated to bond with existing plaster and remain slightly flexible after curing. The repair must match the hardness and texture of the surrounding plaster while accommodating the fact that plaster walls move as one solid piece. Drywall repair uses paper or fiberglass tape over joints, then multiple coats of joint compound sanded progressively smoother until the seam disappears. The techniques look similar but the materials behave differently, which is why using drywall joint compound on plaster cracks often fails. Joint compound stays softer than cured plaster and doesn’t bond as strongly to plaster surfaces as purpose-made plaster repair materials do.
Final Words
Knowing how to repair cracks in plaster walls comes down to matching the right technique to your crack type.
Widen the crack, use flexible filler, apply mesh tape when needed, and finish with fine surface filler.
Skip the shortcuts. They cost more time later when the crack comes back.
Most hairline and non-structural cracks are safe DIY projects. Stair-step patterns, wide diagonal cracks, or recurring damage in the same spot means it’s time to call a pro.
Your walls will look smooth again, and the repair will hold up.
FAQ
What is the best way to fix cracks in plaster walls?
The best way to fix cracks in plaster walls is to widen the crack with a utility knife to create a V-shaped groove, clean out loose debris, apply flexible filler that moves with the wall, then finish with fine surface filler for a smooth, seamless repair.
Can I just paint over hairline cracks in plaster?
You should not just paint over hairline cracks in plaster because they will show through the paint and likely return. Even hairline cracks need proper cleaning, filling with flexible filler, and priming before painting to achieve a lasting repair.
What is the best material to patch plaster walls?
The best material to patch plaster walls is flexible filler for the base layer, followed by fine surface filler for the finish coat. Flexible filler moves with wall temperature changes and building movement without fracturing, while fine surface filler creates a smooth, paint-ready finish.
How do you repair hairline cracks in plaster walls?
To repair hairline cracks in plaster walls, widen the crack slightly with a utility knife to create better adhesion space, vacuum out debris, apply flexible filler with a putty knife, sand smooth after drying, apply fine surface filler, prime, and paint.
When should I call a professional for plaster wall cracks?
You should call a professional for plaster wall cracks when you see diagonal or stair-step patterns around windows and doors, cracks wider than 6mm, horizontal cracks in load-bearing walls, recurring cracks in the same location, or cracks accompanied by door and window misalignment.
How long does plaster crack filler take to dry?
Plaster crack filler typically takes several hours to dry between coats, with fine surface filler requiring complete drying before painting. Deep cracks need extended drying time between layers, and the total repair process may span one to two days depending on crack depth.
What causes cracks in old plaster walls?
Cracks in old plaster walls are caused by age-related brittleness, temperature and humidity fluctuations that cause expansion and contraction, building settlement and structural movement, and deterioration of the original plaster material over time.
Do I need mesh tape for plaster wall crack repair?
You need mesh tape for plaster wall crack repair when fixing wide cracks over 3mm or deep cracks that extend beyond the surface layer. The mesh tape reinforces the repair and prevents the crack from reopening after the filler dries.
What is the difference between fixing plaster and drywall cracks?
The difference between fixing plaster and drywall cracks is that plaster requires flexible filler and mesh tape reinforcement due to its rigid composition over lath, while drywall uses joint compound and paper tape along seams where panels meet.
Why do plaster wall cracks keep coming back?
Plaster wall cracks keep coming back when you fill them without widening the crack first, use non-flexible all-purpose filler instead of flexible filler, fail to address underlying moisture or structural issues, or paint before the filler completely dries.
How much does it cost to repair plaster wall cracks yourself?
Repairing plaster wall cracks yourself costs between $15 and $50 in materials for basic hairline and small crack repairs. Wide or deep cracks requiring mesh tape and multiple filler types may cost $40 to $80 in materials, plus your time.
Should I use plaster of Paris or joint compound for wall cracks?
You should use plaster of Paris for deep cracks in plaster walls because it provides better adhesion to the existing plaster material. Joint compound works for hairline surface cracks, but flexible filler prevents crack recurrence better than either option in movement-prone areas.