


Ever notice your window frames look fine but your heating bill keeps climbing? That cold draft sneaking past your closed window isn’t coming through the glass. It’s slipping through the gaps around the frame. The good news is you can fix most window gaps yourself in an afternoon with basic tools and materials from the hardware store. This guide walks you through diagnosing your gap size, choosing the right repair method, and stopping those drafts for good.
Quick Diagnosis Guide: Identifying Window Gap Severity

Hold a lit match or incense stick near your window frames and watch the smoke. If it gets pulled toward the window instead of rising straight up, you’ve got an air leak.
Now look at the gap size to figure out what you’re dealing with.
Hairline cracks (less than 1/8 inch) – Head to the caulking section. Standard exterior caulk or silicone sealant will handle this.
Small gaps (1/8 to 1/4 inch) – You can use either caulking or weatherstripping. Pick caulk for stationary joints, weatherstripping for moving parts.
Medium gaps (1/4 inch to 3/4 inch) – You’ll need weatherstripping or foam backer rod covered with caulk.
Large gaps (3/4 inch to 2cm, which is about 0.8 inches) – Use foam backer rod pushed into the gap, then seal over it with caulk.
Oversized gaps (larger than 2cm) – This calls for low expansion spray foam insulation.
Location matters – Interior gaps can use paintable acrylic latex caulk, while exterior gaps need silicone sealant or exterior grade products that stand up to weather.
Before you start any repair, gather your tools and materials.
Essential Tools and Materials for Window Gap Repairs
Getting your supplies ready now means you won’t stop halfway through because you’re missing something. That leads to rushed work and gaps that fail within months.
Here’s what you’ll need:
- Caulk gun – Gives you control over bead size and keeps steady pressure
- Putty knife – Removes old caulk and scrapes loose paint
- Utility knife – Cuts cartridge nozzles and trims foam
- Scraper tool – Gets into tight corners and under hardened caulk
- Caulk smoother or spoon – Creates a clean, professional looking bead
- Painter’s tape – Keeps edges clean and makes cleanup easier
- Cleaning cloths – Wipes away excess product before it dries
- Inspection flashlight – Shows you gaps you’d miss in regular light
Your material choice depends on where the gap is and what it’s exposed to. Exterior gaps face rain, sun, and temperature swings. Interior gaps need to look clean and accept paint. Some products handle moisture better. Others stay flexible longer.
| Material Type | Best For | Coverage |
|---|---|---|
| Exterior caulk (silicone sealant) | Outside window frames, high moisture areas, surfaces that won’t be painted | 10 to 20 linear feet per tube depending on gap width |
| Acrylic latex caulk (paintable caulk) | Interior window gaps, any surface requiring paint, vinyl windows | 15 to 25 linear feet per tube depending on gap width |
| Weatherstripping products | Moving window parts (sashes, jambs), operable windows | Varies by product, typically sold in 17 foot rolls |
| Foam backer rod | Gaps 3/8 inch to 2cm, provides backing for caulk in deep gaps | Sold in 20 foot lengths, diameter determines gap fill |
| Spray foam insulation (low expansion) | Oversized gaps larger than 2cm, areas needing thermal barrier | 12 to 20 linear feet per can depending on gap depth |
You’ll also want safety glasses if you’re using spray foam or scraping old paint. Work gloves protect your hands from sharp edges. Keep a drop cloth under your work area. If you’re removing old painted caulk, have paint stripper and a wire brush ready.
Step by Step Caulking Process for Window Frame Gaps
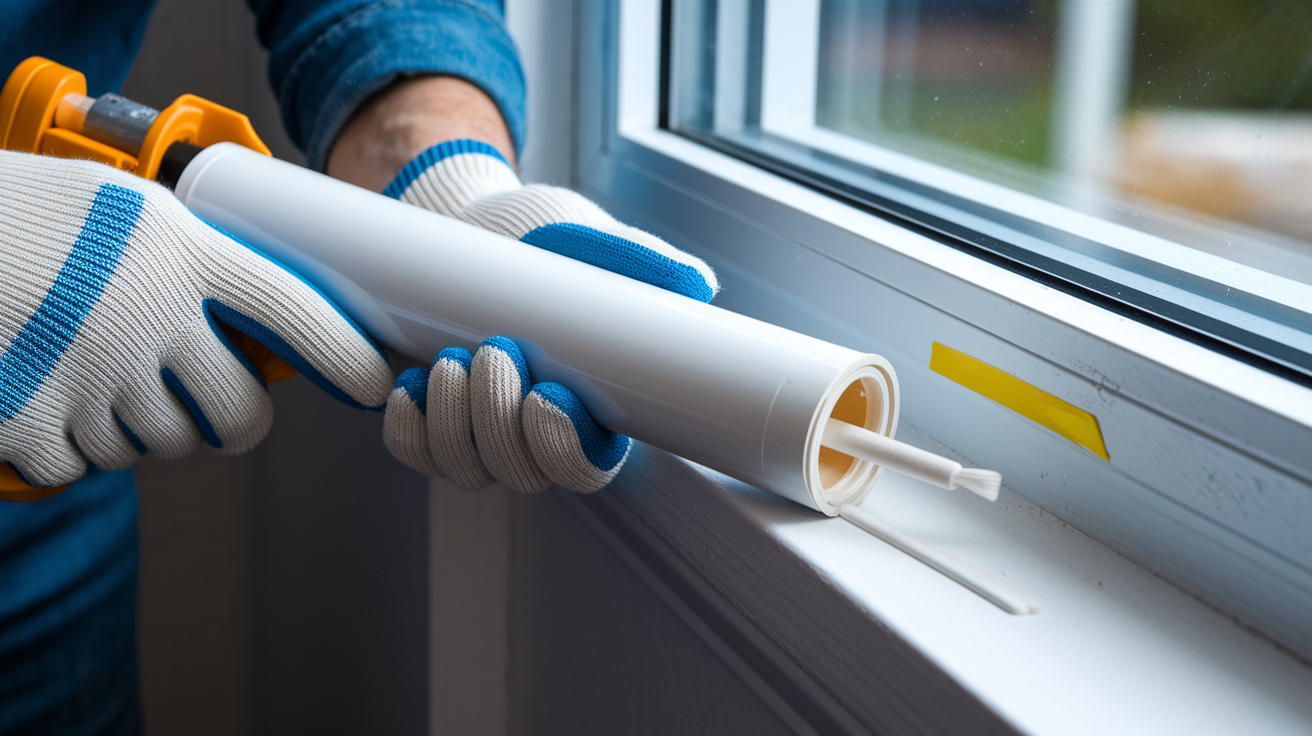
Caulking works for gaps up to 1/4 inch and costs less than other options. It’s the go to fix for most window frame joints.
Follow these steps:
-
Remove old caulk with a putty knife or scraper tool. Get all of it out. Old caulk prevents new material from sticking to the surface.
-
Clean the surface thoroughly, removing dirt, debris, and moisture. Wipe down with a dry cloth. Check corners where dust collects.
-
Allow the surface to dry completely. If you sealed it right after rain or in humid conditions, wait an extra day.
-
Apply painter’s tape along both edges of the gap for clean lines. Place it about 1/8 inch from the joint edge.
-
Cut the cartridge nozzle at a 45 degree angle, matching the gap width. Start with a small opening. You can always cut more off.
-
Load the cartridge into your caulk gun. Puncture the inner seal with a long nail or the built in puncture tool.
-
Apply in one smooth, continuous motion with steady pressure. Keep the gun moving. Don’t stop mid bead.
-
Smooth the bead immediately with a caulk smoother or your finger dipped in water and detergent solution (50/50 mixture). One pass is better than multiple touch ups.
-
Remove painter’s tape before caulk skins over and clean excess with a damp cloth. Wait too long and you’ll pull up the edge of your bead.
Temperature matters when you apply caulk. Work in conditions between 40°F and 90°F. Below that, caulk won’t flow smoothly or bond properly. Above that, it skins over too fast to smooth.
Acrylic latex caulk needs at least 30 minutes before you can paint it, but full curing takes 24 hours. Silicone sealant takes longer, usually 24 hours before it’s waterproof, with full cure in several days. Don’t test it by running water over it too soon.
Apply caulk on both interior and exterior window frames for the best draft protection. Exterior caulk stops water and air from getting into the wall cavity. Interior caulk creates a second barrier and gives you a clean, finished look.
Weatherstripping Solutions for Window Gaps
Weatherstripping seals moving parts. The spots where your window sash slides against the jamb or where it meets the sill when closed. Caulk would glue these parts shut. Weatherstripping compresses when the window closes, then springs back when you open it.
| Type | Longevity | Installation Difficulty | Cost Range |
|---|---|---|---|
| Bronze weather stripping | Decades | Difficult | High |
| Self stick foam | 2 years | Easy | Low |
| Adhesive backed EPDM rubber | 10+ years | Moderate | Moderate |
| Pulley seals | 5 to 8 years | Easy to moderate | Low to moderate |
Bronze weather stripping lasts the longest but requires precision installation. You nail thin bronze strips into the window channel, then bend them slightly to create pressure against the sash. Get the angle wrong and your window binds or the seal fails.
Adhesive backed EPDM rubber offers the best balance for most homeowners. It lasts 10 years or more, costs a reasonable amount, and goes in without special tools. Self stick foam is the easiest option but breaks down quickly. Plan to replace it every couple of years.
To install weatherstripping, measure each gap dimension carefully. Cut pieces slightly longer than needed. You can trim to exact fit. Clean surfaces with rubbing alcohol to remove oils and dust that prevent adhesive from bonding. Press firmly along the entire length, especially at corners and ends. The weatherstripping should compress about 25% to 50% when the window closes. Too much compression and the window won’t close. Too little and air slips through.
Pulley seals are specialty products designed to block air that sneaks in around old window cord channels. If you have traditional double hung windows with pulleys and weights, you’ll feel cold air coming from those openings.
Check weatherstripping at the start of each heating season. If you see visible gaps when the window is closed, or if you can feel drafts with your hand, it’s time to replace it. Compressed foam that stays flat instead of springing back has failed. Rubber that’s cracked or peeling won’t seal anymore.
Foam Solutions for Larger Window Frame Gaps
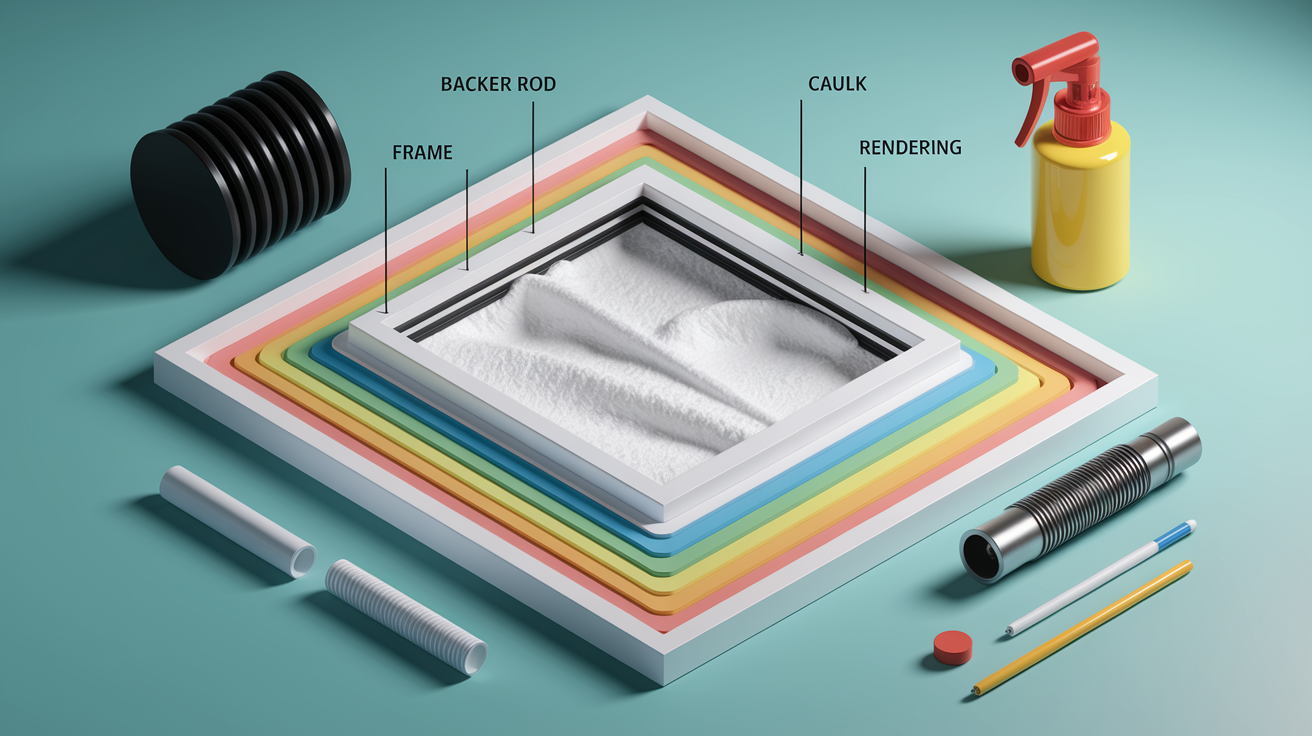
When gaps measure 3/8 inch or wider, caulk alone won’t work. You need something to fill the depth first.
Foam backer rod handles gaps from 3/8 inch up to about 2cm (that’s roughly 3/4 inch). Pick a diameter that’s 25% to 50% larger than your gap width. When you push it in, it should compress and stay in place on its own. Use a putty knife or flathead screwdriver to work it into the gap, pressing it down so it sits about 1/4 inch below the surface. That creates a recess for your caulk. Without that backing, caulk sags into deep gaps and never seals properly. The backer rod gives the caulk something to bridge across and stick to on both sides.
Once the backer rod is in place, run a bead of exterior caulk or silicone sealant over the top. Smooth it with your finger or a caulk tool. This gives you a complete weather seal that blocks air and water. The rod stays somewhat flexible, so your caulk can move with it as the window frame expands and contracts with temperature changes.
For gaps larger than 2cm, use low expansion spray foam insulation. This is important. Regular expanding foam can push with enough force to bow your window frame, and then the window won’t open or close right. Low expansion foam grows about 30% to 40% instead of tripling in size.
Fill the gap only 50% to 60% of its depth. The foam expands as it cures. If you fill it completely, you’ll end up with foam pushing out everywhere. Hold the can upside down and work from the bottom of the gap upward, moving slowly. One pass is usually enough. Let it cure for at least 8 hours. Most products need 24 hours to fully harden.
Once cured, trim excess foam flush with the window frame using a utility knife. Make several light passes instead of trying to cut through in one stroke. The foam cuts cleanly when you use a sharp blade. After trimming, seal the foam with caulk. Spray foam breaks down under UV light from the sun. A layer of caulk protects it and gives you a finished surface you can paint if needed.
Common mistakes with foam: using high expansion foam that warps frames, overfilling and then trying to clean up the mess, and painting uncured foam. The solvents in paint can dissolve foam that hasn’t fully hardened. Wait at least 24 hours, preferably 48.
Window Sill and Exterior Trim Gap Repairs
Window sills and exterior trim take more abuse than other parts of the window. Rain runs down the glass and pools on the sill. Sun beats on the trim all day. Snow piles up against it in winter.
That’s why gaps show up here first.
Start by checking for wood rot. Take a flathead screwdriver and press it into the wood along the sill and trim joints. Solid wood resists. Rotted wood feels soft or crumbles. Look for discoloration, dark stains or gray patches. Check where paint has failed and peeled away. Water gets in through those spots and sits against bare wood.
If the screwdriver sinks in more than 1/4 inch or you find extensive soft spots, you’re past simple gap filling. That trim section needs replacement. Surface gaps you can fix. Structural rot you can’t.
For minor trim gaps with solid wood underneath:
-
Remove loose or rotted material. Dig out anything that’s soft. Get down to solid wood.
-
Treat exposed wood with fungicide. This kills mold spores and prevents rot from spreading.
-
Fill voids with exterior grade wood filler or epoxy. Epoxy works better for larger voids and stands up to moisture longer than standard wood filler.
-
Sand smooth after curing. Work through 80 grit, then 120 grit sandpaper. The filler should be level with the surrounding wood.
-
Prime, paint, then seal all joints with exterior caulk. Prime first, then paint, then caulk. If you caulk before priming, you’ll see the caulk line through the paint.
Different window materials need different approaches. Wood windows require a rot inspection before you seal anything. Once sealed, moisture trapped inside accelerates rot. Use exterior silicone if you’re not painting. Use paintable latex caulk if you want the trim and caulk to match. Vinyl windows expand and contract significantly with temperature changes, sometimes as much as 1/4 inch on long sections. They need a flexible sealant like paintable latex caulk that can stretch. Silicone works too, but you can’t paint it if your vinyl is a custom color. Aluminum windows conduct temperature so efficiently that they sweat with condensation when warm indoor air hits cold frames. Complete air sealing around aluminum frames is especially important. Use neutral cure silicone. Acid cure silicone can corrode aluminum over time.
If you find damaged frames, extensive wood rot, or large gaps in window frames (gaps over an inch wide or gaps that appeared suddenly), those indicate structural problems. The window may be pulling away from the wall. The wall framing may have shifted. The foundation may be settling. A professional needs to assess what’s happening before you seal anything. Otherwise, you’re hiding a problem that will get worse. For situations involving water damage or moisture infiltration that extends beyond the window area, consider having Water Damage Repair Services evaluate the extent of the problem.
Temporary Window Gap Fixes for Immediate Relief

Sometimes you need a draft stopped right now. Maybe it’s a rental property and you’re not allowed to make permanent changes. Maybe it’s January and you can’t afford window replacement until spring. Maybe you just found a gap during a cold snap and need time to plan a proper repair.
Temporary fixes work for these situations.
Rope caulk – This comes in 1/8 inch strips that you press into gaps by hand. It’s available in gray and brown shades that blend into most window frames. Rope caulk prevents cold leaks, dust, dirt, and insects from coming through. It doesn’t harden like regular caulk. You pull it out when you’re done with it. It leaves no residue. If you store it properly (wrap it back up in the package and keep it dry), rope caulk stays usable for 4 to 5 years. You can reuse the same strip season after season.
Removable caulk – This goes on with a standard caulk gun just like permanent caulk, but it dries clear and rubbery instead of hard. One tube covers up to 56 feet. It works on gaps up to 1/4 inch wide. When warm weather returns, you grab an edge and peel it off. It comes away in strips without tools or solvents. Use this when you want the finished look of a caulk line but don’t want it to be permanent.
Foam backer rods – These non-sticky polyethylene rods come in diameters starting at 3/8 inch. You push them into the gap where they’re practically invisible. They’re reusable as long as you don’t compress them too much. Pull them out, and they go right back in another gap or back in the same spot next season. They work well for larger gaps where rope caulk won’t fill enough space.
Installation is straightforward. For rope caulk, unroll the length you need, press it into the gap with your thumb, and keep working along the joint. For removable caulk, follow the same steps as standard caulking. Cut the nozzle, apply in a smooth bead, and smooth immediately. For foam backer rods, just push them in with your fingers or a putty knife.
These products reduce drafts and energy loss immediately. You’ll feel the difference the same day you install them. They also work for draft proofing bathrooms and entryways.
That said, temporary solutions are exactly that. They’re stopgaps. When you’re ready, transition to permanent caulking or weatherstripping for performance that lasts. Permanent products last years and give better protection against water infiltration.
Energy Savings and Maintenance Through Proper Window Sealing
The average home loses up to 30% of its heating and cooling energy through air leaks around windows and doors. That’s hundreds of dollars a year going out through gaps you can fix in about a day of work.
Sealed windows create a thermal barrier that reduces how often your heating and cooling systems run. When cold air stops leaking in during winter, your furnace doesn’t cycle on as often. When cool air stops escaping during summer, your air conditioner works less. The temperature near your windows stabilizes. Those cold spots that made you avoid certain rooms in winter disappear.
You get other benefits too. Condensation problems decrease when cold air infiltration stops. That indoor air meets the cold window glass and forms water. Seal the leaks and you reduce the moisture differential. Indoor air quality improves because sealed windows block dust infiltration. Allergen control gets better. Moisture related mold growth risk drops when you eliminate the damp conditions that gaps create.
Keep your window seals working with regular checks.
Check all caulk lines for cracking, peeling, or gaps twice yearly. Once in spring, once in fall. Look closely at corners and where different materials meet.
Test weatherstripping compression and adhesion before heating season. Close the window on a dollar bill. If you can pull it out easily, the seal isn’t tight enough.
Inspect sills and exterior trim for water staining or paint failure after heavy rain periods. Water marks show where seals have failed.
Perform a flame or incense test annually to identify new air leaks. Windows settle and materials move. New gaps appear over time.
Examine window operation for binding or difficulty that suggests frame movement. A window that used to open smoothly but now sticks might mean the frame shifted and created new gaps.
Product lifespan varies significantly. Budget caulks and foam weatherstripping last 2 to 3 years before they need replacement. Quality acrylic latex and silicone caulks last 5 to 8 years if applied correctly. Adhesive backed EPDM rubber lasts 10 or more years. Bronze weatherstripping can last decades if maintained properly.
Why don’t seals last forever? Expansion and contraction from temperature fluctuations gradually stress all sealing materials. A window frame heats up in summer sun and expands. It contracts in winter cold. This movement happens every single day, year after year. Eventually, every seal develops small cracks. Proactive inspection catches those cracks before complete seal failure, when you’re back to feeling drafts and losing energy.
Common Window Gap Repair Mistakes to Avoid

Proper technique determines whether your repairs last five years or fail in five months.
Common mistakes that cause early failure:
Applying caulk over old deteriorated caulk without removal. New caulk bonds to the old caulk, not to the window. When the old caulk lets go, both layers fail.
Skipping surface preparation and cleaning steps. Caulk can’t stick to dust, dirt, or oily residue. Clean surfaces hold seals. Contaminated ones don’t.
Using interior caulk on exterior applications. Interior products can’t handle UV exposure, temperature extremes, or moisture. They crack and peel within months outside.
Applying in temperatures below 40°F or above 90°F. Cold caulk doesn’t flow right or bond properly. Hot conditions cause it to skin over before you can smooth it.
Painting before minimum drying time (30+ minutes) or full curing. The surface may feel dry, but the product needs time to develop full adhesion and flexibility.
Overfilling gaps, which causes excess material and poor adhesion. Thick beads sag, trap air bubbles, and take forever to cure all the way through.
Choosing the wrong product for gap size. Standard caulk for oversized gaps, or foam for hairline cracks. Each product has a size range where it works. Outside that range, it fails.
If your repairs fail early, here’s what went wrong. Cracking caulk within the first year indicates improper surface prep or the wrong product for the conditions. Silicone on a surface that flexes a lot. Acrylic latex where silicone was needed. Peeling sealant suggests contaminated surfaces or incompatible materials. Maybe you applied new silicone over old acrylic latex. Maybe there was soap residue on the surface. Discoloration or mold growth shows moisture trapped behind the seal. The gap filled, but water still gets into the wall cavity from somewhere else. A failed seal above the spot you fixed, or a crack in the trim you didn’t notice.
Thorough prep work and product selection matching both gap dimensions and exposure conditions prevent most failures. Spend time on surface prep. Pick the right product. Follow the temperature guidelines printed on the package. Let it cure completely before testing it or painting over it.
When to Hire a Professional for Window Gap Problems
Most gap sealing is straightforward DIY work. You can handle it in a day. But certain conditions need professional assessment.
Call for professional help when you see:
-
Gaps wider than 2 inches, suggesting structural issues or settling foundation. Window frames don’t develop huge gaps on their own. Something moved.
-
Extensive wood rot or damaged frame requiring partial window replacement. Once rot goes deep into the framing, epoxy filler won’t fix it. The damaged section needs rebuilding.
-
Water infiltration causing interior wall damage beyond the window area. Drywall stains, peeling paint on the wall a foot away from the window, or soft drywall all indicate water getting past the window frame into the wall cavity.
-
Windows that won’t open, close, or lock properly after the gap appears. Binding windows or failed locks mean the frame moved enough to throw off alignment.
-
Visible frame separation from wall structure. You should not see daylight between the window frame and your wall. If you do, the entire window installation is compromised.
-
Multiple windows developing gaps simultaneously, indicating whole house settlement. One window, maybe it’s just age. Multiple windows at once means something shifted underneath your house.
Professionals offer solutions that go beyond gap filling. They assess structural issues. They rebuild window frames when needed. They install proper flashing that routes water away from vulnerable areas. They replace windows when frames are deteriorated beyond repair, and window replacement is the only true solution when windows are past their prime.
Different window operation styles create specific problems. Double hung windows with persistent gaps along the sash channels may have worn balance systems. The sashes don’t stay where you put them. They slide down or won’t stay open. That’s a hardware replacement job, not a gap filling project. Casement windows with gaps on the hinge side may indicate hardware failure or frame warping beyond what you can fix yourself. The whole window cranks out, or the latch doesn’t engage anymore.
Professional assessment costs are worthwhile when gap problems indicate deeper issues. You prevent small problems from becoming major structural repairs. A window that’s pulling away from the wall can let water run behind your siding. That leads to sheathing rot and interior wall damage. Fix it while it’s just a window problem.
For comprehensive evaluation of gap issues related to structural movement, water damage, or deteriorated framing, RestoreSafeHome House Repair Services can assess whether simple gap sealing will solve the problem or if more extensive repairs are needed.
Final Words
Gaps around windows create drafts, waste energy, and let moisture into your home. But most gap problems respond well to straightforward fixes when you match the right method to the gap size.
Learning how to fix gaps around windows starts with measuring the gap width and understanding whether you need caulk, weatherstripping, backer rod, or spray foam. Take time to clean surfaces thoroughly and choose products rated for your specific application.
Small repairs done right can save hundreds of dollars in energy costs and prevent water damage from taking hold. And you’ll notice the difference the first cold night after you finish.
FAQ
How do you fill gaps around windows?
Gaps around windows are filled by first measuring the gap width, then selecting the appropriate product: caulk for gaps under 1/4 inch, foam backer rod plus caulk for gaps between 3/8 inch and 2cm, and low expansion spray foam for gaps larger than 2cm.
How do you seal gaps around windows?
Gaps around windows are sealed by removing old caulk, cleaning the surface thoroughly, allowing it to dry completely, then applying exterior caulk or silicone sealant in one smooth continuous motion using a caulk gun with the nozzle cut at a 45-degree angle.
Can you use great stuff gaps and cracks around windows?
Great Stuff or similar expanding foam can be used around windows only if it’s a low expansion formula for gaps larger than 2cm, filled only 50-60% as foam expands, then trimmed flush and caulked over for UV protection and finished appearance.
Where should you not caulk around windows?
You should not caulk the bottom edge of exterior window sills or the weep holes built into vinyl window frames, as these areas need to drain moisture that gets behind the window rather than trapping water inside.
What size gap is too large for caulk alone?
Gaps larger than 1/4 inch are too large for caulk alone and require foam backer rod pushed into the gap first, then caulk applied over the top, while gaps over 2cm need low expansion spray foam instead.
How long does window caulk last before needing replacement?
Window caulk typically lasts 2-3 years for budget products, 5-8 years for quality acrylic latex or silicone caulk, and requires replacement when you notice cracking, peeling, or gaps developing from expansion and contraction caused by temperature fluctuations.
What’s the difference between interior and exterior window caulk?
Exterior window caulk is formulated with silicone or exterior-grade latex to withstand temperature extremes, UV exposure, and moisture, while interior caulk is typically paintable acrylic latex designed for stable indoor conditions without weather resistance requirements.
How do I know if a window gap needs professional repair?
A window gap needs professional repair when it’s wider than 2 inches, shows extensive wood rot or damaged frame, causes interior wall water damage, accompanies windows that won’t operate properly, or appears with visible frame separation from wall structure.