


Ever notice how squeaky floors always get worse at the worst times? That’s because temporary fixes like powder or wax just mask the friction while the real problem keeps getting worse underneath. Squeaks happen when floorboards pull away from the subfloor, fasteners work loose, or gaps open at the joists. The good news: permanent repairs are straightforward once you know where the movement is happening and whether you can work from above or below. This guide walks you through the diagnosis, the three methods that actually last, and what each repair costs in time and materials.
Permanent Repair Methods: Top Solutions That Stop Floor Squeaks
Three methods actually fix squeaky floors for good. Which one you need depends on where you can access the problem and how bad it’s gotten. Screw reinforcement from above works when you’re stuck working from the top. Shims and adhesive from below give you the longest lasting fix. Joist reinforcement tackles the structural movement that’s causing squeaks across a wider area.
Screw Reinforcement From Above
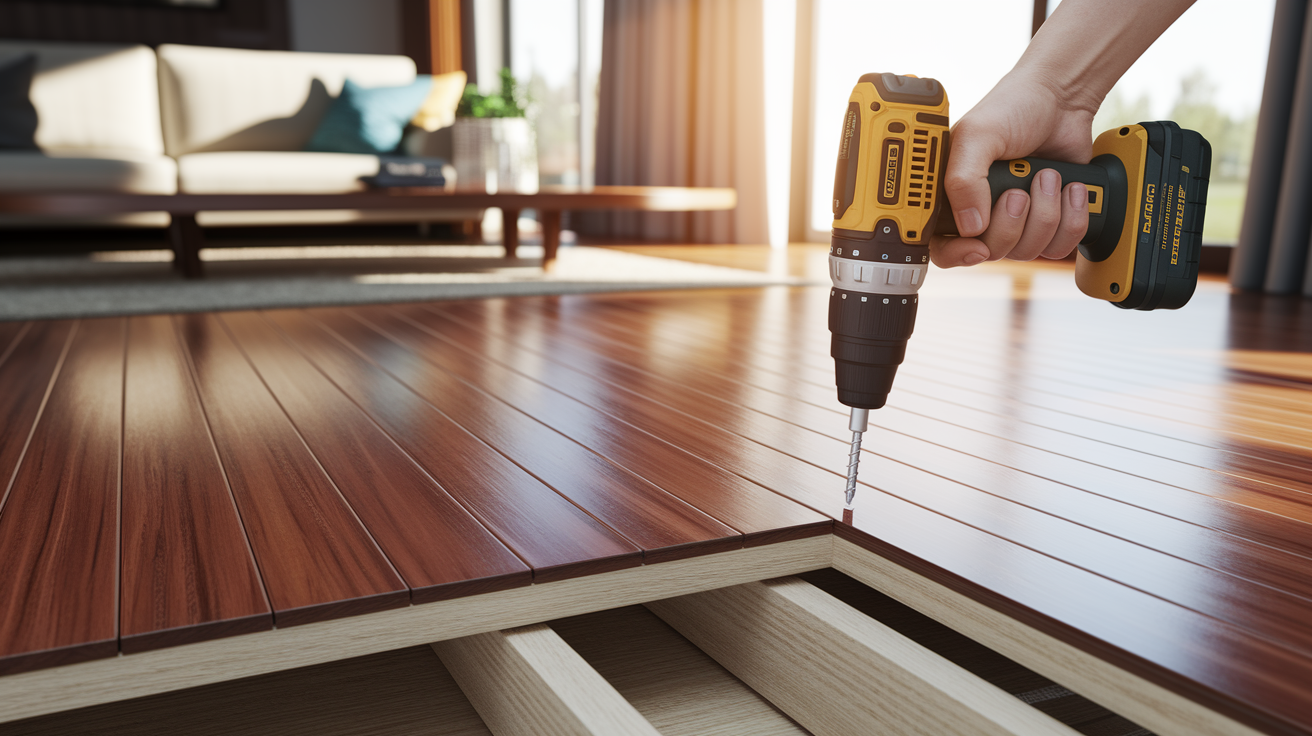
You’re drilling pilot holes and driving 1.25 to 2 inch wood screws at an angle through the floorboards into the subfloor and joists. Then fill the holes with wood filler that matches your floor. Works for hardwood, engineered wood, and exposed subfloor. It’s the easiest approach if you’ve got a drill, screws, and filler. That angled path gives you better holding power and keeps the wood from splitting.
Shim and Adhesive Application From Below
Get carpenter’s glue or construction adhesive on thin wood shims, tap them into the gaps between subfloor and joists, then lock everything down with angled screws. You need basement or crawl space access for this. It’s the most durable fix because you’re not touching the finished floor. The glue plus the screws create a bond that eliminates movement permanently.
Joist Reinforcement and Bridging
Install cross bracing between joists or attach sister joists next to damaged ones using construction adhesive and bolts. This handles structural movement, widespread squeaking, or bouncy floors that tell you the support isn’t adequate. Reinforcement spreads weight more evenly and stops the side to side movement that creates persistent squeaks across big sections.
Squeaky floors happen when friction builds up between floorboards and subfloor, fasteners work loose or weren’t installed right, gaps open between the subfloor and joists, wood swells and shrinks with humidity changes, or the house settles. These are structural problems. They need mechanical fixes that address what’s actually moving.
Temporary fixes like talcum powder or graphite just hide the symptoms by cutting friction at the surface. They don’t stabilize loose boards, close gaps, or secure parts that have separated. The squeak comes back in weeks or months because the movement underneath keeps happening.
Diagnosing Your Squeaky Floor Before Starting Repairs
You need accurate diagnosis to pick a repair that’ll actually work. Wrong approach wastes your time and money while the squeak stays put.
The walking test needs a helper below the floor in a basement or crawl space. Walk slowly across the squeaky spot while your helper watches for movement between subfloor and joists. This shows you whether the problem is surface friction, loose floorboards, or gaps at the joist.
Figure out if you’re working from above or below before you buy anything. Basement or crawl space access lets you do shim repairs without damaging finished floors. When you can only work from above, plan for visible screw holes that need filling and finishing.
-
Walk slowly across the whole floor while a helper watches movement from below, noting exactly where the subfloor shifts or pulls away from joists.
-
Mark squeaky spots on the floor with painter’s tape or chalk, creating a map of problem areas before you start.
-
Check your access points. Do you have basement access, crawl space entry, or are you stuck working from above through the finished floor?
-
Use a stud finder to locate floor joists under the squeaky areas. Mark joist locations with tape since repairs need to connect to these structural parts.
-
Test if the squeak happens when you put weight on the board or when you step off. That tells you whether the board’s rubbing during compression or expansion.
Complete Guide to Tools, Materials, Costs, and Time Requirements
What you need changes based on whether you’re working from above or below and whether you’re fixing surface boards, subfloor, or joists. Get everything ready before starting so you don’t have delays.
Most DIY repairs run $20 to $75 for materials. Professional repairs typically cost $150 to $500 depending on how much area you’re covering and how complicated it gets.
| Tool/Material | Purpose | Approximate Cost |
|---|---|---|
| Cordless drill with bit set | Drilling pilot holes and driving screws through floorboards into subfloor | $40-120 (if needed) |
| Wood screws (1.25-2 inches) | Securing floorboards to subfloor and joists with stronger holding power than nails | $8-15 per box |
| Carpenter’s glue | Bonding wood shims to subfloor and joists for gap filling repairs | $5-12 per bottle |
| Wood shims (tapered) | Filling gaps between joists and subfloor when working from below | $6-10 per bundle |
| Stud finder | Locating floor joists beneath finished flooring for proper screw placement | $15-35 |
| Hammer and nail set | Setting finish nails below surface and tapping shims into position | $12-25 |
| Wood filler (matching stain) | Filling screw and nail holes in finished hardwood floors | $6-12 per container |
| Construction adhesive | Creating permanent bonds between subfloor layers and structural members | $4-8 per tube |
| Repair Method | DIY Material Cost | Professional Cost | Time Required |
|---|---|---|---|
| Screw reinforcement from above | $20-40 | $150-300 | 1-2 hours |
| Shim and adhesive from below | $25-50 | $200-400 | 2-4 hours |
| Specialty screw kits (Counter-Snap, Squeeeeek-No-More) | $35-75 | $175-350 | 1-3 hours |
| Joist reinforcement with bridging | $50-120 | $300-600 | 4-8 hours |
| Complete subfloor replacement | $200-500+ | $800-2,500+ | 2-4 days |
| Moisture remediation with floor repair | N/A (requires professional) | $500-3,000+ | 3-7 days |
Several things affect repair costs beyond basic materials. How much area you’re covering directly impacts material amounts and labor time. Floor type determines if you need specialty bits, matching wood filler, or specific fastener lengths. Whether you can access from below affects if repairs can be made without going through finished floors. How bad the structural issues are determines if simple shimming works or you need joist reinforcement.
Spending money on permanent repairs now prevents bigger costs from damage that keeps getting worse. A $40 screw and shim repair today avoids a $2,000 subfloor replacement later. Having all tools and materials ready before you start prevents delays and keeps you from using inadequate substitutes that compromise the fix. For situations where water damage might have weakened the subfloor, consider checking for related problems. Learn more about addressing moisture issues at Water Damage Repair. And if floor repairs expose damaged walls, you might need Drywall Repair to finish the job properly.
Fixing Squeaky Hardwood Floors From Above With Screws
This is the easiest method if you’ve got hardwood floors and no basement access. You’re working from the finished floor surface without needing specialized equipment.
Screws give you more holding power than nails because the threads grab the wood fibers. They fix the root cause by pulling loose floorboards tight against the subfloor and locking them to joists. Nails work loose over time as wood expands and contracts, but screws keep constant pressure.
-
Find the squeak precisely by walking across the floor and mark it with painter’s tape, then use a stud finder to locate the nearest joist.
-
Drill a 3/32 inch pilot hole through the hardwood at a 45 degree angle toward the joist, angling the drill so the screw will go through both subfloor and joist.
-
Drive a 1.25 to 2 inch wood screw through the pilot hole until the head sits slightly below the floor surface, using firm pressure so you don’t strip the screw head.
-
Make sure the screw hits the joist by drilling deep enough that at least half the screw length goes into the joist for maximum holding strength.
-
Fill the hole with wood filler that matches your floor stain, slightly overfilling to account for shrinkage as the filler dries.
-
Sand the filled hole smooth when it’s completely dry, blending it with the surrounding floor so the repair becomes nearly invisible.
Specialized kits like Counter-Snap use breakaway screws that snap below the surface during installation. The screw head breaks off at a scored line, leaving a clean hole that’s easier to fill than a standard countersunk screw. The kit includes a depth control fixture that keeps you from drilling too deep.
Repairing Squeaky Floors From Below Using Shims and Adhesive

Working from below gives you the most durable repairs without damaging finished floors. This works for all flooring types since repairs stay invisible from above.
-
Have a helper walk on the floor above while you watch from the basement or crawl space, noting exactly where the subfloor moves or separates from joists.
-
Put a generous bead of carpenter’s glue or construction adhesive on a thin wood shim, coating the tapered edge that’ll contact both joist and subfloor.
-
Gently tap the shim into the gap between joist and subfloor with a hammer, stopping when you feel resistance. Forcing it too far can actually lift the floor and create new gaps.
-
Have your helper walk on the spot again to confirm the squeak’s gone before you add fasteners.
-
Drive a 1 1/4 inch screw at a 45 degree angle through the subfloor into the joist near the shim location, pulling the subfloor tight against the joist.
-
Wipe away excess glue that squeezes out during installation before it dries and hardens.
-
Wait 24 hours for the adhesive to cure completely before putting full foot traffic loads on it.
The Squeak-Ender system offers specialty hardware with mounting plates that attach to the subfloor underside and threaded rods that connect to brackets on the joist. Tightening the rod pulls the subfloor firmly against the joist and holds it there permanently. This works well for multiple squeaky spots along a single joist run.
This method works for all floor types including carpet since repairs are completely invisible from the living space above. You’re not drilling through finished flooring, filling holes, or trying to match stains. The repair addresses the structural gap without cosmetic concerns.
Structural Floor Joist Repairs for Persistent Squeaks
Widespread squeaking, visible sagging, or floors that feel bouncy when you walk tell you that surface repairs won’t cut it. These symptoms point to joist level problems that need structural reinforcement.
Bridging installation between joists stops the side to side movement that lets joists shift and separate from the subfloor. Solid wood bridging uses dimensional lumber cut to fit snugly between joists at mid span. Metal cross bracing uses premade X shaped brackets that nail to joist sides. Either type spreads weight across multiple joists and stiffens the floor system. Install bridging every 8 feet along joist runs in older homes where it was left out during original construction.
The sister joist technique reinforces damaged or undersized joists by attaching matching dimensional lumber alongside the existing joist. Apply construction adhesive to the contact surfaces, position the new joist tight against the old one, and secure it with 3/8 inch carriage bolts spaced 16 inches apart. The sister joist carries load alongside the weakened member, effectively doubling the support. This works for joists that have cracked, warped, or were originally undersized for the span.
These repairs need professional assessment when building codes govern structural modifications or when you’re uncertain about load calculations. An engineer or licensed contractor can determine if existing joists meet current span tables, calculate proper sister joist sizing, and make sure modifications won’t affect how loads transfer through the structure. Some jurisdictions require permits for structural work even when you’re reinforcing existing members rather than removing them.
Repair Methods by Floor Type: Hardwood, Engineered Wood, Carpet, and Subfloor Materials
How you fix it changes based on flooring material thickness, installation method, and whether you can access fastening points without damaging the surface.
Hardwood Flooring Repairs
Screw reinforcement uses 1.25 to 2 inch screws driven through 3/32 inch pilot holes at 45 degree angles into the subfloor and joists. The angled path increases wood contact and cuts the chance of splitting boards. Drill pilot holes every 6 inches along squeaky board runs.
Matching wood filler to your floor stain matters for invisible repairs. Test filler on scrap wood or in a hidden spot first. Apply filler with a putty knife, slightly overfilling the hole. After it dries completely (usually 2 to 4 hours), sand it flush with 150 grit sandpaper. The repair should blend with the surrounding floor when you’re done.
Counter-Snap kits include breakaway screws that snap below the surface at a scored line. The kit’s depth control fixture keeps you from drilling too deep. After the screw head breaks away, you’ve got a clean hole about 1/8 inch deep that takes minimal filler.
Solid hardwood tolerates multiple refinishing cycles over its lifetime, so screw holes aren’t permanent concerns. If you refinish the floor years later, the sanding process removes filler along with the old finish. New filler applied after sanding and before the new finish makes repairs invisible again.
Engineered Wood Flooring Considerations
Engineered wood has a thin hardwood veneer over plywood layers. The wear layer thickness ranges from 1/16 inch in budget products to 1/4 inch in premium floors. This limits screw length.
Use 1 inch screws maximum to avoid going through the wear layer and creating visible damage on the surface. Pilot holes need more precision because there’s less material between the drill bit and the finished surface. Drill carefully and stop frequently to check depth.
The tongue and groove system in engineered floors develops gaps at board joints as the material expands and contracts. These gaps let boards rub and squeak. Adhesive injection between planks stabilizes joints. Use a syringe style adhesive applicator to inject construction adhesive into the gap between boards, then weigh down the area with heavy objects for 24 hours while it cures.
Proper acclimation during installation prevents future problems. Engineered wood needs to sit in the installation room for 48 to 72 hours before installation so moisture content equalizes with the indoor environment. Boards installed too dry will expand and buckle. Boards installed too wet will shrink and create gaps.
Carpet Floor Repairs Without Removal
The Squeeeeek-No-More Kit uses a specialized jig that guides breakaway screws through carpet fibers into joists below. The jig has an alignment guide that positions the screw perpendicular to the subfloor. Drive the screw until it seats against the jig, then snap off the part sticking out. The screw head stays below the carpet backing, leaving no visible surface damage.
Locate joists first using a stud finder pressed against the carpet. Mark joist locations with painter’s tape. Drive screws at each joist crossing within the squeaky area, spacing them 6 to 8 inches apart along the joist run. The carpet pile hides the tiny holes where screws went through.
An alternative uses finish nails driven at 45 degree angles through the carpet, pad, and subfloor into joists. Pre drilling is difficult through carpet, so this works best with thin finish nails that bend rather than split the subfloor. Drive the nail until the head sits just below the carpet surface, then use your fingers to work carpet fibers back over the nail head.
Working from below avoids any carpet penetration if basement or crawl space access exists. Use the shim and adhesive method described earlier. The repair stabilizes the subfloor without touching the carpet at all.
Plywood and Subfloor Material Repairs
Plywood subfloors sometimes develop delamination where the inner plywood layers separate. This creates a flexible, weak spot that squeaks under foot traffic. Check for delamination by pressing hard on the squeaky area. If it feels spongy or compresses noticeably, the layers have separated.
Construction adhesive injected between subfloor layers bonds them back together. Drill small holes at an angle through the top plywood layer into the gap, then inject adhesive until it starts to seep out. Weigh the area down with concrete blocks or other heavy objects for 24 hours while the adhesive cures.
Subfloor thickness must match the span rating for your joist spacing. Most modern homes use 3/4 inch plywood over 16 inch joist spacing. Undersized subfloors flex too much, causing squeaks and eventual structural damage. If your subfloor is only 1/2 inch thick over 16 inch joists, consider adding a second layer of 1/2 inch plywood with construction adhesive and screws to bring it up to proper thickness.
Particle board subfloors hold fasteners poorly because the material consists of compressed wood particles rather than solid wood fibers. Screws pull out more easily under stress. Use ring shank screws specifically designed for particle board, which have ridges that grip better. Space screws closer together than you would in plywood. Every 4 inches instead of every 6 inches.
Proper underlayment installation between the subfloor and finished floor absorbs sound and reduces movement. Cork underlayment works well under hardwood and engineered wood. Foam underlayment suits laminate floors. Felt paper provides a moisture barrier under hardwood installed over older subfloors. Underlayment must be installed flat without wrinkles, which can create high spots that squeak.
Preventing Future Floor Squeaks Through Proper Maintenance
Proper prevention extends repair longevity and protects your flooring investment. Most squeaks develop slowly as conditions change, giving you time to step in before damage gets severe.
- Keep indoor humidity between 30% and 50% year round to minimize wood expansion and contraction cycles that open gaps.
- Use humidifiers in winter when heating systems dry indoor air below 30%, causing wood to shrink.
- Run dehumidifiers in summer when humidity climbs above 50%, which makes wood expand and buckle.
- Let new flooring acclimate 72 hours before installation by storing it in the room where it’ll be installed, giving moisture content time to equalize.
- Make sure you’ve got proper expansion gaps (1/4 to 1/2 inch) at walls and transitions where flooring meets other materials, preventing buckling when wood expands.
- Apply construction adhesive during installation or repairs in addition to mechanical fasteners, creating a dual bond that resists movement.
Seasonal humidity changes cause wood to expand in summer and contract in winter. A 20% humidity swing can change board dimensions by 1/16 inch or more. These movement cycles gradually work fasteners loose and open gaps between components. Keeping humidity consistent year round prevents the repeated expansion contraction cycles that cause most squeaks.
Proper furniture placement and floor protectors distribute weight evenly across the floor surface. Heavy furniture concentrated in one spot can compress the subfloor and create permanent deflection. Use wide furniture pads that spread weight over a larger area. Felt pads under furniture legs prevent scratches and reduce point loads that stress individual boards.
Powder lubricants like talcum powder or graphite reduce friction between floorboards temporarily. Sprinkle the powder into gaps between boards and work it in by walking over the area. The powder coats the board edges and reduces rubbing sounds. This provides temporary relief but doesn’t address structural gaps. Within weeks, foot traffic wears away the powder and the squeak comes back. Liquid lubricants like WD-40 provide even shorter relief and attract dust that speeds up wear. Neither approach stops the movement causing the squeak or protects against progressive damage as gaps widen over time.
When to Hire a Professional for Squeaky Floor Repairs

Squeaks that stick around after you’ve made proper DIY repairs signal deeper problems beyond simple loose boards. Visible sagging across a room indicates joist damage or undersized structural members. Floors that feel bouncy when you walk suggest inadequate support or excessive joist span. Squeaks accompanied by cracking sounds point to structural members failing under load.
Certain situations need specialized expertise from the start. Antique or historic flooring demands period appropriate repair methods and materials that preserve value. Suspected foundation settlement causes floor problems that DIY repairs can’t address. The foundation needs correction before floor repairs will hold. Water damage or pest damage requires remediation of the underlying problem before floor repairs make sense. Building code compliance for structural modifications needs professional documentation and often engineered plans. Learn more about comprehensive structural repairs at Carpentry Repairs.
Professional services start with comprehensive inspection beyond just identifying squeaks. Contractors use moisture meters to check for hidden water problems. They assess structural loads to determine if joists meet current span requirements. They identify whether squeaks result from poor installation, material defects, or structural movement. This diagnosis often reveals problems that DIY attempts would miss entirely.
Expect detailed documentation from professional repairs. Written estimates should spell out the scope of work, identify materials by brand and grade, break out labor and material costs separately, and provide a timeline from start to completion. Warranties typically cover workmanship for one year and sometimes extend to materials. Structural modifications may require building permits, which the contractor obtains and includes in the project cost.
Pick contractors based on verifiable credentials rather than lowest price. Check that licensing is current and insurance covers both liability and workers compensation. Ask for references from projects completed in the past year involving similar floor repairs. Compare at least three written estimates that address the same scope of work. Discuss how the contractor will protect surrounding areas during repairs, what daily cleanup looks like, and how they handle unexpected issues discovered during work. Strong contractors explain underlying causes and show you the problems rather than just treating symptoms. For a complete evaluation of multiple home repair needs, consider a full assessment at Home Restoration Services.
Final Words
The right repair method depends on your floor type and whether you can access the space from below.
Screw reinforcement from above works well for most hardwood and engineered floors. Shim and adhesive repairs from underneath provide the most durable fix without touching your finished surface.
When you’re dealing with widespread squeaking or visible sagging, joist reinforcement addresses the structural movement causing the problem.
Learning how to fix squeaky floors permanently means diagnosing the root cause first, then choosing the repair that stops movement at the source. Temporary lubricants only mask symptoms.
Invest a few hours and the right materials now. You’ll walk across quiet, solid floors for years.
FAQ
Can I fix squeaky floors myself?
You can fix squeaky floors yourself if you have access to the affected area and basic tools. Most DIY repairs involve driving screws through floorboards into the subfloor or applying shims from below. Simple surface squeaks respond well to homeowner repairs, but widespread squeaking or structural issues need professional assessment.
Does WD-40 work on squeaky floors?
WD-40 provides only temporary relief for squeaky floors by reducing friction between boards. It attracts dust over time and doesn’t address the underlying structural gaps causing the squeak. Permanent fixes require securing loose floorboards to the subfloor with screws or filling gaps between joists and subfloor with shims and adhesive.
What is the best lubricant for squeaky floors?
The best lubricants for minor surface squeaks are powdered graphite or talcum powder, which reduce friction without attracting dust. However, lubricants only mask symptoms temporarily and require regular reapplication. Permanent solutions involve structural repairs like screw reinforcement, shimming gaps between subfloor and joists, or joist bracing that eliminate movement causing squeaks.
How do I stop my floors from creaking when walking?
You stop floors from creaking by securing loose connections between floorboards, subfloor, and joists. From above, drive wood screws at angles through pilot holes into the subfloor. From below, apply carpenter’s glue to wood shims and tap them into gaps between joists and subfloor, then secure with angled screws. Both methods eliminate the movement and friction that cause creaking.