


Ever notice how a small water stain on your fascia board can hide a much bigger problem behind it? That spot you’ve been ignoring probably isn’t just surface damage. It’s rot, and it spreads faster than you think. The good news is you can repair minor fascia rot yourself with the right approach and save the cost of a full contractor visit. This guide walks you through testing the damage, deciding between epoxy repair and board replacement, and fixing the water source so the problem doesn’t come back.
Assessment and Repair Strategy: Epoxy Fix vs. Complete Board Replacement

Push a screwdriver into the damaged area. If it sinks more than half an inch into soft, mushy wood, you’re dealing with rot, not just surface discoloration. Isolated soft spots smaller than 6 inches that haven’t compromised the board’s structural connection to rafters can be repaired with epoxy consolidant and filler. Extensive damage, multiple rotted sections, or rot affecting how the board attaches to rafters means you need full board replacement.
The epoxy repair pathway works for minor damage. Remove the loose rotted wood with a chisel. Apply epoxy consolidant to harden the remaining wood fibers. Fill the cavity with epoxy filler once the consolidant cures. Sand it smooth, prime, and paint to match the existing fascia. Most small repairs take 4 to 6 hours including drying time between steps.
Full replacement requires more steps but solves widespread rot. Inspect the entire fascia system to map all damaged areas. Identify and fix the water sources causing the rot. Damaged shingles above the fascia, missing drip edge that lets water run behind the board, or clogged gutters spilling water directly onto the wood. Remove the gutters and damaged boards. Check the underlying rafters for rot. Install new pre-finished boards that span at least two rafters for solid attachment. Reinstall the gutters.
Fascia boards are the horizontal 2×6 or 2×8 boards running along your roof edge. They connect your gutters to the roof rafters and seal your attic from weather and animals. They rot because they sit just below the roofline where water intrusion happens constantly. Every time it rains, every time snow melts, every time gutters overflow. Rot spreads beyond what you can see. A 12 inch stain on the surface might hide 3 feet of compromised wood behind it. Probe the entire board before you decide between patching and replacing.
Fix the water source before you repair anything. If damaged shingles are letting water run down behind the fascia, new boards will rot just as fast as the old ones. If the gutters overflow because they’re packed with leaves, the problem will come right back. Identifying and correcting the root cause isn’t optional. It’s the difference between a repair that holds up and one that fails within a year.
Essential Tools and Materials for Fascia Board Rot Repair
Gather everything before you climb the ladder. Multiple trips up and down increase your risk of falling, and you’ll lose focus every time you have to stop and hunt for a tool.
Quality materials prevent the repair from failing early. Cheap fasteners rust through. Inferior caulk cracks and pulls away. Using the right grade of lumber and paint means the work lasts.
Safety Equipment:
- Safety glasses
- Work gloves
- Sturdy extension ladder with stabilizer attachment
Removal Tools:
- Pry bar or 6 in 1 painter’s tool
- Cat’s paw nail puller
- 16 oz hammer
- Utility knife with sharp blades
Cutting and Measuring Tools:
- Circular saw or handsaw
- Oscillating multi tool (for partial replacements)
- Tape measure
- Speed square
Fastening Tools:
- Drill or nail gun
- Hammer
- Nail set
Materials:
- Replacement fascia boards (match existing dimensions)
- 2 inch spiral shank galvanized nails or exterior screws
- Siliconized latex caulk with caulk gun
- Exterior grade wood primer
- Exterior paint or stain
- Paintbrush or roller
- Wood filler or epoxy consolidant (for minor repairs)
Epoxy Consolidant Repair Method for Minor Fascia Rot
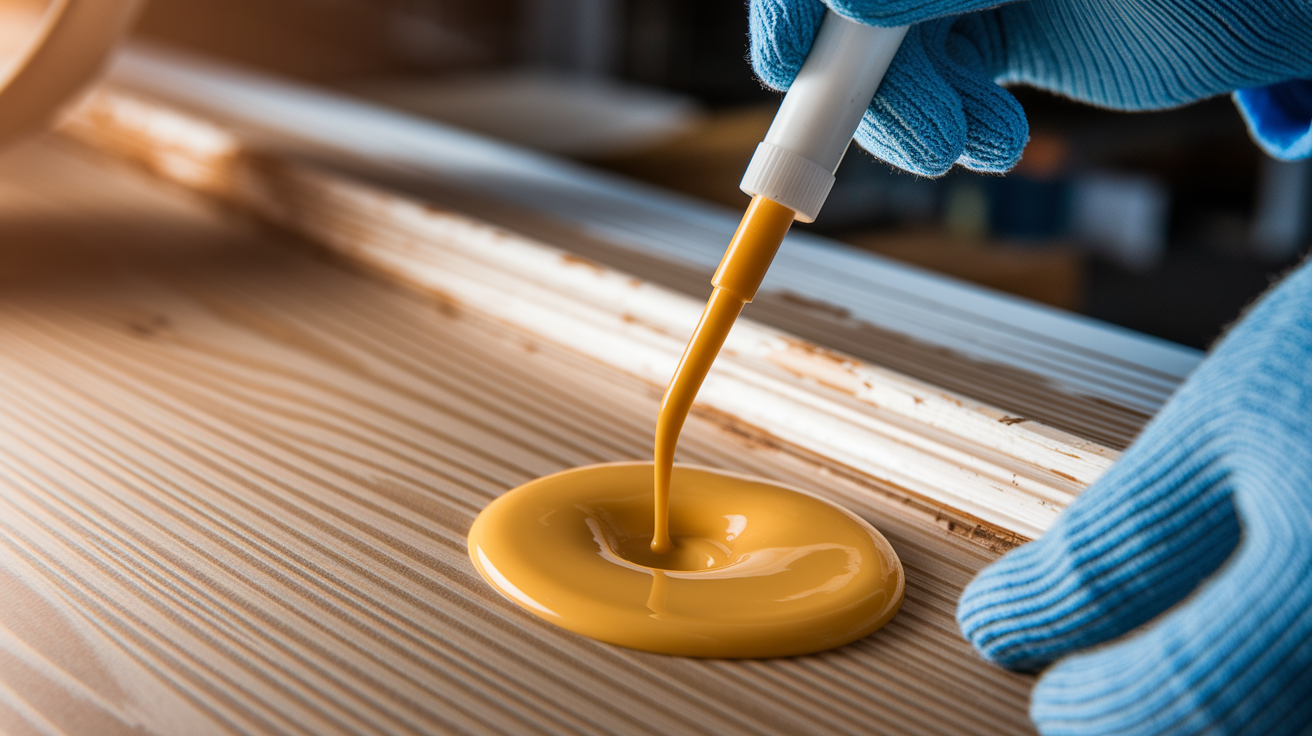
Epoxy repair makes sense for isolated rot areas smaller than 6 inches where most of the board remains solid and structurally sound. This approach saves the time and cost of removing and replacing entire sections when only a small area has deteriorated.
Epoxy Repair Steps:
-
Test the damaged area by pushing a screwdriver into the wood to determine how deep the rot extends and whether it’s limited to a small section
-
Remove all loose, punky, or soft rotted wood using a chisel or wire brush until you reach solid wood that resists pressure from the screwdriver
-
Clean the cavity thoroughly to remove dust, debris, and loose fibers, then allow it to dry completely for 24 to 48 hours or speed the process with a heat gun
-
Apply epoxy consolidant liberally into the cavity so it penetrates and hardens the remaining soft wood fibers according to the manufacturer’s instructions
-
After the consolidant cures per the product timeline, fill the cavity with epoxy wood filler, building it slightly above the surrounding surface to account for sanding
-
Sand the cured filler smooth and flush with the fascia face, prime the repair area, and paint to match the existing fascia color
Epoxy repair only works when structural integrity remains intact. If soft spots measure larger than 6 inches, if the rot extends through the full thickness of the board, or if damage affects how the board connects to the rafters, patching won’t solve the problem. You need full board replacement for extensive rot that compromises the board’s ability to support gutters and protect the roof edge.
Removing Damaged Fascia Boards Safely
Run a utility knife along all caulk lines and seams where the fascia meets the soffit, corners, and trim before you try prying anything loose. This cuts the adhesive bond so you don’t tear adjacent materials when the board comes free. Remove gutter sections by unscrewing the brackets from the fascia. Work carefully around the brackets so you don’t bend them. You’ll need to reuse them if they’re still in good shape.
Use a 6 in 1 painter’s tool or flat pry bar to start separating the board from the rafters. Begin at the base of the board where it meets the soffit. Work gradually across the length of the board, prying gently in multiple spots rather than forcing removal at a single point. Incremental pressure prevents splitting the board or damaging the rafter tails behind it.
Expose the nail heads with a cat’s paw nail puller. Slide the claw under each nail head and rock the tool back to lift the nail out cleanly. For partial replacements where you’re only removing a damaged section, use an oscillating multi tool with a wood blade to make controlled interrupt cuts through the fascia face at both ends of the damaged area. Position these cuts over rafter centers so the new board section will have solid backing for fastening.
After you extract the damaged board, remove every remaining fastener from the rafter tails using a hammer or drill. Pull any nails that didn’t come out with the board. Back out any screws still embedded in the wood. This creates a clean, smooth mounting surface for the replacement material. Old fasteners left in place interfere with new ones and prevent the new board from sitting flush against the rafters.
Some fascia configurations include soffit panels that tuck up behind the bottom edge of the fascia board. If rot has spread into the soffit material, you’ll need to examine it once the fascia is removed and potentially replace damaged sections. Work carefully around roof shingles during the removal process. You don’t want to lift or damage shingles that are in good condition, as that creates new leak points.
Inspecting and Repairing Sub Fascia and Rafter Damage

Removing the fascia board reveals the condition of the rafter tails and sub fascia that support it. These underlying structural components must be solid before you install new boards. Hidden rot is common when moisture has penetrated through the fascia for months or years.
Test the rafter tails by probing them with a screwdriver the same way you tested the visible fascia. Push into the wood at multiple points along each rafter end. Look for dark staining that indicates moisture has soaked into the wood grain. Check the full length of exposed framing, not just the ends. Sometimes rot starts where the rafter meets the wall and works outward.
Minor surface rot responds to the same epoxy treatment used for fascia repairs. Apply epoxy consolidant to harden the softened wood fibers, then fill any voids with epoxy filler for cosmetic repair. Extensive rot requires structural reinforcement. Add scab blocks. Solid pieces of lumber fastened alongside the damaged section to transfer the load to undamaged framing. Fasten these reinforcement pieces with exterior screws driven into solid wood on both sides of the rotted area. Complete rafter tail replacement becomes necessary when rot extends too far back to reinforce effectively or when structural compromise affects more than half the rafter’s thickness.
Clean every inch of the mounting surface before installing new fascia. Scrape off old caulk residue that creates bumps under the new board. Remove paint globs from previous work. Extract any protruding fasteners or nails that weren’t removed with the board. Use a wire brush to clean debris from the corners where rafters meet. The new fascia board needs to sit flat and tight against clean, prepared framing. Gaps between the board and rafters create weak points where wind can catch the fascia or where the board will flex under the weight of gutters.
Selecting the Right Fascia Board Replacement Material
Material choice determines how long your repair lasts and how much maintenance you’ll need to do over the next 20 years.
| Material Type | Moisture Resistance | Cost Range | Maintenance Needs | Best Use Case |
|---|---|---|---|---|
| PVC/UPVC | Impervious to rot and moisture | $2 to $4 per linear foot | None, occasional cleaning only | Any climate, maximum durability, zero rot risk |
| Cedar/Cypress/Redwood | Natural rot resistance from wood oils | $3 to $6 per linear foot | Minimal, may not need sealant in dry climates | Traditional appearance, dry to moderate climates |
| Pressure Treated Pine/Fir | Good resistance when properly sealed | $1 to $2 per linear foot | Seal and repaint every 5 to 7 years | Budget conscious repairs in any climate |
| Clear Pine | Poor unless completely sealed | $1.50 to $3 per linear foot | Prime all sides before install, repaint every 5 to 7 years | Best paint surface, must be sealed immediately |
PVC materials offer complete rot resistance with no maintenance requirements. They never need painting, never absorb moisture, and never warp. The trade off is appearance. They look like plastic rather than wood, which doesn’t match the aesthetic of traditional or historic homes. Pressure treated lumber provides solid moisture resistance at moderate cost but requires sealing on all six sides and repainting every few years as the protective coating breaks down under UV exposure.
Measure your existing board before you buy replacement material. Most fascia boards are 3/4 inch thick and either 1×6, 1×8, or 2×8 in width. Match these dimensions exactly so the new board aligns with soffits, trim, and gutters. Avoid finger jointed boards where short pieces are glued together. These joints trap moisture and fail faster than solid boards. Stay away from knotty pine because knots create pockets that hold water and rot first. Clear straight grain lumber without knots or defects provides the smoothest painting surface and the longest service life when properly sealed on all sides before installation.
Measuring, Cutting, and Pre Finishing Replacement Boards
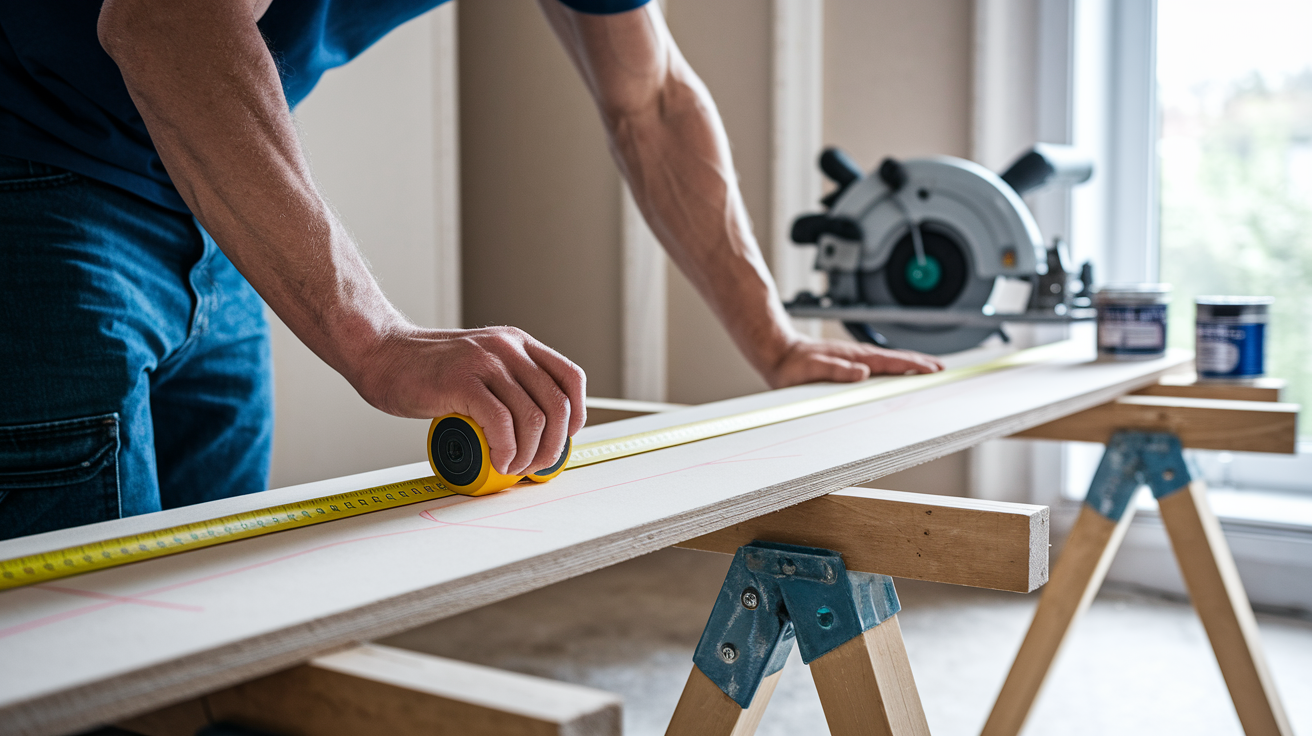
Butt your tape measure against inside corners and pull it to the long point of outside corners when measuring for miter cuts. Measure twice and write the numbers down. Boards spanning long runs often require splice joints positioned directly over rafter centers where both board ends have solid backing for fastening.
Cut straight sections using a circular saw with a guide clamped to the board to ensure straight cuts. Set the blade depth slightly deeper than the board thickness so you cut completely through in one pass. Cut 45 degree miters for corner connections using a speed square as a guide or a miter saw for precision angles. Check the angle against the actual corner before cutting. Not all corners are exactly 90 degrees, and you may need to adjust the miter slightly.
For long runs that require splice joints, cut opposing 45 degree bevels on the board ends where they meet over a rafter. This scarf joint sheds water better than a simple butt joint and creates a stronger connection because the overlapping bevels support each other. Leave a 1/8 inch gap at all seams where board sections meet. This small gap allows caulk to penetrate and seal the joint properly rather than just bridging across a tight seam that can separate as wood expands and contracts.
Pre finishing seals the wood completely before installation and is far easier than trying to paint boards that are already fastened to rafters. Apply exterior grade primer to all six sides of each board. The face, back, top edge, bottom edge, and both ends. Allow the primer to dry per the manufacturer’s specifications, usually 2 to 4 hours. Apply at least one coat of exterior paint or stain over the primer. The goal is complete coverage on every surface so moisture can’t penetrate from any direction.
Complete sealing of all surfaces prevents moisture absorption through the back of the board, the ends, and the edges that will be hidden once installed. These hidden surfaces are often ignored, but they’re where rot starts because water wicks into unsealed end grain and works its way through the board. Pre finishing lets you coat these surfaces while you can still reach them easily on sawhorses or a work table.
Apply siliconized latex caulk at all seams where board sections meet, at corner joints, where the fascia meets the soffit, and along any gaps between the fascia and roofline components once the boards are installed. Cut the caulk tube nozzle at a 45 degree angle to create a smooth bead. Tool the caulk smooth with a wet finger immediately after application so it fills the gap completely and creates a clean finished appearance. Use siliconized latex rather than pure silicone because latex caulk can be painted and silicone can’t.
Fill all nail or screw divots with caulk once fasteners are driven. Smooth the caulk flush with the board surface using your finger or a putty knife. Let it dry completely, then apply at least one additional coat of exterior grade acrylic latex paint to all exposed surfaces. Pay particular attention to end cuts where new boards were measured and cut to length, and to the bottom edge of the fascia where water tends to collect. This final coat provides UV protection and creates a breathable moisture barrier that lets the wood dry if water does get behind the paint, rather than trapping moisture inside like an impermeable coating would.
Installing and Fastening New Fascia Boards Correctly
Hold the board flush with the roofline and level across its entire length. The top edge should align with where the drip edge will be positioned. The face of the board should be plumb. Straight up and down, not leaning in or out. Use temporary support or have a helper hold long sections in position while you fasten them. Trying to hold, position, and fasten a 16 foot board by yourself usually ends with the board dropping or shifting out of alignment.
Use 2 inch spiral shank galvanized nails or stainless steel exterior screws to fasten the board. Place fasteners in a high low pattern. One near the top edge of the board, one near the bottom edge, spaced every 16 to 24 inches to correspond with rafter locations. This pattern distributes the holding force across the full height of the board rather than concentrating stress along a single line of fasteners.
Drive fasteners at a slight angle through the fascia into the rafter tails rather than straight in perpendicular to the board face. Angled fasteners provide superior holding power compared to straight in fasteners because they resist the pulling force of hanging gutters better. The angle creates a mechanical lock that fights withdrawal as gutters load the fascia with weight from water and debris.
Use a nail set to drive nail heads slightly below the surface after initial fastening. This creates small divots that you’ll fill with caulk for a smooth, water tight finish. Countersinking the fastener heads protects them from direct weather exposure and hides them visually once you caulk and paint the divots. Fasteners left flush or proud of the surface collect water and rust, and they’re visible even after painting.
All replacement sections must span at least two rafters for secure mounting. A board fastened to only one rafter will flex and work loose under the weight of gutters and the stress of wind. Keep boards level and properly aligned so gutters will pitch correctly when you reinstall them. Gutters follow the fascia line, so if the fascia slopes the wrong direction, the gutters will too. Proper fascia installation prevents water intrusion that leads to larger structural damage requiring professional restoration.
Reinstalling Gutters and Final Roofline Components

Install the drip edge first before reattaching gutters. Position it so the upper flange slides under the lowest course of shingles while the lower edge extends over the fascia face to direct water into the gutters instead of behind them onto the fascia. Secure the drip edge with roofing nails spaced 12 to 16 inches apart along its length. The drip edge creates a defined path for water to follow from the roof into the gutter system rather than running down the fascia face.
Mark rafter locations on the new fascia before positioning gutter brackets. Space brackets to achieve proper pitch. Gutters need to slope 1/4 inch per 10 feet of run toward downspouts so water flows instead of pooling. Fasten brackets firmly into solid wood using screws long enough to penetrate through the fascia and into the rafters behind it. Brackets screwed only into the fascia board will pull loose under the weight of water filled gutters.
Hang the gutter sections onto the brackets, ensuring the slope runs consistently toward each downspout. Connect gutter sections with slip joints sealed with gutter sealant or silicone. Check that all seams are watertight by running your finger along the inside of each joint to feel for gaps or misalignment.
Test the complete system before you put your tools away. Run water from a garden hose through the gutters to verify proper flow and pitch. Watch for water pooling in low spots, overflowing at corners or seams, or running behind the gutter instead of into it. Confirm that the drip edge successfully channels water into the gutters rather than letting it run behind them onto the new fascia. If water isn’t flowing correctly, adjust the bracket positions or gutter pitch now, while everything is still accessible and you have your tools out.
Cost Estimates and Time Requirements for Fascia Board Repairs
Understanding costs before you start prevents budget surprises and helps you decide whether to handle the work yourself or hire professionals.
Total costs vary significantly based on material choice, how much fascia needs replacement, how easy the area is to reach, and whether you’re doing the work or paying someone else.
| Cost Category | DIY Cost Range | Professional Cost Range | Notes |
|---|---|---|---|
| Materials, Wood Fascia | $150 to $300 for 150 linear feet | Included in labor quote | Pressure treated or clear pine |
| Materials, PVC Fascia | $300 to $600 for 150 linear feet | Included in labor quote | Zero maintenance, longest lifespan |
| Basic Tools/Supplies | $75 to $150 | N/A | Primer, paint, caulk, fasteners. Assumes you own basic carpentry tools |
| Gutter Removal/Reinstall | Time investment only | $200 to $400 | Often included in fascia replacement quote |
| Labor per Linear Foot | N/A | $6 to $12 | Varies by region, complexity, and height |
| Complete 150 Linear Foot Project | $225 to $450 (wood) or $375 to $750 (PVC) | $1,200 to $2,400 (wood) or $1,800 to $3,000 (PVC) | Two story homes add 25 to 40% to professional costs due to scaffolding |
Typical DIY timeframes run about 4 to 6 hours for a simple 10 foot section replacement including removal, installation, and finishing. A full house fascia replacement covering 150 linear feet usually takes 2 to 3 days including all preparation, removal, installation, and finishing steps. Working at height significantly slows progress compared to ground level carpentry because you’re constantly climbing up and down the ladder, positioning tools and materials, and working in awkward positions while maintaining balance.
Professional costs depend on several factors. Two story homes requiring scaffolding or specialized ladder equipment cost 25 to 40 percent more than single story work. Extensive underlying rafter damage that requires structural repairs before fascia replacement adds to the quote. Complex gutter systems with multiple corners, downspouts, and custom fittings take longer to remove and reinstall. Regional labor rates vary significantly. The same work costs more in urban areas than rural ones. Professional installation includes proper safety equipment, insurance coverage in case something goes wrong, and typically comes with warranty protection on both materials and workmanship for 1 to 5 years depending on the contractor.
Safety Considerations for Working at Roofline Height
Fascia work requires extended periods on ladders at dangerous heights. Proper safety precautions are non negotiable, not optional recommendations.
Safety Requirements:
- Use Type I or Type IA extension ladder rated for your weight plus the weight of tools and materials you’ll carry up
- Install a ladder stabilizer or standoff bracket to prevent gutter damage and improve stability by creating a wider base
- Maintain 3 point contact at all times. Two hands and one foot, or two feet and one hand
- Position the ladder at the proper 4 to 1 angle ratio: 1 foot away from the wall for every 4 feet of height
- Extend the ladder at least 3 feet above the roof edge to provide a handhold for safe transition if you need to step onto the roof
- Never overreach to the side while on the ladder. Reposition it frequently rather than stretching beyond your center of gravity
- Wear non slip work boots with ankle support to reduce fatigue and improve footing on ladder rungs
- Use a tool belt to keep both hands free for climbing rather than carrying tools up the ladder
- Work with a helper who can stabilize the ladder base and hand up tools and materials so you’re not climbing with your hands full
- Avoid working in wind conditions that affect ladder stability, in rain, or on wet or icy surfaces that create slip hazards
Weather and temperature requirements matter for both safety and work quality. Avoid painting or applying caulk when temperatures fall below 50°F or rise above 90°F. Most products won’t cure properly outside this range, and the manufacturer’s warranty won’t cover failures from improper application conditions. Never work during wind conditions that make the ladder move or feel unstable. Recognize that professional contractors have fall protection equipment including harnesses, tie off anchors, and specialized training that most DIYers lack. If the height makes you uncomfortable or the work area is difficult to reach safely, hiring professionals eliminates the risk of serious injury from a fall.
Preventing Future Fascia Board Rot and Maintenance Tips
Set up an annual inspection schedule and stick to it. Examine all fascia boards each spring for early warning signs: discoloration that looks different from last year, soft spots when you press the wood, peeling paint, gaps in caulk lines, and evidence of water staining running down from the roofline. Professional annual inspections catch deterioration early, before minor surface issues turn into expensive structural damage that requires rafter repair or replacement.
Gutter system maintenance is your primary defense against fascia rot. Clean gutters and downspouts at least twice yearly in spring and fall, more often if you have trees near the house that drop leaves, seeds, or needles. Ensure downspouts direct water at least 6 feet away from the foundation rather than dumping it right next to the house where it can soak back into the structure. Verify that gutter pitch remains correct. Gutters sag over time, and sagging creates low spots where water pools instead of draining. Repair any leaks or separated seams immediately when you spot them, because even a small drip onto the fascia eventually causes rot.
Coating maintenance requirements depend on the material you installed. Wood fascia requires repainting every 5 to 7 years or sooner when the paint shows wear, chalking, or cracking that exposes bare wood to moisture. Inspect and refresh caulk at all seams and joints every 2 to 3 years because caulk shrinks and pulls away from wood as it ages, opening gaps for water infiltration. PVC fascia requires only occasional cleaning with soap and water. No repainting, no caulking, no sealing.
Additional prevention measures extend fascia life beyond basic maintenance. Trim back tree branches that hang over the roof or touch the fascia because they trap moisture against the wood and prevent it from drying. Improve attic ventilation if you notice condensation on the inside of roof sheathing or rafters. Poor ventilation causes moisture to condense at roof edges where it soaks into fascia from behind. Ensure the drip edge remains properly positioned under shingles and over the fascia face so water follows the intended path into gutters. Address any roof leaks promptly rather than letting them persist, because water that gets under shingles works its way down to the fascia and causes rot from above where you can’t see it happening until the damage is already extensive.
Final Words
Fascia board rot repair comes down to honest assessment and thorough work.
Test the damage, fix the water source first, and choose the repair method that matches what you’re dealing with. Epoxy works for small isolated spots. Full replacement is the right call when rot has spread or structural integrity is compromised.
Pre-finish your boards, seal every joint, and fasten everything securely.
The repair holds up when you address the cause, not just the symptom. Clean gutters, proper drip edge, and routine inspections keep new fascia boards dry and functional for years.
FAQ
How do you fix wood rot on fascia boards?
You fix wood rot on fascia boards by first testing the damage depth with a screwdriver. For isolated soft spots smaller than 6 inches, remove loose rotted wood, apply epoxy consolidant to harden remaining fibers, fill with epoxy filler, sand smooth, prime, and paint. Extensive rot requires removing the damaged board, fixing the water source causing the rot, inspecting underlying rafters for damage, and installing a new pre-finished replacement board that spans at least two rafters.
Does homeowners insurance cover rotted fascia?
Homeowners insurance typically does not cover rotted fascia because rot develops gradually from lack of maintenance rather than from sudden covered events. Insurance usually covers fascia damage only when caused by a specific covered peril like storm damage or fire. Rot caused by clogged gutters, poor ventilation, or deferred maintenance is considered a homeowner responsibility.
Why is my fascia board rotting?
Your fascia board is rotting because water is reaching the wood and staying there long enough to cause decay. Common causes include clogged gutters that overflow onto the fascia, damaged or missing drip edge that allows water to run behind the board, roof leaks that drip onto the fascia, and inadequate paint or sealant that lets moisture penetrate the wood.
Can you repair damaged fascia board without replacing it?
You can repair damaged fascia board without replacing it only when rot is minor and isolated. If soft spots are smaller than 6 inches and the board remains structurally sound, remove loose rotted wood, apply epoxy consolidant to harden remaining fibers, fill the cavity with epoxy filler, sand smooth, and refinish. Extensive rot, structural compromise, or damage affecting rafter connections requires full board replacement.