


Ever notice how the same corner keeps cracking no matter how many times you patch it? That’s because most corner cracks need more than just a quick skim of compound over the damage. The problem is often the corner bead underneath or failed tape at the seam, not just the surface layer. This guide walks through the actual fix for both outside and inside corners, including when you need to replace the bead completely and when re-taping will hold. You’ll know what materials to grab, what the repair looks like step by step, and how to avoid the crack coming back in six months.
Essential Repair Approaches for Cracked Drywall Corners
The repair approach depends on whether you’re fixing an outside corner (where two walls meet at a protruding edge) or an inside corner (where two walls meet at an interior angle). Outside corners need corner bead replacement for structural integrity. Inside corners need tape and compound application.
Before you start, grab these materials:
- Joint compound (all-purpose type)
- Putty knives in two sizes (6 inch and 10 inch)
- Sandpaper (both 120 grit and 220 grit)
- Primer suitable for drywall
- Paint matching your wall color
- Utility knife with sharp blades
Additional materials depend on your corner type. Outside corners need metal or composite corner bead plus drywall screws. Inside corners require paper tape or mesh tape.
The outside corner approach involves removing the damaged corner bead section completely. Install a new metal or composite bead secured with screws every 8 inches, then apply multiple compound coats over the bead extending onto the adjacent wall surfaces. The inside corner approach involves cleaning the damaged area thoroughly, embedding paper tape or mesh tape in fresh joint compound along the corner seam, then applying additional compound layers while feathering the edges outward for a smooth transition.
Repairs typically take 2 to 3 days because of mandatory drying time between coats. Each coat needs at least 4 to 6 hours to dry, though 24 hours is better for best results. Your actual hands on work time is only 2 to 4 hours spread across those days. Beginners should expect a learning curve on the first attempt. But you can achieve professional looking results with patience and proper technique.
Tools and Materials Required for Drywall Corner Repairs
Gathering everything beforehand saves multiple trips to the hardware store and keeps the repair moving forward. Most repairs cost between $15 and $40 in materials for a DIY approach, which is way less than hiring a professional.
Essential Tools for Corner Repair
- Utility knife for cutting away damaged material and trimming corner bead to length
- 6 inch putty knife used for first coat application and working in tight spaces
- 10 inch putty knife for wider second and third coats with better feathering
- Sanding block provides flat, even pressure for smooth results
- 120 grit sandpaper initial smoothing to remove ridges and high spots
- 220 grit sandpaper final smoothing for paint ready surface
- Drywall saw or jab saw cuts through damaged drywall sections cleanly
- Mud pan holds joint compound at comfortable working angle
- Corner trowel specialized tool for inside corners (optional but helpful)
- Hammer or drill secures corner bead with nails or screws
Materials Checklist
- All-purpose joint compound works for all coat applications from first to final
- Corner bead metal for durability or paper faced for easier finishing
- Drywall screws 1¼ inch length for securing corner bead
- Primer drywall specific primer prevents flashing and ensures even coverage
- Matching paint brings repair to same finish as surrounding wall
- Paper tape or mesh tape reinforcement for inside corner repairs
- Spray adhesive helps position certain bead types before compound application (optional)
Most materials are available at home improvement stores or local hardware shops. Optional items that make the job easier include a shop vacuum for dust control, a work light positioned at an angle to reveal surface imperfections, and plastic sheeting to protect floors and furniture from compound drips and sanding dust.
Understanding Why Drywall Corners Crack

Identifying the cause determines the proper repair approach and whether you’re dealing with a simple cosmetic issue or a symptom of something more serious.
All buildings settle over time. This creates stress at corners where two planes meet at right angles. Natural settling creates hairline cracks that are usually harmless and purely cosmetic. These settling cracks typically appear within the first year or two after construction as the lumber dries and the foundation adjusts to the soil beneath it. Hairline cracks less than 1/8 inch wide are normal. Cracks wider than 1/4 inch may indicate foundation movement beyond typical ranges and need professional assessment.
Impact damage accounts for most corner problems in occupied homes. Furniture strikes during moves, vacuum cleaner bumps, door handles swinging too wide, and children’s toys all create dents and cracks in vulnerable corners. High traffic areas like hallway corners and room entries near doorways take repeated abuse that eventually breaks down the corner bead and compound. You’ll recognize impact damage by the dented appearance, often with the corner bead visible through the damaged compound or pushed inward from the blow.
Moisture and temperature fluctuations weaken drywall and joint compound over time. Water leaks from plumbing behind walls, roof leaks above ceiling corners, or condensation from temperature differences cause the paper facing on drywall to separate and the compound to soften and crumble. You’ll see water stains, discoloration, or a soft, spongy feeling when you press on the damaged area. Temperature changes cause materials to expand in heat and contract in cold, creating stress at the seams where different materials meet. Humidity changes affect joint compound directly since it’s a water based material that absorbs and releases moisture with seasonal changes.
Structural concerns require attention before cosmetic repair. Warning signs include bulging or bowing walls near the cracked corner, multiple corners throughout the house cracking at the same time, recurring cracks that reappear after previous repairs, or cracks accompanied by mold growth or musty smell. Stair step cracking patterns running diagonally across the corner suggest significant foundation movement or structural framing issues. These situations need professional assessment and correction of the underlying problem before you seal up the wall, or the crack will just reappear and potentially hide dangerous conditions developing behind the surface.
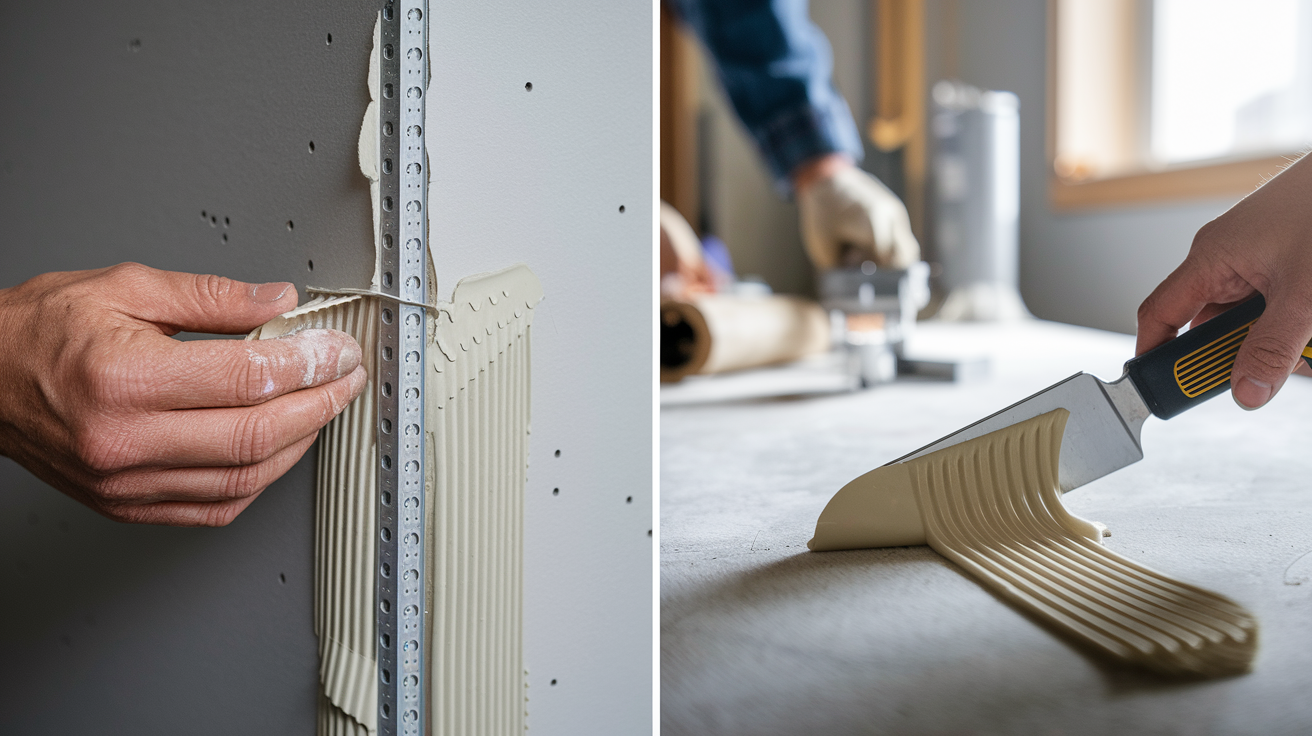
Repairing Outside Corners With Corner Bead Replacement
Outside corners take the most abuse in any home. They often require complete bead replacement rather than just compound patching over the damaged area.
The corner bead replacement process follows these steps:
- Remove loose material and damaged bead sections using a utility knife to cut along both sides of the damaged area, scoring through the old compound to expose the bead underneath
- Cut back to solid drywall by removing all crumbly or soft sections, creating clean edges that provide good adhesion for new compound
- Measure and cut new corner bead to exact length using tin snips for metal bead or a utility knife for vinyl types, matching the removed section precisely
- Position bead flush on both sides using a straight edge or level to check alignment, ensuring the corner forms a true 90 degree angle without gaps
- Secure with drywall screws every 8 inches starting from the center and working outward toward both ends, countersinking screws slightly below the bead surface
- Verify square corners with a level checking both vertical and horizontal alignment, making adjustments before the compound goes on
- Prepare for compound application by ensuring all screw heads are set properly and the bead feels solid with no movement when pressed
Different bead types work better in specific situations. Metal corner bead provides maximum durability and protection against future impacts. It can dent if struck hard enough and may rust in humid environments. Vinyl bead resists rust completely and installs easily but offers less impact protection than metal. It can crack if hit sharply. Flex corner bead or composite bead bends around curved walls and bullnose corners where rigid metal cannot follow the contour. It has slight give that prevents re-cracking from normal building movement. Paper faced bead has compound ready paper covering both sides that feathers easily during finishing, creating nearly invisible repairs but providing less structural support than metal.
| Bead Type | Best For | Key Advantage |
|---|---|---|
| Metal | High traffic areas, standard 90 degree corners | Maximum impact resistance and durability |
| Vinyl | Humid locations, bathrooms, basements | Complete rust resistance and easier cutting |
| Flex/Composite | Curved walls, rounded corners, problem areas | Conforms to irregular surfaces and resists re-cracking |
| Paper-faced | Repairs requiring invisible finish | Easiest to feather and blend with existing wall |
Fixing Inside Drywall Corners With Tape and Compound
Inside corners where walls meet walls or walls meet ceilings require tape embedded in compound rather than rigid corner bead. The tape reinforces the joint and prevents future cracking at the seam. Simple re-taping works when the existing corner structure is sound but the compound and tape have failed. Full corner reconstruction is needed when you see gaps between the drywall sheets or damaged drywall edges that need cutting back to solid material.
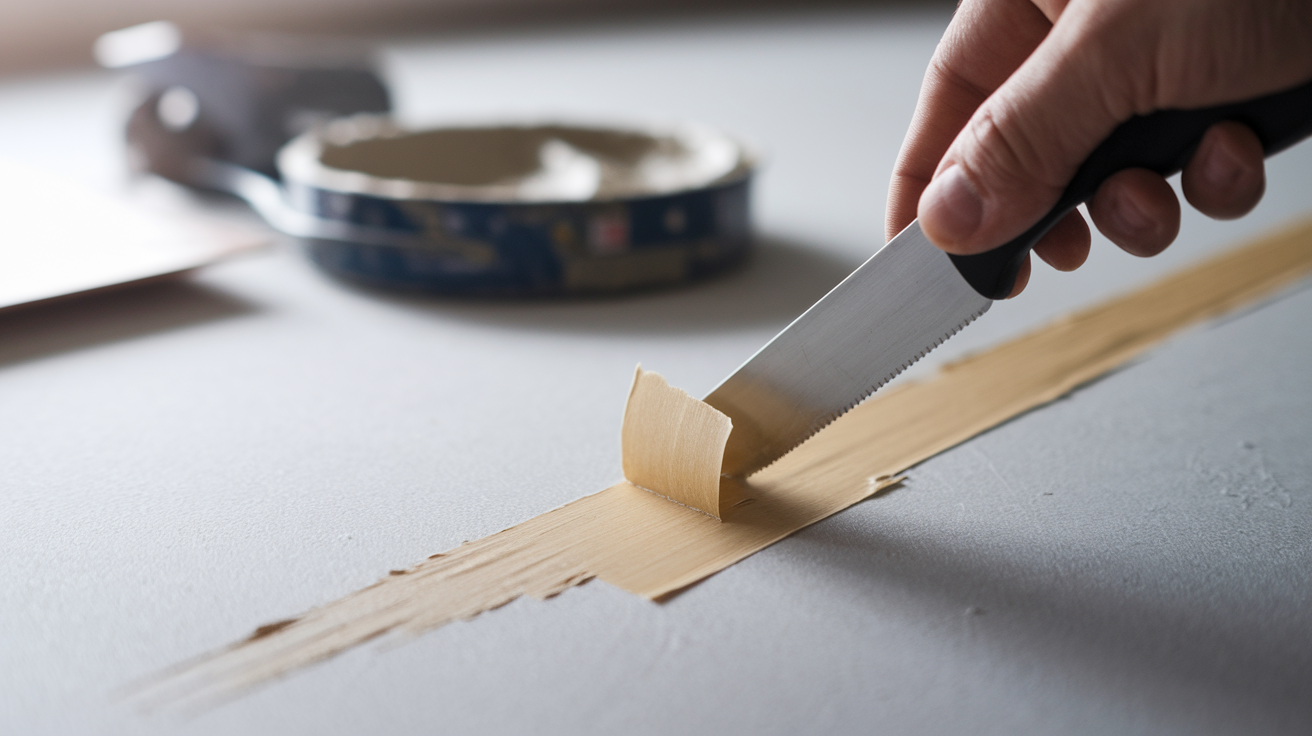
The paper tape method provides the strongest repair when done correctly. Start by removing all loose material and cleaning the surface thoroughly with a brush or vacuum to ensure good adhesion. Apply a thin joint compound layer to both sides of the corner using your 6 inch knife, coating about 4 to 6 inches out from the corner on each wall. Fold the paper tape lengthwise along its center crease and press it into the wet compound, starting at the top and working downward. Use a corner trowel or your 6 inch knife held at a 45 degree angle to press the tape firmly into the corner while smoothing it along both sides, embedding it completely in the compound underneath. Work in one smooth motion from top to bottom, applying enough pressure to squeeze out excess compound but not so much that you create dry spots where the tape isn’t properly adhered. Feather the edges outward so the compound tapers to nothing about 6 inches from the corner on both sides.
The mesh tape alternative uses self adhesive fiberglass tape that sticks directly to clean, dry drywall without a compound bed underneath. Mesh tape is easier for beginners since you don’t have to embed it while the compound is still wet. But it’s slightly less strong than paper tape and requires either setting compound or multiple coats of all-purpose compound to fully cover the texture. Press the mesh tape firmly into the corner, then apply your first coat of compound over it using the same feathering technique as with paper tape. Paper tape creates a stronger bond and resists cracking better over time. It has a steeper learning curve because proper embedding technique takes practice. The tape must be fully bedded in compound with no air bubbles or dry edges, which beginners sometimes struggle with on the first attempt.
For wider cracks that have opened up more than 1/8 inch, use the V notch technique by cutting a shallow V groove along the crack with your utility knife before taping. This removes any loose material and creates a channel that fills with compound for better adhesion. Keep your corner trowel at the correct angle throughout the process, about 45 degrees to each wall surface, which presses the tape into the corner while smoothing both sides at the same time without creating ridges or gaps.
Applying and Finishing Joint Compound on Corner Repairs
Proper compound application is where most DIY repairs succeed or fail. Patience with multiple thin coats beats rushing with thick applications every time.
Use your 6 inch taping knife for the first coat, applying a thin layer that extends 6 to 8 inches beyond the corner bead on each side or beyond the tape edges on inside corners. Keep the knife at a low angle to the wall surface, almost flat, which helps feather the edges so they taper smoothly into the existing wall. Fill all fastener dimples and gaps around the corner bead completely. Don’t worry about achieving perfection on the first coat since it’s primarily for adhesion and filling rather than final appearance. You’ll see ridges, tool marks, and uneven areas at this stage. Completely normal and expected.
The multiple coat process requires discipline and patience:
- Timing between coats: Wait a minimum of 4 to 6 hours between coats in normal conditions, but 24 hours is ideal for the strongest bond and minimal shrinkage cracks
- Expanding width with each coat: Apply the second coat 8 to 10 inches wide and the third coat 10 to 12 inches wide, gradually widening to blend the repair into the surrounding wall
- Using progressively wider knives: Switch to your 10 inch knife for second and third coats, which creates smoother surfaces with less noticeable blade marks
- Applying thinner coats as you progress: Each coat should be thinner than the previous one, with the final coat being almost transparent as you skim over any remaining imperfections
- Achieving smooth feather edges: The edges must taper to nothing so you can’t feel a ridge when you run your hand across the transition from repair to original wall
All-purpose compound works for most repairs and handles all coats from first to final. Setting compound dries faster through a chemical reaction rather than water evaporation, making it useful for same day repairs or structural repairs where you need strength quickly. But it’s harder to sand and less forgiving of mistakes. Topping compound is formulated specifically for final skim coats and sands easier than all-purpose, creating ultra smooth surfaces. Lightweight spackle works only for minor touch ups and small imperfections since it shrinks more than standard compound. Humidity and temperature affect drying time significantly, with high humidity slowing drying and cold temperatures extending cure times by hours or even days in extreme cases.
Sanding Techniques for Smooth Drywall Corner Finishes
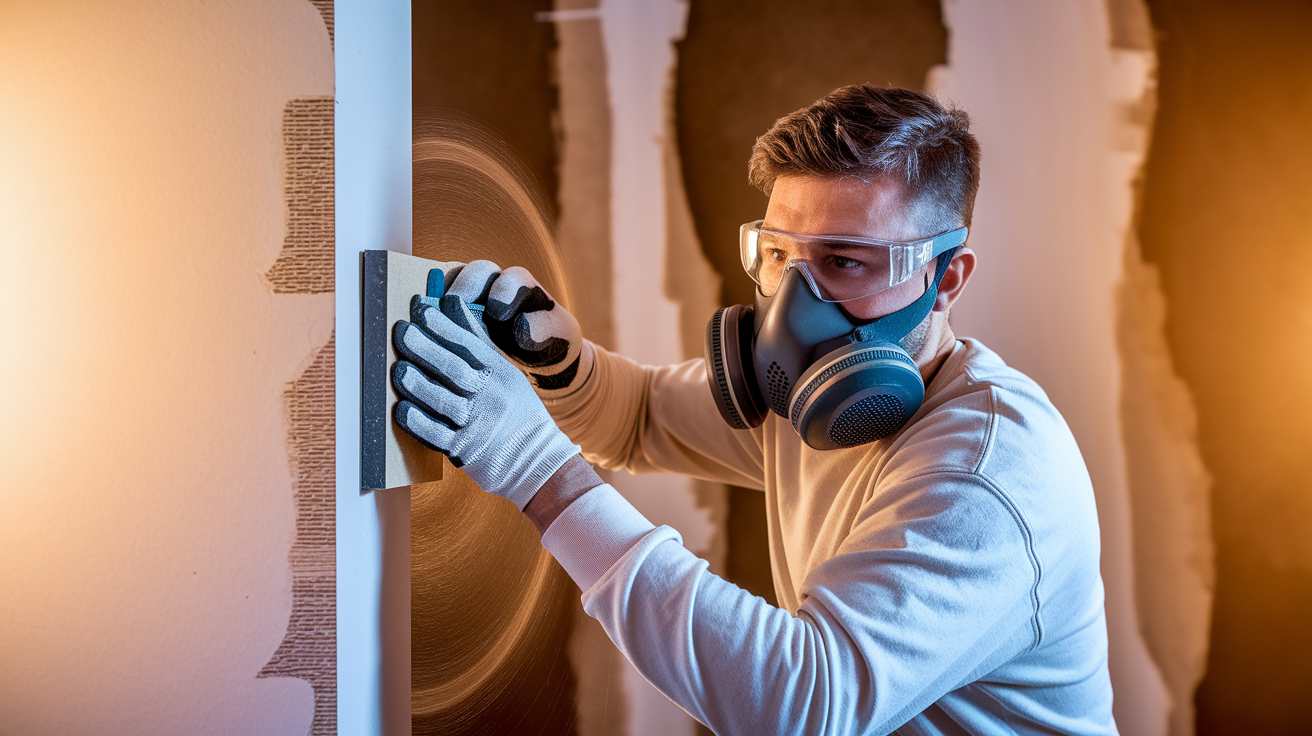
Wait for complete drying before sanding. You can verify by checking that the compound is bright white with no dark spots indicating moisture remaining in the material. Touching the surface should feel cool and dry, not damp or tacky.
Proper ventilation and dust protection are necessary since drywall dust is fine and irritating. Open windows, use a fan to direct dust outdoors, and wear a dust mask rated N95 or higher. Eye protection prevents dust from irritating your eyes during overhead sanding on ceiling corners.
Follow this sanding process for smooth, paint ready corners:
- Start with 120 grit sandpaper mounted on your sanding block for initial smoothing, which removes high spots and obvious ridges without scratching the surface
- Use light circular motions working from the center of the repair outward toward the edges, letting the sandpaper do the work without applying heavy pressure
- Check progress frequently by running your hand over the surface, which reveals bumps and valleys your eyes might miss, and by shining a work light at an angle across the repair
- Switch to 220 grit sandpaper for final smoothing, which removes the scratches left by the coarser 120 grit and creates a surface that accepts primer evenly
- Use the damp sponge technique as an alternative to reduce airborne dust by wiping the repair with a slightly damp (not wet) sponge to smooth the compound instead of sanding
- Remove all dust with a tack cloth or damp rag before priming, since even a thin layer of dust prevents proper primer adhesion and shows through the final paint
Over sanding that exposes the tape or corner bead underneath ruins the repair and requires another coat of compound to rebuild the surface. Creating valleys by applying too much pressure in one spot makes the corner look wavy instead of straight. Ignoring dust cleanup before painting causes the primer to sit on top of the dust layer rather than bonding to the compound, leading to peeling later. Using too coarse sandpaper creates scratches visible through the paint, especially in angled light from windows or lamps. Proper lighting reveals imperfections during sanding that you’ll definitely see after painting. Position a work light at a low angle across the repair to cast shadows on any remaining bumps or depressions.
Priming and Painting Repaired Drywall Corners
Primer is necessary because it seals the porous joint compound, prevents flashing (where the repair shows through as a dull spot), and ensures even paint coverage that matches the surrounding wall. Skipping primer is the most common mistake that makes repairs visible after painting, even when the sanding and compound work was perfect.
Apply primer using a brush to cut in along the corner itself, then switch to a small roller for the surrounding repaired area. This method ensures thorough coverage in the tight corner angle while maintaining consistent texture on the flat surfaces. Allow full drying per the manufacturer’s specifications, typically 1 to 4 hours depending on the primer type and environmental conditions. While the primer dries, check for any remaining imperfections by looking at the surface from different angles in good light. Minor issues can be spot sanded now and touched up with additional primer before the final paint goes on.
Paint matching presents challenges since wall paint changes color slightly over time due to UV exposure, fading, and accumulated dirt. Take a paint chip from an inconspicuous area (inside a closet works well) to your paint store for computer color matching. When an exact match isn’t possible because the existing paint has aged significantly, plan to paint the entire wall from corner to corner rather than just the repair area. This approach ensures consistent color across the whole surface. Use the same paint sheen as the existing walls since mixing sheens (flat, eggshell, satin, semi-gloss) makes repairs obvious even when the color matches perfectly. Apply at least two coats of finish paint for uniform coverage and color depth.
Texture matching for textured walls requires additional steps and practice. Orange peel and knockdown finishes are the most common textures in modern homes. Spray texture in aerosol cans provides a quick solution for small repairs, but the pattern rarely matches existing texture exactly. Apply the spray in short bursts from about 18 inches away, building up gradually rather than spraying heavily all at once. Practice your technique on cardboard first until you can reproduce something close to the existing texture pattern. Blend the texture while it’s still wet by lightly knocking down high spots with a drywall knife or trowel if needed for knockdown texture. Complex texture patterns like skip trowel, swirl, or heavy popcorn texture are difficult to match convincingly and represent situations where calling a professional makes sense for invisible results.
Alternative Methods: Composite and Flex Corner Bead Systems

Newer composite materials solve common problems with traditional metal beads. No more denting, rusting, cracking at fastener points, and visibility of bead edges showing through multiple compound coats.
Composite Corner Bead Installation Process
The installation method differs significantly from metal bead since composite materials use compound for adhesion rather than mechanical fasteners. Cut the bead to length with a utility knife or scissors by scoring through the material and bending it to snap cleanly. Apply a generous amount of joint compound to both corner sides, covering about 3 to 4 inches out from the corner on each wall. Press the bead into the wet compound, ensuring it’s centered perfectly in the corner and flush with both drywall surfaces. Use your taping knife to smooth the compound and remove excess that squeezes out from behind the bead, working from the center outward and maintaining consistent pressure to keep the bead positioned correctly. Allow complete drying before applying additional compound layers, typically 24 hours for the thicker bed coat. Some composite bead types allow the use of spray adhesive for initial positioning, which tacks the bead in place while you apply the embedding compound, making it easier to keep alignment on longer sections.
When to Choose Flex or Composite Beads
Rounded corners and bullnose corners where metal bead can’t follow the curve require flexible materials. Composite beads bend around these shapes while maintaining structural support. High traffic areas where furniture moves frequently and impacts are likely benefit from the dent resistance of composite materials, which compress slightly under impact rather than permanently denting like metal. Repair situations where the existing corner isn’t perfectly straight happen often in older homes with settled framing. Composite bead flexes to conform to these irregularities rather than bridging gaps like rigid metal. Areas with previous cracking problems caused by normal building movement do better with composite’s slight give, which absorbs stress instead of transferring it to the joint compound where it creates new cracks. Basements, bathrooms, and other areas where rust is a concern require either vinyl or composite beads since any metal bead will eventually corrode in persistent moisture.
Composite beads cost more initially, typically $8 to $15 per 8 foot length compared to $3 to $6 for metal. But they often provide better long term results with fewer callbacks for re-cracking. The easier installation process for beginners who struggle with keeping metal bead straight and properly fastened also makes the extra cost worthwhile.
Common Mistakes That Cause Drywall Corner Repairs to Fail
Most corner repair failures result from a few predictable mistakes that are easily avoided with proper knowledge and attention to detail.
Avoid these common errors:
- Applying compound too thick: Causes cracking and excessive shrinkage as the thick layer dries unevenly with the surface drying before the deeper compound, creating stress cracks
- Insufficient drying time between coats: Traps moisture under subsequent layers, weakening the bond and leading to soft spots that sand away too easily
- Failing to remove all loose material: Leaves weak areas under the new compound that eventually detach from the wall
- Not extending compound wide enough: Creates a visible hump or ridge where the repair ends instead of a smooth feather that blends invisibly
- Over tightening corner bead screws: Dimples the bead and compresses the drywall underneath, creating low spots that show after painting
- Painting without primer: Allows the porous compound to absorb paint differently than the sealed drywall, showing the repair as a dull spot
- Ignoring underlying moisture or structural issues: Results in recurring damage as the root cause continues affecting the repair
- Inadequate surface preparation: Leaves dust, grease, or loose particles that prevent proper adhesion
The specific problem of recracking usually indicates inadequate reinforcement, such as using only compound where corner bead or tape was needed to handle the stress at that joint. Ongoing structural movement from foundation settling beyond normal ranges or framing that moves with temperature changes needs professional assessment and correction. The cosmetic repair will just crack again until the movement stops. Moisture issues from hidden leaks or condensation weaken repairs by softening the compound and the drywall paper facing, preventing proper bonding.
Troubleshooting visible repairs after painting usually traces back to skipping primer, which is fixable without starting completely over by spot priming only the visible repair area, allowing it to dry, then repainting. Insufficient feathering of edges creates a raised ring around the repair that shows in angled light and requires adding an additional skim coat extended wider for better blending, then sanding and repainting. Different paint sheen from using flat paint over satin walls or vice versa needs repainting the entire wall corner to corner with the correct matching sheen, since trying to fix it by recoating just the repair makes the problem worse.
Preventing Future Drywall Corner Damage

Prevention costs less than repeated repairs and protects your work after spending days getting the corner smooth and painted perfectly.
| Prevention Method | Best Location | Cost Range |
|---|---|---|
| Corner guards (clear or paintable plastic) | Hallways, room entries, high traffic corners | $8 to $20 per corner |
| Furniture pads on chair backs and table edges | Dining areas, rooms with furniture near corners | $5 to $15 per package |
| Strategic furniture placement | Any room where furniture creates traffic patterns | Free |
| Regular moisture monitoring | Bathrooms, basements, under windows | $20 to $40 for moisture meter |
| Quality protective paint or sealant | All corners in occupied spaces | $25 to $50 per gallon |
Physical protection methods shield corners from the impacts that cause most damage. Install corner guards made of clear plastic or paintable plastic material in hallways and room entries where furniture moves during cleaning or rearranging. The guards absorb impacts that would otherwise dent the drywall and crack the compound. Place furniture pads on chair backs, especially dining chairs that get pushed back from the table repeatedly, and on table edges that face corners. These simple foam or felt pads cost almost nothing and prevent hundreds of small impacts over time. Maintain clear walkways when moving furniture by planning your path and removing obstacles rather than forcing large items through tight spaces where they’ll bump corners. Teaching household members, especially children, about corner vulnerability helps since awareness prevents careless impacts from toys, sports equipment, and rough play.
Environmental prevention addresses moisture and temperature stress that weakens corners over time. Address moisture sources promptly by fixing plumbing leaks when you first notice them rather than waiting until damage spreads, repairing roof leaks that allow water into wall cavities, and controlling condensation issues around windows where cold surfaces meet warm humid air. Maintain consistent indoor temperature and humidity levels year round as much as practical, since extreme swings cause materials to expand and contract repeatedly, stressing joints and seams. Inspect corners regularly for early signs of cracking, checking every few months by running your hand along corners and looking closely for hairline cracks. These early cracks are easier to fix with simple compound patching than wide cracks that need full corner bead replacement. Apply quality paint as a protective barrier that seals the compound and drywall against minor moisture exposure while providing a uniform surface that makes visual inspection easier since any new crack or discoloration shows clearly against the consistent paint color.
Cost Estimates and Time Requirements for Corner Repairs
Basic DIY repair materials run $15 to $25 for joint compound, sandpaper assortment, and primer. Corner bead replacement adds $5 to $15 depending on the type and length needed, with standard metal bead on the low end and composite specialty beads on the high end. Tools add another $20 to $40 for a basic kit if you don’t already own putty knives, a sanding block, and a utility knife. Paint matching costs $15 to $30 for a quart of custom mixed color, which covers the repair area plus some extra for future touch ups. Total typical cost ranges from $30 to $75 for a complete DIY repair including all materials and basic tools.
Time investment involves both working time and waiting time. Actual working time totals 2 to 4 hours spread across multiple days, broken into 30 to 45 minute sessions for each coat application and sanding. Drying time between coats requires 4 to 24 hours per coat depending on compound thickness, humidity, and temperature. Minimum 2 to 3 coats are required for any repair, with complex repairs needing 4 coats. Total elapsed time typically runs 3 to 5 days from start to final paint. Rushing drying time causes the majority of DIY failures since wet compound under a new coat creates weak bonds, shrinkage cracks, and soft spots that sand away unevenly.
| Repair Type | DIY Cost | Pro Cost | Time Required |
|---|---|---|---|
| Simple crack fill without bead replacement | $15 to $30 | $75 to $150 | 2 to 3 days |
| Inside corner retape and compound | $20 to $40 | $100 to $200 | 3 to 4 days |
| Outside corner bead replacement | $30 to $60 | $150 to $300 | 4 to 5 days |
| Extensive damage with multiple corners | $75 to $150 | $400 to $800 | 5 to 7 days |
Professional help makes sense in several situations beyond just convenience. Complex texture matching that requires special equipment and experience to reproduce convincingly often costs less in materials wasted during failed matching attempts than just hiring someone who does it daily. Multiple corners needing repair throughout the house benefits from a pro’s efficiency and bulk material purchasing. Structural concerns requiring assessment before repair need a qualified contractor who can identify and correct underlying problems. Time constraints when you need the repair done quickly for a showing, inspection, or event make the premium worthwhile. Lack of tools means your material costs approach the low end of professional pricing once you add tool purchases. Previous failed DIY attempts that need correcting before starting over sometimes end up costing more to fix than hiring a professional initially. Professional costs typically run $150 to $400 per corner depending on damage extent, repair complexity, regional labor rates, and whether texture matching or extensive prep work is involved.
When to Call a Professional for Corner Crack Repairs

Most corner cracks are straightforward DIY repairs that any homeowner can handle successfully. But certain warning signs indicate underlying problems requiring professional diagnosis and correction.
Professional help is needed when you observe these warning signs:
- Recurring cracks that reappear after repair: Indicates ongoing movement or stress that cosmetic repair won’t solve
- Cracks accompanied by bulging or bowing walls: Suggests structural framing issues or severe foundation movement beyond normal settling
- Visible mold or musty smell near damaged corners: Points to hidden moisture problems requiring source identification and proper remediation
- Multiple corners cracking at the same time throughout the house: Means widespread foundation or framing issues affecting the entire structure
- Cracks wider than 1/4 inch: May indicate significant structural movement rather than normal settling stress
- Stair step cracking patterns running diagonally across corners: Classic sign of foundation settlement or shifting requiring assessment
- Water stains or discoloration around cracks: Reveals active or previous moisture intrusion needing investigation
Structural concerns develop when foundation movement creates stress throughout the house beyond normal ranges. Settling happens in all structures. But excessive settlement from unstable soil, inadequate foundation design, or water undermining the foundation causes ongoing damage that cosmetic repair cannot address. Inadequate framing or construction defects sometimes hide for years until enough stress accumulates to crack corners and other vulnerable points. Cosmetic repair without addressing root causes leads to repeated failure as the underlying problem continues affecting the structure. More seriously, patching over warning signs of structural distress potentially masks dangerous conditions developing behind the walls where you can’t see them until they reach critical stages.
Moisture related issues require professional assessment when you suspect hidden water damage behind walls, ongoing plumbing leaks within wall cavities, roof leaks allowing water into the structure, or serious condensation problems from inadequate ventilation. Mold growth risks accompany any prolonged moisture exposure, creating health hazards and requiring proper remediation beyond simple drywall repair. Professional moisture assessment uses specialized equipment like moisture meters and thermal cameras to identify wet areas not visible on the surface. Mold inspection determines the extent of contamination and whether remediation is needed before sealing damaged areas. For situations involving moisture related corner damage that extends beyond simple cosmetic repair, consider consulting resources about water damage repair and restoration to understand the comprehensive approach needed when water has compromised your home’s structure.
Final Words
Fixing cracked drywall corners comes down to choosing the right approach for your specific damage.
Outside corners need sturdy corner bead replacement. Inside corners require proper tape embedding and patient compound application.
The process takes a few days because of drying time, but the actual hands-on work is manageable for most homeowners.
Start with clean prep work, use thin coats, and don’t rush the drying between layers. If you see recurring cracks, water stains, or structural warning signs, get a professional assessment before patching things up.
Most corner repairs cost under $75 in materials and restore a clean, safe finish that holds up.
FAQ
How do you fix drywall cracks on corners?
Fixing drywall cracks on corners depends on whether you’re working with an outside corner (where walls meet at a protruding edge) or an inside corner (where walls meet at an interior angle). Outside corners typically need corner bead replacement, which involves removing the damaged section, installing new metal or vinyl bead secured with screws every 8 inches, then applying multiple coats of joint compound over the bead. Inside corners require cleaning the crack, embedding paper tape or mesh tape in joint compound along the seam, then applying additional compound layers while feathering the edges outward. Both repairs need 2-3 days for proper drying between coats, though actual hands-on work is only 2-4 hours.
Is it normal for drywall to crack in corners?
Drywall cracking in corners is normal and happens in most homes as buildings settle over time. Natural foundation movement creates stress where two wall planes meet, resulting in hairline cracks that are purely cosmetic. Impact damage from furniture, temperature fluctuations causing expansion and contraction, and humidity changes affecting joint compound also cause corner cracks. However, recurring cracks that reappear after repair, cracks wider than 1/4 inch, or cracks accompanied by bulging walls, mold, or water stains indicate structural or moisture issues requiring professional assessment before you attempt cosmetic repair.
Can you put new corner bead over old corner bead?
Putting new corner bead over old corner bead is not recommended because it creates a bulge that’s difficult to hide with joint compound and makes the corner thicker than surrounding walls. The proper approach involves removing the damaged section of old corner bead by cutting it away with a utility knife, then installing new bead flush with the existing drywall surface on both sides. If the existing bead is still firmly attached and undamaged, you can repair minor cracks with joint compound alone without replacing the bead at all.
How do you fix busted drywall corners?
Fixing busted drywall corners requires removing all loose or damaged material back to solid drywall using a utility knife. For outside corners, cut and remove the damaged corner bead section, install new bead cut to exact length and secured with drywall screws every 8 inches, then apply thin coats of joint compound extending 6-8 inches onto adjacent walls. For inside corners, clean the area thoroughly, embed paper tape folded lengthwise into a thin layer of joint compound, then apply additional coats while feathering edges. After 24-hour drying between coats, sand smooth with 120-grit then 220-grit sandpaper, prime, and paint.
What tools do you need to repair drywall corners?
Repairing drywall corners requires a 6-inch putty knife for initial compound application, a 10-inch knife for wider coats, a utility knife for cutting and cleanup, sandpaper in 120-grit and 220-grit, a sanding block, and a corner trowel for inside corners. You’ll also need a mud pan for holding compound, a drywall saw for removing damaged sections, and either a hammer or drill for securing corner bead. Most repairs cost $15-40 in materials for the DIY approach, with basic tool kits running another $20-40 if you don’t already own these items.
What causes drywall corners to keep cracking?
Drywall corners keep cracking when the underlying cause hasn’t been addressed or when inadequate reinforcement was used during repair. Ongoing structural movement from foundation settling, moisture issues weakening the drywall, or temperature fluctuations causing expansion and contraction create repeated stress at corner joints. Repairs that used only joint compound without proper corner bead reinforcement on outside corners or without tape on inside corners will crack again. Recurring cracks accompanied by bulging walls, water stains, or mold require professional assessment for structural or moisture problems before attempting another cosmetic repair.
How long does joint compound take to dry on corners?
Joint compound on corners takes a minimum of 4-6 hours to dry between coats, though waiting 24 hours is ideal for complete drying and stronger repairs. Drying time varies significantly with humidity and temperature, with high humidity or cold temperatures extending drying time. The compound should appear bright white with no dark spots indicating moisture before you sand or apply the next coat. Rushing the drying process causes the most common DIY repair failures, including cracking, poor adhesion, and visible repair lines after painting.
Should you use paper tape or mesh tape on inside corners?
Paper tape creates a stronger bond on inside corners and is the preferred choice for most professional repairs, though it requires proper embedding technique and has a steeper learning curve for beginners. Mesh tape (fiberglass tape) is self-adhesive and easier to apply, making it beginner-friendly, but requires setting compound or multiple coats of all-purpose compound for adequate strength. For inside corners where walls meet walls or walls meet ceilings, fold paper tape lengthwise and press it into wet joint compound using a corner trowel at the correct angle for proper embedding.
What type of corner bead is best for high-traffic areas?
Composite or flex corner beads work best for high-traffic areas because they resist denting better than traditional metal beads and have slight give that prevents re-cracking from building movement or impacts. Vinyl beads offer rust resistance in moisture-prone areas, while paper-faced composite beads provide easier finishing and conform to corners that aren’t perfectly straight. Metal corner beads remain the most economical choice and provide adequate durability for most applications, but they dent easily from furniture strikes and can show through thin paint layers if not properly covered with compound.
How do you match texture when repairing drywall corners?
Matching texture when repairing drywall corners requires identifying the existing texture type (smooth, orange peel, knockdown, or skip trowel) and using spray texture or hand application to replicate the pattern. Practice the technique on cardboard first to dial in the right spray distance and pressure for orange peel or knockdown finishes. Apply texture while the final compound coat is still slightly damp for better blending, then feather the edges where new texture meets old. Complex texture patterns or heavy textures may require professional help for invisible repairs.
When should you call a professional for corner cracks?
Call a professional for corner cracks when you see recurring cracks that reappear after repair, cracks accompanied by bulging or bowing walls, visible mold or musty smell near damaged corners, or multiple corners cracking simultaneously. Cracks wider than 1/4 inch, stair-step cracking patterns, or water stains around cracks indicate structural or moisture issues requiring professional diagnosis before cosmetic repair. Foundation movement, hidden water damage, plumbing leaks, or mold growth risks need professional moisture assessment and structural evaluation to address root causes rather than just patching visible damage.