


Ever notice how water always finds the weakest spot in your house and settles in? Baseboards are usually it. They sit right where water pools after a slow leak, bathroom humidity, or poor drainage. When they start peeling, warping, or going soft, you’ve got a decision to make: patch the surface or actually fix the problem. This guide walks through both assessment and repair, from finding the moisture source (which comes first, always) to getting new trim installed so it stays dry and looks right.
Assessment: Identifying Damage and Locating Moisture Sources
You need two things figured out before you touch anything: how bad the damage is and where the water’s coming from. Both happen before repairs start. Find the moisture source first or you’ll be redoing this whole mess in a few months.
Recognizing Moisture Damage Signs
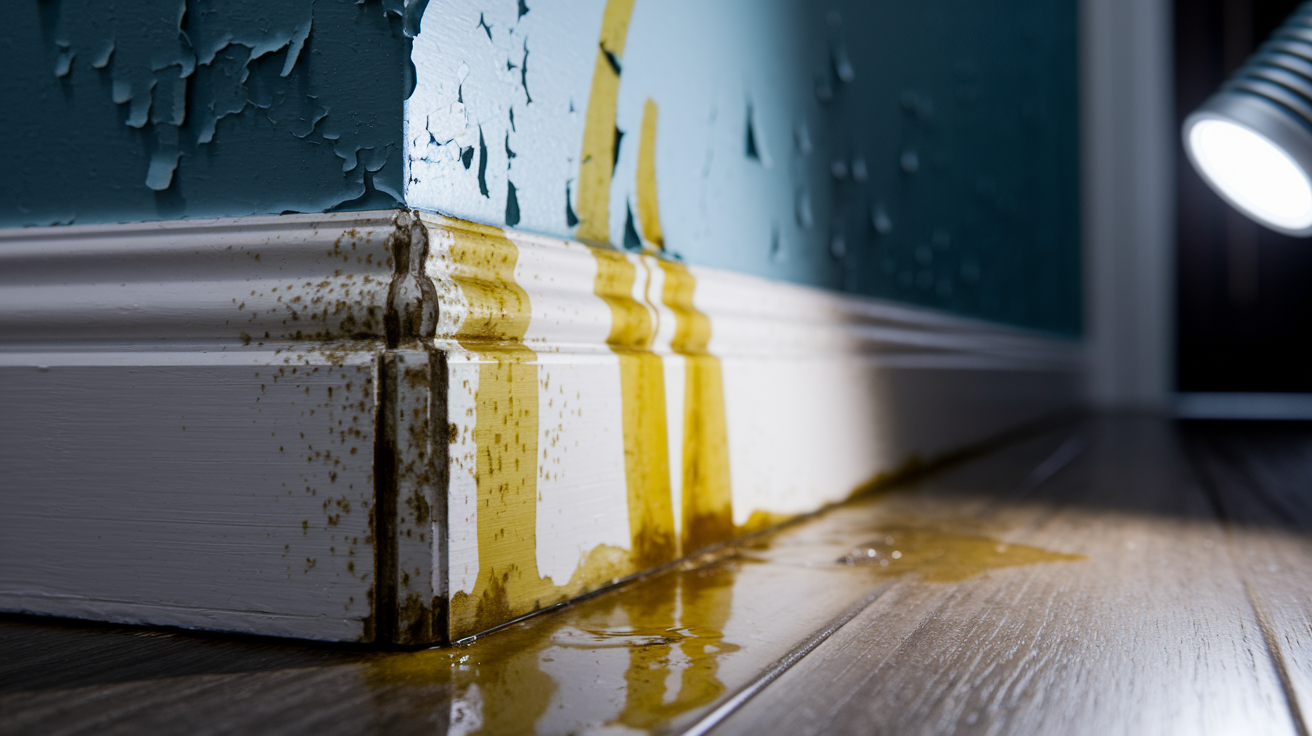
Get down close with good lighting and check the entire length. Corners and spots near plumbing hide the worst problems.
- Peeling or bubbling paint – Paint lifts away in flakes or forms raised bubbles filled with moisture
- Yellowish or brownish discoloration – Water leaves distinct stains, often streaks or patches climbing up from the floor
- Baseboards separating from walls – Gaps appear where they once fit flush
- Mold or mildew presence – Dark spots, fuzzy growth, or greenish patches, usually with a musty smell
- Warping – Baseboard curves, twists, or bows away from its original straight profile
- Swelling – Baseboard looks thicker or puffy, especially along bottom edges
- Softness and sponginess when pressed – Material gives under finger pressure instead of feeling solid
- Texture changes – Surface feels rough, crumbly, or flaky rather than smooth
- Separation at joints – Mitered corners or seams pull apart as material expands
- Disintegration when touched – Material crumbles or breaks away, particularly common with water damaged MDF
Areas near the floor get hit hardest because water flows downward and settles there. Check behind furniture and in closets where damage goes unnoticed for months. The back side facing the wall often shows worse damage than the front.
Locating the Moisture Source
Most baseboard water damage comes from inside the house. Plumbing leaks from toilets, sinks, and tubs cause constant problems. Washing machines, dishwashers, and water heaters develop slow leaks that create persistent dampness. Minor pipe leaks within walls cause gradual saturation that spreads through framing and eventually reaches baseboards. Poor bathroom ventilation allows humidity to condense on walls and trim. Basements naturally accumulate moisture through condensation, especially in humid climates.
External moisture comes from poor foundation drainage that lets water pool against the house and seep through walls. Windows and doors that aren’t sealed properly let rain penetrate during storms. Storm water hits low areas and homes without proper grading. Gutters that overflow or direct water toward the foundation create persistent moisture problems. Flooding from heavy rains saturates walls from the ground up. Soil graded toward the house instead of away channels water directly at the foundation.
Don’t start repairs until the moisture source is completely resolved. Fixing baseboards without eliminating the water source guarantees damage returns and turns your work into wasted effort. Call a plumber if you suspect pipe leaks or fixture problems. Contact a foundation specialist if you notice exterior drainage issues, foundation cracks, or persistent basement moisture.
Safety Precautions, Tools, and Materials Preparation
Get your safety equipment and complete tool inventory ready before starting. This prevents project delays and health risks. Most items are available at home improvement stores, and having everything on hand keeps things moving smoothly.
Essential Safety Measures for Moisture Damage Work
Mold exposure causes respiratory irritation, allergic reactions, and serious health problems, especially for people with asthma or compromised immune systems. Water damaged materials also harbor bacteria and release harmful dust particles during removal and sanding.
You need an N95 or better respirator mask, especially if mold is present. Standard dust masks don’t provide adequate protection. Wear waterproof gloves to protect hands from contaminated materials and cleaning solutions. Safety glasses shield eyes from debris and dust. Long sleeves, pants, and closed toe shoes prevent skin contact with mold and damaged materials.
Prepare the workspace before starting demolition. Position fans to create airflow that pushes contaminated air toward open windows or doors. Contain dust by sealing doorways to other rooms with plastic sheeting and painter’s tape. Keep the work area away from living spaces, especially bedrooms and areas where children play. Bag all contaminated materials immediately in heavy duty trash bags and dispose of properly. Don’t sweep or vacuum mold covered materials because this spreads spores throughout the house.
Get professional mold remediation when mold growth exceeds 10 square feet, when black mold (Stachybotrys) is present, when structural damage exists behind baseboards, or when household members have respiratory concerns or immune system vulnerabilities.
Complete Tools and Materials Checklist
Having everything ready before starting prevents frustrating mid project delays and extra trips to the store.
| Tool/Material | Purpose | Notes |
|---|---|---|
| Utility knife | Scoring paint seals before removal | Use fresh sharp blades for clean cuts |
| Pry bar or putty knife | Gently detaching baseboard from wall | Wider putty knife reduces wall damage |
| Hammer | Driving nail punch, general demolition | Standard claw hammer works fine |
| Miter saw | Making precise 45 degree angle cuts | Can rent if you don’t own one |
| Measuring tape | Accurate measurements for cuts | 25 foot tape recommended |
| Nail gun or finishing nails | Securing new baseboards to wall | Pneumatic nail gun speeds installation |
| Sanding block and sandpaper | Smoothing repairs and preparing for paint | 120 to 150 grit for finish work |
| Caulk gun | Applying caulk and construction adhesive | Standard size fits most tubes |
| Dehumidifier and fans | Drying area thoroughly before repairs | Run continuously for 48 to 72 hours minimum |
| Replacement baseboards | Replacing damaged sections | Match height and profile to existing trim |
| Wood filler or wood putty | Filling nail holes and small cracks | Choose stainable if not painting |
| Construction adhesive | Securing baseboards to wall surface | Use waterproof formula for wet areas |
| Primer and paint | Finishing and protecting new baseboards | Match existing trim color |
| Moisture meter | Verifying complete dryness before proceeding | Helpful but optional for small projects |
Consider renting specialized tools like pneumatic nail guns or miter saws if you don’t own them. Quality materials ensure repairs last, particularly in moisture prone areas. Spending a bit more on waterproof adhesive, PVC trim, and proper caulk prevents having to redo the work when cheap materials fail.
Step by Step Repair Process: Minor to Severe Damage

Your approach depends on damage severity. Minor surface damage needs filling and refinishing. Severe warping, crumbling, or mold penetration requires complete replacement. Both approaches share common initial steps like removal and drying but diverge based on your damage assessment.
Removing Damaged Baseboards Safely
Careful removal prevents additional wall repair work and makes the project go faster.
-
Score the paint seal along the top edge. Run a sharp utility knife along where the baseboard meets the wall to break the paint bond. Press firmly and make several passes for thick paint buildup.
-
Start at a seam or the most damaged section. Beginning at an existing break point or end makes the first separation easier and less likely to cause wall damage.
-
Insert a pry bar behind the baseboard near nail locations. Slide the flat end between the baseboard and wall, positioning it where nails secure the trim to studs.
-
Work gradually along the entire length without forcing. Apply steady, gentle pressure at each nail location. Move along incrementally rather than trying to remove one section completely at a time.
-
Remove nails from the baseboard or wall. Pull nails through the back of the baseboard rather than the front to avoid enlarging nail holes. Remove any nails left in the wall with pliers or the pry bar claw.
-
Label pieces if reusing any undamaged sections. Mark which wall each piece came from and its orientation if you plan to reinstall any original sections after cleaning and repairs.
Expect some resistance and occasional complications. If the baseboard breaks during removal, continue carefully with the remaining pieces. When paint pulls off drywall, you didn’t score the paint seal deep enough. Go back over the area with deeper cuts from your utility knife. Stubborn nails sometimes refuse to budge. Use a nail punch to drive them through the baseboard rather than risk major wall damage. Adhesive resistance requires patience. Work slowly with a wider putty knife positioned flat against the wall to minimize gouging.
Thorough Drying: The Critical Step
This is the most important phase for preventing mold and ensuring your repair lasts. Skipping or rushing drying guarantees problems within weeks or months.
- Position fans directly toward the affected wall area. Create constant air circulation across wet surfaces to carry moisture away.
- Run dehumidifiers continuously in the enclosed space. Dehumidifiers pull moisture from air and materials, speeding the drying process significantly.
- Check moisture levels with a moisture meter if available. Readings below 15% indicate sufficient dryness. Above 20% means materials are still too wet.
- Ensure minimum 48 to 72 hours drying time. Longer drying is better than rushing. Severe saturation requires a week or more.
- Inspect wall cavity behind baseboards and subflooring for hidden moisture. Moisture often penetrates deeper than surface damage suggests.
- Treat any visible mold with EPA approved solutions before proceeding. Kill mold spores before sealing them behind new baseboards.
- Confirm complete dryness through touch test and visual inspection. Surfaces should feel completely dry, with no cool spots or visible moisture.
- Extend drying time in humid climates or for severe saturation. High ambient humidity slows drying significantly.
Verify complete dryness before moving forward. The wall and floor should feel completely dry to your touch, with no dampness, coolness, or soft spots. Visual inspection should reveal no moisture, discoloration that looks wet, or condensation. A moisture meter reading below 15% confirms dryness objectively. Professional drying equipment becomes necessary when extensive moisture damage affects large areas, when water has saturated wall cavities or insulation, or when you can’t achieve dryness after a week of fan and dehumidifier use. For situations requiring professional drying equipment and comprehensive moisture assessment, restoration specialists have industrial dehumidifiers, air movers, and infrared cameras that locate hidden moisture.
Rushing this phase guarantees repair failure. Trapped moisture behind new baseboards grows mold, rots framing, and destroys your work.
Repairing Minor Damage (Small Cracks, Slight Swelling, Surface Issues)
Minor damage means small cracks, slight swelling without structural compromise, surface discoloration, or minor warping that doesn’t prevent reinstallation. This approach only works when baseboard structural integrity remains intact and the material isn’t crumbling or severely rotted.
-
Lightly sand damaged areas with fine grit sandpaper. Use 120 grit sandpaper to remove loose material, smooth rough edges, and create a surface that accepts filler properly.
-
Apply wood filler or epoxy to cracks and gouges. Press filler firmly into damaged areas with a putty knife. Use epoxy reinforced filler for larger gaps that need structural support.
-
Allow complete drying per manufacturer instructions. Drying times vary from 2 hours for fast dry formulas to 24 hours for standard products. Check the label and don’t rush this step.
-
Sand filled areas flush with the surrounding surface. Start with 120 grit sandpaper to level major high spots, then finish with 150 grit for a smooth surface that blends with the original material.
-
Wipe completely clean with a tack cloth before priming. Remove all sanding dust or primer and paint won’t adhere properly. A slightly damp rag works if you don’t have a tack cloth.
Compare wood filler options based on your specific needs. Water based fillers work well for small cracks and nail holes, clean up easily with water, and dry quickly. Solvent based fillers provide better adhesion and durability but require mineral spirits for cleanup and have strong odors. Epoxy reinforced fillers bond structural gaps and add strength but cost more and take longer to dry. Solid wood accepts all filler types better than MDF, which tends to crumble around filled areas when water damage has compromised its integrity.
Complete Replacement for Severe Damage
Replacement becomes necessary when you see extensive warping that prevents proper fit against the wall, crumbling or soft areas indicating rot, visible mold penetration into the material, or structural compromise where the baseboard breaks easily or has lost rigidity. Replacement provides better long term results than attempting to salvage severely damaged sections and spending hours on repairs that won’t hold up.
Selecting Moisture Appropriate Materials
Material choice determines how your repair holds up when moisture returns. PVC or vinyl trim provides complete moisture immunity, making it ideal for bathrooms, laundry rooms, kitchens, and basements. PVC never rots, resists mold growth completely, and requires minimal maintenance. The main drawbacks are higher material cost and a slightly different appearance than traditional wood. Solid wood such as pine or oak offers natural moisture resistance when properly sealed, can be refinished or repaired later, provides traditional appearance that matches older homes, and costs less than PVC while performing well in moderate risk areas. Avoid MDF in any moisture prone location. It swells dramatically and crumbles when wet, making it suitable only for consistently dry interior spaces far from water sources. Composite materials balance moisture resistance with affordability and work well in areas with occasional minor exposure but not constant moisture.
Use PVC for high risk areas like bathrooms, laundries, and kitchens. Choose solid wood for moderate risk spaces like living rooms with occasional spills or basements with controlled humidity.
Measuring, Cutting, and Fitting New Baseboards
Accurate measuring prevents wasted material and installation frustration. Measure the wall length from corner to corner or from one end to the door casing. Add 1/8 inch to your measurement to allow slight adjustment room during installation. Mark cut lines clearly on the baseboard face with a pencil, making sure marks are visible and precise. Measure twice before cutting. The old carpenter’s rule exists because it prevents expensive mistakes.
Joint types depend on where sections meet. Cut 45 degree miter joints for outside corners using a miter saw set to exactly 45 degrees. Both pieces meeting at the corner receive opposing 45 degree cuts so they fit together in a right angle. For inside corners, the coping technique creates tighter, more professional joints than mitered corners. Cut one baseboard square where it meets the corner. On the adjoining piece, cut a 45 degree miter, then use a coping saw to cut along the profile line revealed by the miter, creating a piece that nestles perfectly against the first baseboard’s profile. Use square cuts for butt joints at door casings and where baseboards terminate at walls. PVC cuts easily with standard wood saws but requires sharp blades for clean edges without ragged tears.
Installing and Securing Replacement Baseboards
-
Apply construction adhesive in thin beads on the baseboard back. Use waterproof formula adhesive in bathrooms, kitchens, and laundries. Run beads vertically every 8 to 10 inches rather than one continuous bead.
-
Position carefully against the wall and press firmly along the entire length. Start at one end and work toward the other, pressing the baseboard flat against the wall and down to the floor.
-
Secure with finishing nails every 16 inches. Drive nails at a slight downward angle through the baseboard into the wall.
-
Aim nails into wall studs for the best hold. Locate studs beforehand with a stud finder or by tapping the wall and listening for solid versus hollow sounds. Nails into studs hold much better than nails into drywall alone.
-
Countersink nails slightly below the surface with a nail punch. Tap the nail punch gently until the nail head sits about 1/16 inch below the baseboard face, creating a small hole you’ll fill later.
-
Check level and alignment before adhesive sets. Step back and sight down the baseboard length to verify it sits straight and level. Make immediate adjustments if needed because adhesive begins setting within 10 to 15 minutes.
Seal all end cuts on wood baseboards with primer or wood sealer before installation. Exposed end grain absorbs moisture rapidly and causes premature rot. Brush sealer on all cut ends and let dry completely before installing the pieces.
Finishing: Achieving Seamless Professional Results
Proper finishing determines whether repairs are noticeable or blend seamlessly with existing trim. This phase requires patience for drying between coats, but the extra time determines whether your work looks like a professional repair or an obvious patch job.
-
Fill all nail holes and small gaps with wood putty. Use a putty knife to press putty firmly into each hole, slightly overfilling so the putty sits proud of the surface.
-
Allow putty to dry completely per manufacturer timeframe. Most standard wood putty requires 30 minutes to 2 hours. Fast dry formulas set in 15 minutes. Check the container label and wait the full time.
-
Sand filled areas and entire baseboard surface with fine grit sandpaper. Use 120 to 150 grit sandpaper to smooth filled spots flush with the surrounding surface and lightly scuff the entire baseboard to help paint adhere.
-
Wipe all surfaces clean with a tack cloth. Remove every trace of sanding dust or the dust will create bumps and rough texture under your paint.
-
Apply flexible caulk between baseboard and wall, and baseboard and floor. Run a thin, consistent bead of paintable caulk along both gaps to seal them completely.
-
Smooth caulk with a damp finger or tool before it skins over. Work quickly, within a few minutes of application, to create smooth, concave joints that look professional.
-
Apply quality primer coat and allow to dry completely. Primer seals wood, prevents tannin bleed through from knots, and creates uniform surface for paint. Let dry 2 to 4 hours or per label instructions.
-
Apply 1 to 2 finish coats of paint, allowing proper drying time between coats. Apply thin, even coats with a quality brush or small roller. Wait at least 2 to 4 hours between coats, longer if humidity is high.
Color matching requires attention to detail that makes repairs invisible. Take a paint chip or small section of baseboard to the paint store for computer color matching. Test the matched color in an inconspicuous area first and let it dry completely. Wet paint looks different than dry. Check the color in both natural daylight and artificial lighting because lighting dramatically affects how colors appear. If the match isn’t perfect, have the store adjust the formula slightly.
Texture matching matters in older homes where baseboards have accumulated layers of paint with specific sheen levels. Satin finish provides subtle sheen and hides minor imperfections well. Semi gloss offers more durability and moisture resistance, making it appropriate for kitchens and bathrooms. Matte or flat finishes show every flaw and don’t clean well, making them poor choices for baseboards.
Seal all end cuts and joints in bathrooms, kitchens, and laundries with waterproof caulk after paint dries completely. This creates a moisture barrier that prevents water from sneaking behind the baseboard and starting the damage cycle again.
Application technique affects final appearance significantly. Use quality brushes or small foam rollers designed for trim work. Cheap brushes leave visible bristle marks. Apply thin, even coats rather than one thick coat that sags and takes forever to dry. Sand lightly between coats with 220 grit sandpaper for the smoothest possible finish, though this step is optional for everyday results. Work in the direction of the wood grain whenever possible, though this matters less on PVC trim.
Prevention: Protecting Baseboards from Future Moisture Damage

Prevention costs far less and takes less time than repeated repairs. Most preventive measures require minimal investment and effort but provide substantial long term protection against water damage returning to your newly repaired baseboards.
Plumbing Maintenance:
- Conduct annual plumbing inspections, scheduling them in fall before winter when pipes tend to freeze and burst.
- Install water leak detectors near appliances including washing machines, dishwashers, and water heaters. These inexpensive devices sound alarms when water appears where it shouldn’t.
- Check under sinks regularly for drips, moisture, or water stains that indicate developing leaks.
- Inspect and replace washing machine supply hoses every 3 to 5 years before they fail. Burst hoses dump gallons of water in minutes.
Indoor Moisture Control:
- Run bathroom exhaust fans during showers and for at least 30 minutes afterward to remove humidity before it condenses on walls.
- Use dehumidifiers during humid summer months to keep indoor humidity below 50%, preventing condensation throughout the house.
- Ensure proper attic and crawlspace ventilation to prevent moisture accumulation that migrates into living spaces.
- Wipe up spills immediately in kitchens and bathrooms rather than letting water sit on floors where it seeps under baseboards.
Sealing and Waterproofing:
- Apply waterproof caulk where baseboards meet floors in bathrooms, kitchens, and laundries, creating a moisture barrier at the most vulnerable junction.
- Install vapor barriers behind baseboards during installation in high moisture rooms like full bathrooms and laundry areas.
- Seal around window and door frames to prevent exterior water entry during wind driven rain.
- Recaulk joints annually in wet areas because caulk deteriorates over time and loses effectiveness.
Exterior Water Management:
- Maintain proper foundation grading with soil sloping away from the house at least 6 inches over the first 10 feet.
- Keep gutters clean and free flowing so water doesn’t overflow near the foundation.
- Ensure downspouts direct water at least 5 feet away from the foundation, using extensions if necessary.
- Inspect the foundation for cracks and seal them promptly with appropriate masonry sealant before water penetrates.
Establish a seasonal inspection routine in spring and fall to catch problems early. Walk through your home checking for musty odors, soft spots, discoloration, and other early warning signs. Address small issues immediately. A $5 tube of caulk applied today prevents a $500 repair project next year.
When Professional Help Is Necessary
Many baseboard repairs are well suited for confident DIYers with basic tools and reasonable home improvement experience. Straightforward replacement in a single room with clear water source falls within the capability of most homeowners willing to learn as they go.
Certain situations require professional expertise, specialized equipment, or proper licensing for safety and quality results that last. Attempting repairs beyond your skill level or tackling problems that need professional diagnosis often leads to incomplete repairs, recurring damage, or safety hazards.
- Extensive mold growth covering more than 10 square feet. Requires certified mold remediation following EPA protocols, specialized containment, and proper disposal procedures.
- Structural damage discovered behind baseboards. Damage affecting wall framing, floor joists, or load bearing members needs structural evaluation and repair by licensed contractors.
- Subflooring damage or rot beneath baseboards. Requires removal of finished flooring, subfloor replacement, and reinstallation that most DIYers can’t do properly.
- Suspected plumbing leaks within walls. Requires diagnosis equipment and access techniques without causing excessive damage, plus licensed plumbing repair.
- Custom millwork or historic trim. Specialized matching and woodworking skills are needed to replicate profiles that are no longer manufactured.
- Widespread damage throughout multiple rooms. Suggests systemic moisture problems requiring comprehensive diagnosis and remediation beyond single room scope.
- Uncertainty about moisture source location or resolution. Professional moisture assessment with thermal imaging and moisture meters pinpoints hidden problems.
- Personal health concerns or respiratory sensitivities. Makes mold exposure risky even with proper protective equipment.
Professionals have specialized equipment unavailable to homeowners. Calibrated moisture meters measure exact moisture content in materials and behind surfaces. Industrial grade dehumidifiers and air movers dry structures far faster than consumer units. Infrared cameras detect hidden moisture, leaks, and insulation problems without demolition. Mold testing capabilities identify species and contamination levels for proper remediation planning.
Professional work typically includes warranties on both labor and materials, providing protection if problems recur. For comprehensive assessment and repair services throughout the home, professional house repair contractors handle everything from moisture diagnosis through final finishing with experienced crews and proper equipment.
Obtain multiple detailed quotes for comparison, making sure you understand exactly what each contractor will do. Ensure quotes include moisture source resolution and prevention measures, not just cosmetic baseboard replacement. Verify proper licensing and insurance coverage before work begins.
Project Costs and Insurance Considerations

Costs vary significantly based on damage extent, materials selected, room size, and whether you choose DIY or professional labor. DIY approaches save labor costs but require your time investment, tool access, and confidence in your skills.
| Project Scope | DIY Cost Range | Professional Cost Range | Typical Timeline |
|---|---|---|---|
| Minor repair single room (filling, sanding, repainting) | $50 to $150 materials only | $300 to $600 with labor | 2 to 3 days total (mostly drying time) |
| Complete replacement single room | $200 to $500 materials only | $600 to $1,200 with labor | 3 to 5 days total |
| Multiple room replacement | $500 to $1,500 materials only | $1,500 to $4,000+ with labor | 5 to 7 days total |
| Water damage restoration with mold remediation | Not recommended DIY | $2,000 to $8,000+ professional only | 5 to 10+ days depending on extent |
| Historic or custom trim restoration | Not recommended DIY | $3,000 to $10,000+ professional only | 1 to 3 weeks with custom milling |
Multiple factors influence final costs beyond basic material and labor rates. Baseboard material choice makes substantial difference. PVC costs $1.50 to $3.00 per linear foot versus $0.50 to $1.50 for MDF, but PVC lasts far longer in wet areas and never needs replacement from moisture damage. Linear footage required obviously affects total cost. Room accessibility complicates work. Stairs, heavy furniture requiring moving, and tight spaces increase labor time. Whether mold treatment is required adds $500 to $3,000 depending on extent. Local labor rates vary significantly by region, with coastal and urban areas charging substantially more than rural locations.
Additional costs often get overlooked during initial planning. Tool rental runs $40 to $100 per day if you need specialized equipment like miter saws or pneumatic nailers. Paint color matching sometimes requires custom mixing at premium prices. Disposal fees for water damaged materials containing mold can add $50 to $200. Moisture source repair often exceeds baseboard costs. Plumbing repairs range from $150 for simple fixes to $1,500+ for pipe replacement, and foundation drainage correction runs $1,000 to $5,000 depending on solutions needed.
Homeowners insurance coverage depends on how damage occurred. Sudden catastrophic events like burst pipes, flooding from appliance failures, and storm damage typically receive coverage under standard homeowners policies. Gradual leaks and maintenance related deterioration usually fall under policy exclusions because insurance covers accidents, not deferred maintenance.
Document all damage thoroughly with photos before starting any repairs. Multiple angles and close ups of damage help with claims evaluation. Contact your insurance company early in the process, before beginning repairs if damage is extensive. Your adjuster needs to assess damage severity and approve coverage before you proceed. Keep receipts for all materials, rental equipment, and professional services for potential reimbursement. Note that deductibles may exceed repair costs for minor single room projects, making claims pointless for small repairs under $1,000 to $2,500 depending on your policy.
Common Mistakes That Lead to Repair Failure
Understanding common mistakes prevents wasted time, money, and frustration from repairs that fail and damage that returns. Most repair failures stem from rushing critical steps or underestimating how important proper preparation is to long term success.
-
Not resolving the moisture source first. Repairing or replacing baseboards while the water source remains active guarantees damage recurrence within months or even weeks. Always fix leaks, drainage issues, or ventilation problems before touching the baseboards. Cosmetic repairs over active moisture problems waste every dollar and hour you invest.
-
Insufficient drying time. Rushing to reinstall baseboards before walls and floors completely dry traps moisture behind the new trim, causing mold growth and continued deterioration you can’t see until damage reappears. Always allow minimum 48 to 72 hours with active ventilation from fans and dehumidifiers. Touch the wall and floor. If either feels even slightly cool or damp, keep drying.
-
Skipping primer before painting. Primer seals wood, prevents tannin bleeding from knots that creates yellow or brown stains through paint, and ensures proper paint adhesion especially on bare wood or filled repair areas. Skipping straight to paint causes uneven finish, poor adhesion, and early paint failure.
-
Using MDF baseboards in moisture prone areas. MDF swells like a sponge and crumbles into mush when exposed to moisture. Never install MDF in bathrooms, kitchens, laundries, basements, or anywhere water exposure is possible. Always use PVC or solid wood in these locations even though MDF costs less initially.
-
Not sealing end cuts and joints. Exposed wood end grain absorbs moisture many times faster than face grain or painted surfaces. Always seal every cut end with primer or wood sealer before installation. Use waterproof caulk at all joints in wet areas to create continuous moisture barriers.
-
Failing to inspect behind baseboards for hidden damage. Water damage often extends deep into wall cavities, insulation, and subflooring. Check thoroughly behind removed baseboards before assuming damage is only cosmetic and surface level. Hidden rot, soaked insulation, or mold growth requires remediation before new baseboards go up.
-
Inadequate caulking between baseboard and floor. Gaps at the baseboard to floor junction allow water to seep behind baseboards during spills, mopping, or leaks. Always apply flexible caulk at this critical junction in kitchens, bathrooms, laundries, and entryways where water reaches floors.
-
Attempting to salvage severely damaged sections. Trying to repair rotted, crumbling, or mold penetrated baseboards wastes effort on repairs that won’t hold. Materials with structural compromise or mold penetration can’t be adequately restored. Replace severely compromised sections completely rather than spending hours on repairs that fail quickly.
-
Not testing paint color match before full application. Paint appears dramatically different when wet versus dry and under various lighting conditions. Always test matched color in an inconspicuous area or on scrap material. Check the dried color in both natural daylight and artificial lighting before painting all baseboards, because repainting everything when color is wrong doubles your work.
-
Neglecting to protect surrounding surfaces during work. Sanding creates fine dust that travels throughout rooms. Painting and caulking drip and smear. Pry bars gouge walls and floors. Always use drop cloths to protect floors, painter’s tape to protect walls and adjacent surfaces, and proper containment to limit dust spread. Cleanup takes far longer than proper protection requires.
Invest time to complete each phase correctly rather than rushing to see finished results. Double check your work at each stage before proceeding to the next phase, especially moisture elimination and drying. Getting these critical steps right the first time prevents having to tear out failed repairs and start over.
Realistic Timeline and Skill Requirements

Final Words
Moisture damaged baseboards need attention to both the visible problem and the hidden source. Fix the leak, dry everything completely, then choose repair or replacement based on what the damage looks like when you inspect it closely.
The work itself isn’t complicated, but it does require patience, especially during the drying phase.
Take your time with each step, use the right materials for wet areas, and seal everything properly. Your baseboards will look clean, fit tight, and hold up for years.
FAQ
Can you fix water damaged baseboards?
You can fix water damaged baseboards if the damage is minor, such as small cracks, slight swelling, or surface discoloration. Sand rough areas, fill with wood filler, allow complete drying, then prime and paint. Severely warped, rotted, or mold-penetrated baseboards require full replacement rather than repair.
What is the 7 rule for baseboards?
The 7 rule for baseboards refers to a proportion guideline suggesting baseboard height should be roughly 7% of wall height for balanced appearance. For standard 8-foot ceilings, this equals approximately 5 to 7 inches. However, architectural style, room size, and existing trim details often matter more than strict proportion rules.
Can wood with water damage be repaired?
Wood with water damage can be repaired if the damage hasn’t penetrated deeply or caused structural compromise. Surface issues like minor swelling, small cracks, or discoloration respond to sanding and wood filler. Rotted, crumbling, or mold-penetrated wood cannot be reliably repaired and requires complete replacement for safe, lasting results.
Can you paint over water damaged baseboards?
You cannot paint over water damaged baseboards without proper preparation and expect lasting results. First, resolve the moisture source, allow complete drying for 48 to 72 hours, repair damage with wood filler, sand smooth, apply primer, then paint. Painting over active moisture or unrepaired damage masks problems temporarily but guarantees recurrence.